Установка zoneminder в ubuntu
Содержание:
- Login, Logout & API Security
- Easy Way: Ubuntu 16.04
- ZoneMinder 1.30.4 or Older
- Harder Way: Build Package From Source
- Motion Detection
- PTZ Control Meta-Data APIs
- Benutzerzugriffe auf Webseiten-Dateien gewähren
- Easy Way: Ubuntu 18.04 (Bionic)
- Troubleshooting tips
- Easy Way: Ubuntu 14.x
- Easy Way: Ubuntu 16.04 (Xenial)
- Hardware Advice
- ZoneMinder 1.31 or Newer
- Ubuntu Swap File
Login, Logout & API Security
The APIs tie into ZoneMinder’s existing security model. This means if you have
OPT_AUTH enabled, you need to log into ZoneMinder using the same browser you plan to
use the APIs from. If you are developing an app that relies on the API, you need
to do a POST login from the app into ZoneMinder before you can access the API.
Then, you need to re-use the authentication information of the login (returned as cookie states)
with subsequent APIs for the authentication information to flow through to the APIs.
This means if you plan to use cuRL to experiment with these APIs, you first need to login:
Login process for ZoneMinder v1.32.0 and above
curl -XPOST -d "user=XXXX&pass=YYYY" -c cookies.txt http//yourzmipzmapihostlogin.json
Staring ZM 1.32.0, you also have a logout API that basically clears your session. It looks like this:
curl -b cookies.txt http//yourzmipzmapihostlogout.json
Login process for older versions of ZoneMinder
curl -d "username=XXXX&password=YYYY&action=login&view=console" -c cookies.txt http//yourzmipzmindex.php
The equivalent logout process for older versions of ZoneMinder is:
curl -XPOST -d "username=XXXX&password=YYYY&action=logout&view=console" -b cookies.txt http//yourzmipzmindex.php
replacing XXXX and YYYY with your username and password, respectively.
Please make sure you do this in a directory where you have write permissions, otherwise cookies.txt will not be created
and the command will silently fail.
What the “-c cookies.txt” does is store a cookie state reflecting that you have logged into ZM. You now need
to apply that cookie state to all subsequent APIs. You do that by using a ‘-b cookies.txt’ to subsequent APIs if you are
using CuRL like so:
curl -b cookies.txt http//yourzmipzmapimonitors.json
Easy Way: Ubuntu 16.04
These instructions are for a brand new ubuntu 16.04 system which does not have ZM
installed.
It is recommended that you use an Ubuntu Server install and select the LAMP option
during install to install Apache, MySQL and PHP. If you failed to do this you can
achieve the same result by running:
sudo tasksel install lamp-server
During installation it will ask you to set up a master/root password for the MySQL.
Installing LAMP is not ZoneMinder specific so you will find plenty of resources to
guide you with a quick search.
Step 1: Either run commands in this install using sudo or use the below to become root
sudo -i
Step 2: Update Repos
Latest Release
ZoneMinder is now part of the current standard Ubuntu repository, but
sometimes the official repository can lag behind. To find out check our
releases page for
the latest release.
Alternatively, the ZoneMinder project team maintains a PPA, which is updated immediately
following a new release of ZoneMinder. To use this repository instead of the
official Ubuntu repository, enter the following from the command line:
add-apt-repository ppaiconnorzoneminder
Please note that as of 1.32.0 We are creating a new PPA for each major version, as a means to prevent automatic upgrades from one major version to another. So instead of the above ppa line use the following:
add-apt-repository ppaiconnorzoneminder-1.32
If you are on Trusty or Xenial, you may want to add both, as there are some packages for dependencies included in the old ppa.
Update repo and upgrade.
apt-get update
apt-get upgrade
apt-get dist-upgrade
Step 3: Configure MySQL
Note
The MySQL default configuration file (/etc/mysql/mysql.cnf)is read through
several symbolic links beginning with /etc/mysql/my.cnf as follows:
/etc/mysql/my.cnf -> /etc/alternatives/my.cnf
/etc/alternatives/my.cnf -> /etc/mysql/mysql.cnf
/etc/mysql/mysql.cnf is a basic file
Certain new defaults in MySQL 5.7 cause some issues with ZoneMinder < 1.32.0,
the workaround is to modify the sql_mode setting of MySQL. Please note that these
changes are NOT required for ZoneMinder 1.32.0 and some people have reported them
causing problems in 1.32.0.
To better manage the MySQL server it is recommended to copy the sample config file and
replace the default my.cnf symbolic link.
rm etcmysqlmy.cnf  (this removes the current symbolic link)
cp etcmysqlmysql.conf.dmysqld.cnf etcmysqlmy.cnf
To change MySQL settings:
nano etcmysqlmy.cnf
In the section add the following
sql_mode = NO_ENGINE_SUBSTITUTION
CTRL+o then to save
CTRL+x to exit
Restart MySQL
systemctl restart mysql
Step 4: Install ZoneMinder
apt-get install zoneminder
Step 5: Configure the ZoneMinder Database
This step should not be required on ZoneMinder 1.32.0.
mysql -uroot -p < usrsharezoneminderdbzm_create.sql
mysql -uroot -p -e "grant lock tables,alter,drop,select,insert,update,delete,create,index,alter routine,create routine, trigger,execute on zm.* to 'zmuser'@localhost identified by 'zmpass';"
Step 6: Set permissions
Set /etc/zm/zm.conf to root:www-data 740 and www-data access to content
chmod 740 etczmzm.conf
chown rootwww-data etczmzm.conf
chown -R www-datawww-data usrsharezoneminder
Step 7: Configure Apache correctly:
a2enmod cgi
a2enmod rewrite
a2enconf zoneminder
You may also want to enable to following modules to improve caching performance
a2enmod expires
a2enmod headers
Step 8: Enable and start Zoneminder
systemctl enable zoneminder
systemctl start zoneminder
Step 9: Edit Timezone in PHP
nano etcphp7.0apache2php.ini
Search for (Ctrl + w then type Date and press Enter) and change
date.timezone for your time zone, see (http://php.net/manual/en/timezones.php).
Don’t forget to remove the ; from in front of date.timezone
Date
; Defines the default timezone used by the date functions
; http//php.netdate.timezone
date.timezone = AmericaNew_York
CTRL+o then to save
CTRL+x to exit
Step 10: Reload Apache service
systemctl reload apache2
Step 11: Making sure ZoneMinder works
-
Open up a browser and go to — should bring up ZoneMinder Console
-
(Optional API Check)Open up a tab in the same browser and go to
Congratulations Your installation is complete
ZoneMinder 1.30.4 or Older
On many installs you may wish to dedicate a hard drive or partition for Zoneminder events. There are many reasons why you may want to change the storage location — security, data segregation, preventing encroachment onto OS partition by zoneminder etc.
It’s not terribly difficult to do, but may be non-obvious to the untaught so here’s a brief guide.
Some commands here are based on Debian/Ubuntu installs
1. Become root or «sudo -s» to gain root privs.
2. Stop Zoneminder. «service zoneminder stop», «/usr/bin/zmpkg.pl stop», or «systemctl stop zoneminder»
3. Mount your new partition onto the root filesystem, ensuring it is automatically remounted at boot time by editing /etc/fstab — For the benefit of this guide, I’m calling my new partition /newdrive
Note this new partition can be a local drive, raid partition, lvm/md device, external NAS, SAN, NFS share or SMB share. The only condition is that the I/O throughput should be up to handling what Zoneminder will throw at it. For that speed reason, some favour non-journalled filesystems and accept the extra risk of data corruption
4. Locate Zoneminder’s «events» and «images» directories. In Debian and Ubuntu, these are under /var/cache/zoneminder. In CentOS and Fedora, these are under /var/lib/zoneminder.
If you wish to copy the data across, MOVE the events and images directories to /newdrive/zoneminder (Note this will take a long time on systems with many events). Also, DO NOT restart zoneminder until this entire process is completed. Doing so will cause all your events to be lost!
If you don’t wish to preserve the data, it is MUCH faster to simply delete or rename the original events and images dirs and create new directories in /newdrive/zoneminder. There is no need to remove the «orphaned» entries in the database, zmaudit will take care of those.
Eg:
mkdir /newdrive/zoneminder/events
mv /var/lib/zoneminder/events/* /var/lib/zoneminder/events_old/
— or —
rm -rf /var/lib/zoneminder/events/
Add these lines in fstab to bind-mount an alternate location:
/dev/sdX1 /newdrive ext3 defaults 0 2
/newdrive/zoneminder/images /var/cache/zoneminder/images none defaults,bind  0 2
/newdrive/zoneminder/events /var/cache/zoneminder/events none defaults,bind 0 2
or in some cases,
/newdrive/zoneminder/images /var/lib/zoneminder/images none defaults,bind  0 2
/newdrive/zoneminder/events /var/lib/zoneminder/events none defaults,bind 0 2
or if you have a separate partition for each:
/dev/sdX1 /var/cache/zoneminder/images ext3 defaults 0 2
/dev/sdX2 /var/cache/zoneminder/events ext3 defaults 0 2
(Repeat for images)
5. Ensure ZoneMinder can write to the new destination by changing the owner and group to that of the web server user account. Debian based distros typically use «www-data» as the web server user account while many rpm based distros use «apache».
chown -R apache:apache /newdrive/zoneminder
You will also want to make sure the proper permissions are set in your /var folder, e.g. for debian
chown -R www-data:www-data /var/cache/zoneminder/
6. Finally, mount /newdrive and test your fstab entries («mount -a»). Restart zoneminder ( «service zoneminder start», «/usr/bin/zmpkg.pl start», or «systemctl start zoneminder») Monitor its operation and ensure new events are being created normally and are viewable. Zoneminder should also update the «Disk: %%» on its Console screen to reflect the disk space on its new partition.
FREQUENTLY ASKED QUESTIONS
Question:
Why can’t I just symlink the newdrive to the events folder?
Answer:
Because it does not work in every case. Many rpm and deb packages need the file folders set up exactly the way they were when the first zoneminder package was installed. Changing that around can cause package upgrades to fail, or worse you could lose all your data!
Question:
I noticed that there is an events folder under /usr/share/zoneminder/www, can I mount my dedicated hard drive or volume to that folder?
Answer:
This will not work in every case either and should be avoided. The events and images folders under /usr/share/zoneminder/www are actually symbolic links that point to the real folders under /var/lib/zoneminder (or /var/cache/zoneminder). Altering this in any way has the same affect as the answer to the first question.
Harder Way: Build Package From Source
(These instructions assume installation from source on a ubuntu 15.x+ system)
Step 1: Grab the package installer script
wget https//raw.githubusercontent.comZoneMinderZoneMindermasterutilsdo_debian_package.sh
chmod a+x do_debian_package.sh
Step 2: Update the system
sudo apt-get update
Step 3 Create the package
To build the latest master snapshot:
do_debian_package.sh --snapshot=NOW --branch=master --type=local
To build the latest stable release:
do_debian_package.sh --snapshot=stable --type=local
Note that the distribution will be guessed using
which simply extracts your distribution name — like “vivid”, “trusty” etc. You
can always specify it using –distro=your distro name if you know it. As far as the script
goes, it checks if your distro is “trusty” in which case it pulls in pre-systemd
release configurations and if its not “trusty” it assumes its based on systemd
and pulls in systemd related config files.
(At the end the script will ask if you want to retain the checked out version of
ZoneMinder. If you are a developer and are making local changes, make sure you
select “y” so that the next time you do the build process mentioned here, it
keeps your changes. Selecting any other value than “y” or “Y” will delete the
checked out code and only retain the package)
This should now create a bunch of .deb files
Step 4: Install the package
sudo gdebi zoneminder_<version>_<arch>.deb
(example sudo gdebi zoneminder_1.29.0-vivid-2016012001_amd64.deb)
This will report DB errors — ignore — you need to configure the DB and some other stuff
Step 5: Post install configuration
Motion Detection
What’s all this motion detection stuff, anyhow?
Start with the most sensitive settings, and make them less sensitive until no false alarms are recorded. Night IR detects more false events than daylight. Monitoring for all alarms can easily be done by in Devuan based distros.
Or you can record everything, if modect isn’t working. Mocord will combine both modect and record, having everything recorded, but making a graph where motion occurs (in show timeline). Mocord is the best, but uses more HDD. Beware of running into issues with PurgeWhenFull not able to keep up.
I personally like using hardware motion detectors, as ZMA/zmeventnotification and all the associated software to detect people can be a rabbit hole. But, these come at a cost — more initial setup and wiring.
Why motion detection?
Using modect or mocord is recommended here. Because you are able to click from the main zm index — events — show timeline, and from there quickly review your modect events. Because you save HDD space. And SMS Notifications and ZMTrigger can be setup off of modect alarms (the latter requiring either modect, mocord, or nodect).
Any downsides?
Zones must be tuned to be sensitive enough to see all events, but not so sensitive as to detect false alarms. This requires work, and is not guaranteed to work 100% even after tweaking.
This gives the CPU reductions of not actively Modect/Mocord, while still not missing anything. A dedicated ZM computer (RPI) can be used to analyze old footage. There is more than one way to skin this cat.
Tips
- Zones should be as small as possible, and you should use as few zones per monitor, to lower CPU usage.
- If you see events with 1 or 2 alarm frames occuring, you can make a background filter to delete these.
- Aggressive Modect usage can run into issues with PurgeWhenFull, beware.
- I prefer the usage of external hardware motion sensors via ZMTrigger over modect. Less CPU, and more reliable / flexible.
4K Cameras
Mocord on the low res stream, and record on the high res stream. Do NOT use any analysis on the high res stream. If you want, you can use the ‘linked monitors’ function, and only record the 4K on motion (search forums). However, I don’t.
Conclusion
PTZ Control Meta-Data APIs
PTZ controls associated with a monitor are stored in the Controls table and not the Monitors table inside ZM. What that means is when you get the details of a Monitor, you will only know if it is controllable (isControllable:true) and the control ID.
To be able to retrieve PTZ information related to that Control ID, you need to use the controls API
Note that these APIs only retrieve control data related to PTZ. They don’t actually move the camera. See the “PTZ on live streams” section to move the camera.
This returns all the control definitions:
curl http//serverzmapicontrols.json
This returns control definitions for a specific control ID=5
Benutzerzugriffe auf Webseiten-Dateien gewähren
Da wir auf das Verzeichnis /var/www ein setgit Bit gesetzt haben werden alle erstellten Dateien oder Verzeichnisse mit der Berechtigung www-data erstellt. Um nun auch mit einem normalen Benutzer Dateien und Verzeichnisse bearbeiten zu können, ohne die Berechtigung zu verändern wird bindfs benötigt.
sudo apt-get install bindfs
Wir erstellen uns im Homeverzeichnis einen Ordner über diesen wir auf das /var/www Verzeichnis zugreifen können.
mkdir ~/websites
Anschließend erstellen wir uns den passenden fstab Eintrag damit der Zugriff mit den passenden Berechtigungen durchgeführt wird.
Passt euch den folgenden Befehl an euren Benutzer an. In meinem Falls verwende ich den Benutzer myroot.
printf "\n\nbindfs#/var/www/ /home/$USER/websites/ fuse force-user=$USER,force-group=$USER,create-for-user=www-data,create-for-group=www-data,create-with-perms=0770,chgrp-ignore,chown-ignore,chmod-ignore 0 0" | sudo tee -a /etc/fstab
Überprüfen ob der Befehl richtig ausgeführt wurde:
sudo cat /etc/fstab
# /etc/fstab: static file system information.
#
# Use 'blkid' to print the universally unique identifier for a
# device; this may be used with UUID= as a more robust way to name devices
# that works even if disks are added and removed. See fstab(5).
#
# <file system> <mount point>   <type>  <options>       <dump>  <pass>
# / was on /dev/ubuntu-vg/ubuntu-lv during curtin installation
/dev/disk/by-id/dm-uuid-LVM-biSTbFwePFxtmgpVX68Rwa01ddBXHcAixzw1EBpYcV8kumDeCPxLkQnyNX2hkJ8M / ext4 defaults 0 0
# /boot was on /dev/sda2 during curtin installation
/dev/disk/by-uuid/c4c0f1b3-7284-4880-a2bc-11ab15c0a5f3 /boot ext4 defaults 0 0
/swap.img       none    swap    sw      0       0


bindfs#/var/www/ /home/myroot/websites/ fuse force-user=myroot,force-group=myroot,create-for-user=www-data,create-for-group=www-data,create-with-perms=0770,chgrp-ignore,chown-ignore,chmod-ignore 0 0
Anschließend das erstellte Verzeichnis aus dem Home-Folder mounten:
sudo mount /home/$USER/websites
Easy Way: Ubuntu 18.04 (Bionic)
These instructions are for a brand new ubuntu 18.04 system which does not have ZM
installed.
It is recommended that you use an Ubuntu Server install and select the LAMP option
during install to install Apache, MySQL and PHP. If you failed to do this you can
achieve the same result by running:
sudo apt-get install tasksel
sudo tasksel install lamp-server
During installation it will ask you to set up a master/root password for the MySQL.
Installing LAMP is not ZoneMinder specific so you will find plenty of resources to
guide you with a quick search.
Step 1: Either run commands in this install using sudo or use the below to become root
sudo -i
Step 2: Update Repos
Latest Release
ZoneMinder is now part of the current standard Ubuntu repository, but
sometimes the official repository can lag behind. To find out check our
releases page for
the latest release.
Alternatively, the ZoneMinder project team maintains a PPA, which is updated immediately
following a new release of ZoneMinder. To use this repository instead of the
official Ubuntu repository, enter the following from the command line:
add-apt-repository ppaiconnorzoneminder-1.34
Update repo and upgrade.
apt-get update
apt-get upgrade
apt-get dist-upgrade
Step 3: Configure MySQL
Note
The MySQL default configuration file (/etc/mysql/mysql.cnf)is read through
several symbolic links beginning with /etc/mysql/my.cnf as follows:
/etc/mysql/my.cnf -> /etc/alternatives/my.cnf
/etc/alternatives/my.cnf -> /etc/mysql/mysql.cnf
/etc/mysql/mysql.cnf is a basic file
Certain new defaults in MySQL 5.7 cause some issues with ZoneMinder < 1.32.0,
the workaround is to modify the sql_mode setting of MySQL. Please note that these
changes are NOT required for ZoneMinder 1.32.0 and some people have reported them
causing problems in 1.32.0.
To better manage the MySQL server it is recommended to copy the sample config file and
replace the default my.cnf symbolic link.
rm etcmysqlmy.cnf  (this removes the current symbolic link)
cp etcmysqlmysql.conf.dmysqld.cnf etcmysqlmy.cnf
To change MySQL settings:
nano etcmysqlmy.cnf
In the section add the following
sql_mode = NO_ENGINE_SUBSTITUTION
CTRL+o then to save
CTRL+x to exit
Restart MySQL
systemctl restart mysql
Step 4: Install ZoneMinder
apt-get install zoneminder
Step 5: Configure the ZoneMinder Database
This step should not be required on ZoneMinder 1.32.0.
mysql -uroot -p < usrsharezoneminderdbzm_create.sql
mysql -uroot -p -e "grant lock tables,alter,drop,select,insert,update,delete,create,index,alter routine,create routine, trigger,execute on zm.* to 'zmuser'@localhost identified by 'zmpass';"
Step 6: Set permissions
Set /etc/zm/zm.conf to root:www-data 740 and www-data access to content
chmod 740 etczmzm.conf
chown rootwww-data etczmzm.conf
chown -R www-datawww-data usrsharezoneminder
Step 7: Configure Apache correctly:
a2enmod cgi
a2enmod rewrite
a2enconf zoneminder
You may also want to enable to following modules to improve caching performance
a2enmod expires
a2enmod headers
Step 8: Enable and start Zoneminder
systemctl enable zoneminder
systemctl start zoneminder
Step 9: Edit Timezone in PHP
nano etcphp7.2apache2php.ini
Search for (Ctrl + w then type Date and press Enter) and change
date.timezone for your time zone, see (https://www.php.net/manual/en/timezones.php).
Don’t forget to remove the ; from in front of date.timezone
Date
; Defines the default timezone used by the date functions
; http//php.netdate.timezone
date.timezone = AmericaNew_York
CTRL+o then to save
CTRL+x to exit
Step 10: Reload Apache service
systemctl reload apache2
Step 11: Making sure ZoneMinder works
-
Open up a browser and go to — should bring up ZoneMinder Console
-
(Optional API Check)Open up a tab in the same browser and go to
Congratulations Your installation is complete
Troubleshooting tips
If your filter is not working, here are some useful tips:
- Look at Info and Debug logs in Zoneminder
- Run from command line and see the log output
- Check how long your action is taking — zmfilter.pl will wait for the action to complete before it checks again
- If you are using relative times like ‘now’ or ‘1 year ago’ etc. remember that zmfilter converts that relative time to an absolute date only when it reloads filters, which is dictated by the FILTER_RELOAD_DELAY duration. So, for example, if you are wondering why your events are not being detected before intervals of 5 minutes and you have used such a relative condition, this is why
- In the event that you see your new filter is working great when you try it out from the Web Console (using the Submit or Execute button) but does not seem to work when its running in background mode, you might have just chanced upon a compatibility issue between how Perl and PHP translate free form text to dates/times. When you test it via the “Submit” or “Execute” button, you are invoking a PHP function for time conversion. When the filter runs in background mode, zmfilter.pl calls a perl equivalent function. In some cases, depending on the version of Perl and PHP you have, the results may vary. If you face this situation, the best thing to do is to run from a terminal to make sure the filter actually works in Perl as well.
Easy Way: Ubuntu 14.x
These instructions are for a brand new ubuntu 14.x system which does not have ZM installed.
Step 1: Either run commands in this install using sudo or use the below to become root
sudo -i
Step 2: Install ZoneMinder
add-apt-repository ppaiconnorzoneminder
apt-get update
apt-get install zoneminder
(just press OK for the prompts you get)
Step 3: Set up DB
mysql -uroot -p < usrsharezoneminderdbzm_create.sql
mysql -uroot -p -e "grant select,insert,update,delete,create,alter,index,lock tables on zm.* to 'zmuser'@localhost identified by 'zmpass';"
Step 4: Set up Apache
a2enconf zoneminder
a2enmod rewrite
a2enmod cgi
Step 5: Make zm.conf readable by web user.
sudo chown www-datawww-data etczmzm.conf
Step 6: Edit Timezone in PHP
nano etcphp5apache2php.ini
Search for (Ctrl + w then type Date and press Enter) and change
date.timezone for your time zone, see (http://php.net/manual/en/timezones.php).
Don’t forget to remove the ; from in front of date.timezone
Date
; Defines the default timezone used by the date functions
; http//php.netdate.timezone
date.timezone = AmericaNew_York
CTRL+o then to save
CTRL+x to exit
Step 7: Restart Apache service and start ZoneMinder
service apache2 reload
service zoneminder start
Step 8: Making sure ZoneMinder works
-
Open up a browser and go to — should bring up ZoneMinder Console
-
(Optional API Check)Open up a tab in the same browser and go to
Easy Way: Ubuntu 16.04 (Xenial)
These instructions are for a brand new ubuntu 16.04 system which does not have ZM
installed.
It is recommended that you use an Ubuntu Server install and select the LAMP option
during install to install Apache, MySQL and PHP. If you failed to do this you can
achieve the same result by running:
sudo tasksel install lamp-server
During installation it will ask you to set up a master/root password for the MySQL.
Installing LAMP is not ZoneMinder specific so you will find plenty of resources to
guide you with a quick search.
Step 1: Either run commands in this install using sudo or use the below to become root
sudo -i
Step 2: Update Repos
Latest Release
ZoneMinder is now part of the current standard Ubuntu repository, but
sometimes the official repository can lag behind. To find out check our
releases page for
the latest release.
Alternatively, the ZoneMinder project team maintains a PPA, which is updated immediately
following a new release of ZoneMinder. To use this repository instead of the
official Ubuntu repository, enter the following from the command line:
add-apt-repository ppaiconnorzoneminder
add-apt-repository ppaiconnorzoneminder-1.32
Update repo and upgrade.
apt-get update
apt-get upgrade
apt-get dist-upgrade
Step 3: Configure MySQL
Note
The MySQL default configuration file (/etc/mysql/mysql.cnf)is read through
several symbolic links beginning with /etc/mysql/my.cnf as follows:
/etc/mysql/my.cnf -> /etc/alternatives/my.cnf
/etc/alternatives/my.cnf -> /etc/mysql/mysql.cnf
/etc/mysql/mysql.cnf is a basic file
Certain new defaults in MySQL 5.7 cause some issues with ZoneMinder < 1.32.0,
the workaround is to modify the sql_mode setting of MySQL. Please note that these
changes are NOT required for ZoneMinder 1.32.0 and some people have reported them
causing problems in 1.32.0.
To better manage the MySQL server it is recommended to copy the sample config file and
replace the default my.cnf symbolic link.
rm etcmysqlmy.cnf  (this removes the current symbolic link)
cp etcmysqlmysql.conf.dmysqld.cnf etcmysqlmy.cnf
To change MySQL settings:
nano etcmysqlmy.cnf
In the section add the following
sql_mode = NO_ENGINE_SUBSTITUTION
CTRL+o then to save
CTRL+x to exit
Restart MySQL
systemctl restart mysql
Step 4: Install ZoneMinder
apt-get install zoneminder
Step 5: Configure the ZoneMinder Database
This step should not be required on ZoneMinder 1.32.0.
mysql -uroot -p < usrsharezoneminderdbzm_create.sql
mysql -uroot -p -e "grant lock tables,alter,drop,select,insert,update,delete,create,index,alter routine,create routine, trigger,execute on zm.* to 'zmuser'@localhost identified by 'zmpass';"
Step 6: Set permissions
Set /etc/zm/zm.conf to root:www-data 740 and www-data access to content
chmod 740 etczmzm.conf
chown rootwww-data etczmzm.conf
chown -R www-datawww-data usrsharezoneminder
Step 7: Configure Apache correctly:
a2enmod cgi
a2enmod rewrite
a2enconf zoneminder
You may also want to enable to following modules to improve caching performance
a2enmod expires
a2enmod headers
Step 8: Enable and start Zoneminder
systemctl enable zoneminder
systemctl start zoneminder
Step 9: Edit Timezone in PHP
nano etcphp7.0apache2php.ini
Search for (Ctrl + w then type Date and press Enter) and change
date.timezone for your time zone, see (https://www.php.net/manual/en/timezones.php).
Don’t forget to remove the ; from in front of date.timezone
Date
; Defines the default timezone used by the date functions
; http//php.netdate.timezone
date.timezone = AmericaNew_York
CTRL+o then to save
CTRL+x to exit
Step 10: Reload Apache service
systemctl reload apache2
Step 11: Making sure ZoneMinder works
-
Open up a browser and go to — should bring up ZoneMinder Console
-
(Optional API Check)Open up a tab in the same browser and go to
Congratulations Your installation is complete
Hardware Advice
When setting up the cameras, here is some advice.
- Use fuses on the PSU output to the cameras, if using passive POE adaptors.
- Use barrel plug splitters, and use one 12V PSU. (i.e. a barrel plug that is a 1 to 5 splitter). Cameras in my experience use around 200-400mA of current at 12V (400mA is when IR LEDs are on).
- If you purchase axis cameras, be aware that the cameras are 5V and the barrel plug is 4.0mm x 1.7mm. It’s easiest to use POE on these.
- Installing areas where the temperature is high may cause early camera failure (especially for cheaper cameras). Even something as simple as a corner of an enclosed room where the sun shines all day may be enough heat.
ZoneMinder 1.31 or Newer
Web Console Instructions
Here is a guide for users with 1.32.3 or newer, to add a storage device to ZM via the web portal.
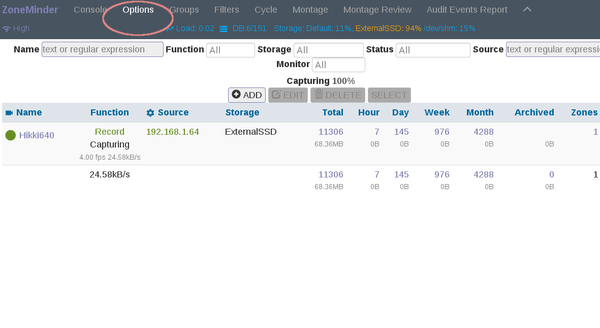
1. From the console, navigate to options.
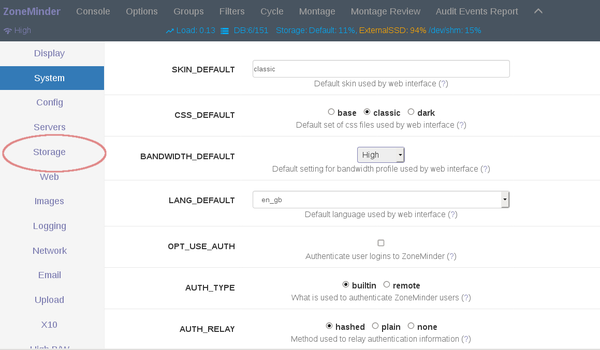
2. In options, navigate to storage.
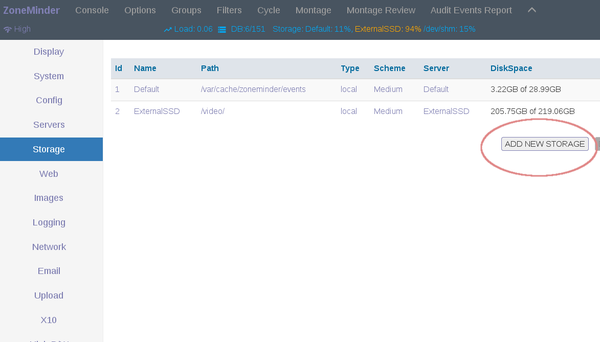
3. Choose Add New Storage.

4. Configure paths appropriately. Here I have an external ext4 filesystem SSD which is mounted at /video/. For those curious, the scheme refers to how the files are named as they are saved in the directory. In old versions of ZM, there were a number of sub directories, (e.g. month 11 would be directory 11, day 30 would be directory 30 in folder 11, for 11/30, and so on, for year, day, hour, etc..). This option is kept for backwards compatibility, but also a newer simpler scheme is available. The default is medium and that will suffice for most.
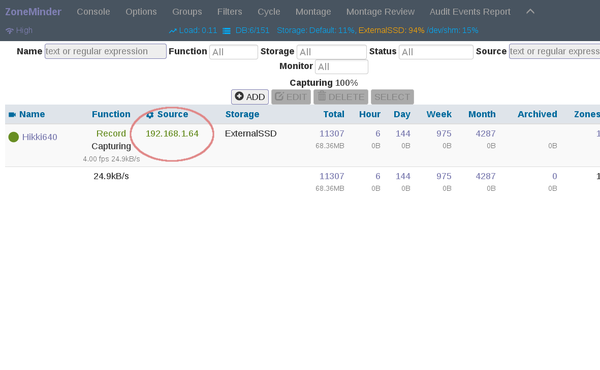
5. After that is added and saved, return to the console. Click source tab to configure where the camera stores video. Here we have the option of configuring where each camera can store its videos. This means you can have multiple HDDs, with multiple cameras, and split the storage across as many or as few HDDs as you wish. Camera 1 can record to HDD1, and Camera 2 can record to HDD2. Or you can have both Camera 1 and 2 on HDD1.
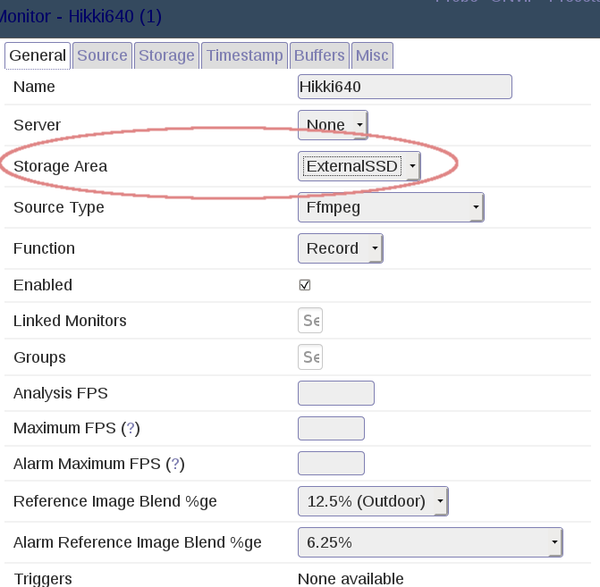
6. In the source of each camera, configure where you want to save the videos.
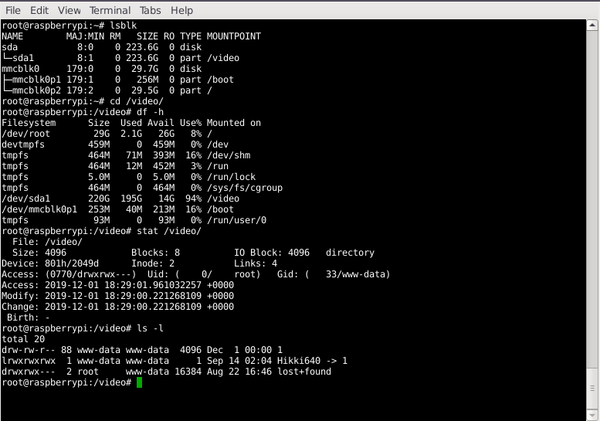
7. Make sure permissions are set correctly. The folder must allocate write and read permissions to www-data (debian) or apache (rhel). See the picture above for details. Note that some filesystems don’t support all permissions, so it’s recommended to use ext4, unless you know what you are doing.
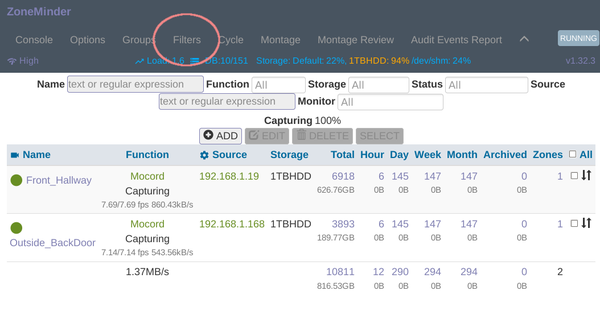
8. We now need a filter, that will delete on our new storage area. Navigate to filters from the console.
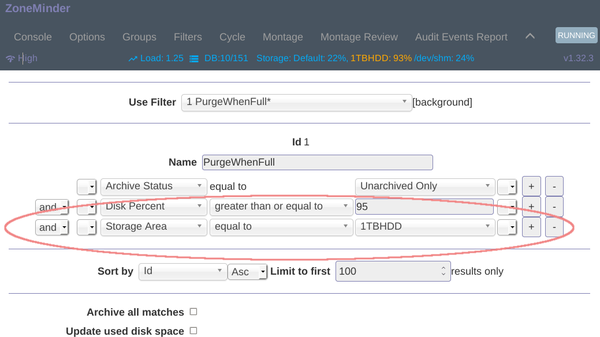
9. Choose the PurgeWhenFull filter. Add storage area and the default will be equal to, which will work. Choose your new storage area from the drop down. You can test the filter now, by clicking on List Matches. Click save, to make the changes permanent.
zmfilter has a log file in /var/log/zm/zmfilter.log if you’ve enabled these log files, and it can be tailed to view the filter in action.
Ubuntu Swap File
I have been puzzled for some time as to why Ubuntu will write to the swap file when there is plenty of RAM installed. I’ve discovered that writing to the swap file is controlled by the «swappiness» setting! By default, Ubuntu uses a swappiness value of 60 which means that when 40% of memory is used, the system will start swapping data from memory to the swap file.
Here is some info you can use to check and/or change swappiness:
To check the swappiness value
cat /proc/sys/vm/swappiness
To change the swappiness value A temporary change (lost on reboot) with a swappiness value of 10 can be made with
sudo sysctl vm.swappiness=10
To make a change permanent, edit the configuration file with your favorite editor:
sudo nano /etc/sysctl.conf
Search for vm.swappiness and change its value as desired. If vm.swappiness does not exist, add it to the end of the file like so:
vm.swappiness=10
The more RAM your system has the lower the swappiness value can be. Possibly even «0» My production system with 16 GIG of RAM works well with a value of «10»
Save the file and reboot.


