Установка и настройка vnc на ubuntu 18.04
Содержание:
Step 3 — Connecting to the VNC Desktop Securely
VNC itself doesn’t use secure protocols when connecting. To securely connect to your server, you’ll establish an SSH tunnel and then tell your VNC client to connect using that tunnel rather than making a direct connection.
Create an SSH connection on your local computer that securely forwards to the connection for VNC. You can do this via the terminal on Linux or macOS with the following command:
Here’s what this command’s options mean:
- : The switch specifies that the given port on the local computer () is to be forwarded to the given host and port on the destination server (, meaning port on the destination server, defined as ). Note that the local port you specify is somewhat arbitrary; as long as the port isn’t already bound to another service, you can use it as the forwarding port for your tunnel.
- : This flag enables compression which can help minimize resource consumption and speed things up.
- : This option tells that you don’t want to execute any remote commands. This setting is useful when you just want to forward ports.
- : The switch let’s you specify the user you want to log in as once you connect to the server. Make sure to replace and with the name of your non-root user and your server’s IP address.
Note: This command establishes an SSH tunnel that forwards information from port on your VNC server to port on your local machine via port on each machine, the default port for SSH. Assuming you followed the prerequisite Initial Server Setup guide for Ubuntu 20.04, you will have added a UFW rule to allow connections to your server over OpenSSH.
This is more secure than simply opening up your server’s firewall to allow connections to port , as that would allow anyone to access your server over VNC. By connecting over an SSH tunnel, you’re limiting VNC access to machines that already have SSH access to the server.
If you are using PuTTY to connect to your server, you can create an SSH tunnel by right-clicking on the top bar of the terminal window, and then clicking the Change Settings… option:

Find the Connection branch in the tree menu on the left-hand side of the PuTTY Reconfiguration window. Expand the SSH branch and click on Tunnels. On the Options controlling SSH port forwarding screen, enter as the Source Port and as the Destination, like this:
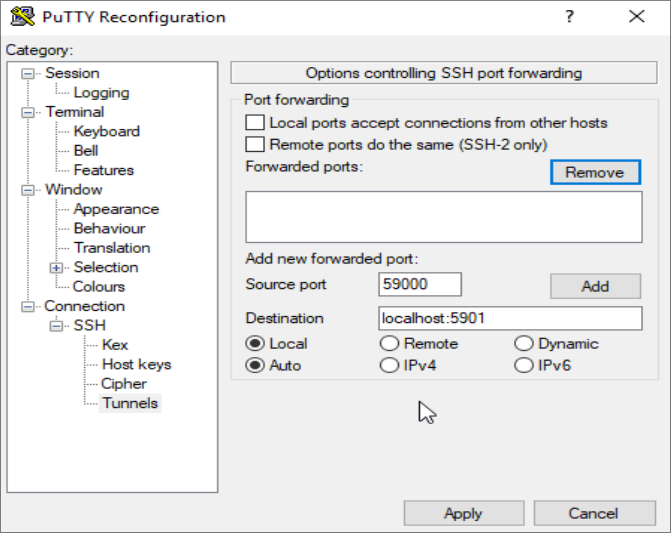
Then click the Add button, and then the Apply button to implement the tunnel.
Once the tunnel is running, use a VNC client to connect to . You’ll be prompted to authenticate using the password you set in Step 1.
Once you are connected, you’ll see the default Xfce desktop. It should look something like this:

You can access files in your home directory with the file manager or from the command line, as seen here:

Press in your local terminal to stop the SSH tunnel and return to your prompt. This will disconnect your VNC session as well.
Now you can configure your VNC server to run as a systemd service.
Polling algorithm
x11vnc keeps a copy of the X server’s frame buffer in RAM. The X11 programming interface XShmGetImage is used to retrieve the frame buffer pixel data. x11vnc compares the X server’s frame buffer against its copy to see which pixel regions have changed (and hence need to be sent to the VNC viewers.) Reading pixel data from the physical frame buffer can be much slower than writing to it (because graphics devices are not optimized for reading) and so a sequential pixel by pixel check would often be too slow.
To improve the situation, x11vnc reads in full rows of pixels separated by 32 pixels vertically. Once it gets to the bottom of the screen it starts again near the top with a slightly different offset. After 32 passes like this it has covered the entire screen. This method enables x11vnc to detect changes on the screen roughly 32 times more quickly than a sequential check would (unless the changes are very small, say only 1 pixel tall.) If the X11 DAMAGE extension is present, x11vnc uses it to provide hints where to focus its polling, thereby finding changes even more quickly and also lowering the system load.
Reset the SSH server
Now that the X11Forward line is turned on in the SSH server configuration file, the SSH server software must reboot, as configuration changes don’t happen right away. For most Linux distributions, resetting SSH involves using the systemctl restart command.
Note: Linux distributions that do not use systemd have their own restart mechanism for SSH. If you can’t figure out the command to reboot your Secure Shell server software, the next best thing is to reboot the machine. Configuration changes will start working after booting back up.
systemctl restart sshd.service
When the SSHD background service comes back up, your SSH server will be ready to forward X11 windows over the network.
Создание Systemd unit файла
Сейчас мы создадим Systemd unit файл, который позволит легко запускать, останавливать или вновь запускать сервис VNC по мере необходимости, как и другие сервисы systemd.
Откройте текстовый редактор, скопируйте и вставьте туда следующую конфигурацию. Не забудьте поменять имя пользователя в строке 7 на ваше.
Shell
sudo nano /etc/systemd/system/vncserver@.service
| 1 | sudo nanoetcsystemdsystemvncserver@.service |
/etc/systemd/system/vncserver@.service
Shell
Description=Remote desktop service (VNC)
After=syslog.target network.target
Type=simple
User=vnc_user
PAMName=login
PIDFile=/home/%u/.vnc/%H%i.pid
ExecStartPre=/bin/sh -c ‘/usr/bin/vncserver -kill :%i > /dev/null 2>&1 || :’
ExecStart=/usr/bin/vncserver :%i -localhost no -geometry 1440×900 -alwaysshared -fg
ExecStop=/usr/bin/vncserver -kill :%i
WantedBy=multi-user.target
|
1 8 |
Unit Description=Remote desktop service(VNC) After=syslog.targetnetwork.target Service Type=simple User=vnc_user PIDFile=home%u.vnc%H%i.pid ExecStartPre=binsh-c’/usr/bin/vncserver -kill :%i > /dev/null 2>&1 || :’ ExecStart=usrbinvncserver%i-localhost no-geometry1440x900-alwaysshared-fg ExecStop=usrbinvncserver-kill%i Install WantedBy=multi-user.target |
Сохраните и закройте файл.
Сообщите systemd, что вы создали новый unit файл:
Shell
sudo systemctl daemon-reload
| 1 | sudo systemctl daemon-reload |
На следующем шаге делаем unit файл доступным с помощью следующей команды:
Shell
sudo systemctl enable vncserver@1.service
| 1 | sudo systemctl enable vncserver@1.service |
Число после знака определяет порт дисплея, на котором будет работать сервис VNC. Это означает, что сервер VNC будет действовать на порту , как и говорилось в предыдущем разделе.
Запустите сервис VNC, выполнив:
Shell
sudo systemctl start vncserver@1.service
| 1 | sudo systemctl start vncserver@1.service |
Проверьте, что сервис успешно запущен:
Shell
sudo systemctl status vncserver@1.service
| 1 | sudo systemctl status vncserver@1.service |
Shell
● vncserver@1.service — Remote desktop service (VNC)
Loaded: loaded (/etc/systemd/system/vncserver@.service; indirect; vendor preset: enabled)
Active: active (running) since Thu 2018-08-16 19:05:54 UTC; 4s ago
Process: 9893 ExecStartPre=/bin/sh -c /usr/bin/vncserver -kill :1 > /dev/null 2>&1 || : (code=exited, status=0/SUCCESS)
Main PID: 9900 (vncserver)
Tasks: 0 (limit: 507)
CGroup: /system.slice/system-vncserver.slice/vncserver@1.service
‣ 9900 /usr/bin/perl /usr/bin/vncserver :1 -geometry 1440×900 -alwaysshared -fg
|
1 |
●vncserver@1.service-Remote desktop service(VNC) Loadedloaded(etcsystemdsystemvncserver@.service;indirect;vendor presetenabled) Activeactive(running)since Thu2018-08-16190554UTC;4sago Process9893ExecStartPre=binsh-cusrbinvncserver-kill1>devnull2>&1||(code=exited,status=SUCCESS) Main PID9900(vncserver) Tasks(limit507) CGroupsystem.slicesystem-vncserver.slicevncserver@1.service ‣9900usrbinperlusrbinvncserver1-geometry1440x900-alwaysshared-fg |


