X-frame-options
Содержание:
Public-Key-Pins (Draft Header)
Purpose
This header is still under draft specification but may have clear security impacts so it has been added to this list. The purpose of the Public-Key-Pins (PKP) header is to allow site operators to provide hashed public key information to be stored in the browser’s cache. Much like it Strict-Transport-Security header it will help user’s from active man-in-the-middle attacks.The header may include multiple pin-<hash algorithm> directives. For example, pin-sha256=base64(sha256(SPKI)). The base64 encoded sha256 hash is the result of hashing the Subject Public Key Info (SPKI) field of an X.509 certificate. While the specification or implementations may change, it was observed that not encapsulating the hashes in quotes is invalid and the hashes will not be added to the PKP cache in Chrome 33. This header acts much like STS by including the max-age and includeSubDomains directive. Additionally, PKP supports a Public-Key-Pins-Report-Only header which can be used to report violations but will not enforce the pinning of certificate information, however this does not appear to be implemented in Chrome yet.
Valid Settings
- max-age=3000; pin-sha256=»d6qzRu9zOECb90Uez27xWltNsj0e1Md7GkYYkVoZWmM=»; — Pins this host for 3000 seconds using the base64 encoded sha256 hash of the x.509 certificate’s Subject Public Key Info with hashes properly encapsulated in quotes.
- max-age=3000; pin-sha256=»d6qzRu9zOECb90Uez27xWltNsj0e1Md7GkYYkVoZWmM=»; report-uri=»http://example.com/pkp-report» — Same as above but allows violations to be reported. Note that if this value is sent in the Public-Key-Pins header the user-agent should enforce and report violations. If the value is sent in Public-Key-Pins-Report-Only it will not be enforced but violations will be reported to the defined site.
Common Invalid Settings
max-age=3000; pin-sha256=d6qzRu9zOECb90Uez27xWltNsj0e1Md7GkYYkVoZWmM=; — Not encapsulating the hash value in quotes leads to Chrome 33 not adding the keys to the PKP cache. This mistake was observed in all but one of the four sites that returned this or the report-only header response.
How To Test
Using the same method as Strict-Transport-Security additional information under the pubkey_hashes field should be visible, if the site successfully had the PKP hashes added.
External References
- Public-Key-Pins draft specification
- Chrome issue tracking the implementation of Public-Key-Pins
- Chromium source code for processing Public-Key-Pins header
X-Frame-Options
This http header helps avoiding clickjacking attacks. Browser support is as
follow: IE 8+, Chrome 4.1+, Firefox 3.6.9+, Opera 10.5+, Safari 4+. Posible
values are:
- deny
- browser refuses to display requested document in a frame
- sameorigin
- browser refuses to display requested document in a frame, in case that origin does not match
- allow-from: DOMAIN
- browser displays requested document in a frame only if it loaded from DOMAIN
// Raw header
X-Frame-Options: sameorigin

// How to send the response header with PHP
header("X-Frame-Options: sameorigin");

// How to send the response header with Apache (.htaccess)
<IfModule mod_headers.c>
    Header set X-Frame-Options "sameorigin"
</IfModule>

// How to send the response header with Express.js
app.use(function(req, res, next) {
    res.header("X-Frame-Options", "sameorigin");
    next();
});
 Figure 1. X-Frame-Options
Note: The HTTP header has a
directive which obsoletes this header for supporting browsers.
Особенности продвижения сайтов во фреймах
Некоторые системы поиска неправильно или очень некорректно индексируют файлы с фреймовой структурой. В результате индексная база заполняется не адресами родительских ресурсов (так, как должно было быть), а ссылками на дочерние сайты.
Чтобы минимизировать проблемы индексации сайтов, основанных на фреймах, при их описании применяются специальные теги и параметры. Основным элементом контейнерной структуры является frameset. Именно он заменяет в исходном коде стандартный body;. Каждый отдельный контейнер в структуре описывается frame. Его количество в коде страницы отвечает числу отдельных участков, отображающихся в окне браузера при просмотре.
Указанные теги стоит расположить на главной странице сайта, а затем продублировать содержание внутри каждого из них.
What it can do: Block reflected XSS attacks
Reflected XSS occurs when a malicious query parameter in a page’s URL is rendered unsanitized on the page.
The XSS protection against this is not implemented uniformly across browsers (and it’s not supported at all by Firefox). But the basic idea is that the browser searches through the html looking for a script tag that exactly matches the script tag in the URL. If it finds a match, then the page is prevented from loading.
As an example, suppose our page takes the ‘user’ query parameter from the URL and displays it in a welcome message:

We’ll turn off Chrome’s default XSS auditor by including the following header in our server responses (this is not something you should normally do):
X-XSS-Protection: 0
Now we’ll replace ‘Mario’ with a script tag and see what happens:

With the turned off, the script runs and an alert box appears.
Now we’ll turn the back on by including the following header in our server responses:
X-XSS-Protection: 1; mode=block
We’re blocked when we attempt to reload the page:

We see the following message in the Chrome dev console:
The XSS Auditor blocked access to 'http://localhost:8080/todos?user=%3Cscript%3Ealert(1)%3C/script%3E' because the source code of a script was found within the request. The server sent an 'X-XSS-Protection' header requesting this behavior.
Here we have an example of the in action. It has signaled to the browser to block the loading of the page, because
<script>alert(1)</script>
appears both in the URL and within the page’s html.
We generally recommend setting , which (as we saw above) prevents the loading of the page if a reflected script is detected. An alternative is to set , which signals the browser to sanitize the reflected script and then continue to load the page.
X-Frame-Options directives
The header has three different directives in which you can choose from. These must be sent as an HTTP header, as the browser will ignore if found in a META tag. It is also important to note that certain directives are only supported in certain browsers. See browser support further below in this post. While it is not required to send this response header across your entire site, it is best practice to at least enable it on pages that need it.
1. directive
The directive completely disables the loading of the page in a frame, regardless of what site is trying. Below is what the header request will look like if this is enabled.
This might be a great way to lock down your site, but it will also break a lot of functionality. The following two directives below are more common use cases for a typical website.
Examples of sites currently using the directive:
2. directive
The directive allows the page to be loaded in a frame on the same origin as the page itself. Below is what the header request will look like if this is enabled.
We have the directive enabled on this website. With this directive enabled, only our website is allowed to embed an iframe of one of our pages. This is probably the most commonly used directive out of the three. It is a good balance between functionality and security.
It is also important to note that if a browser or plugin can not reliably determine whether the origin of the content and the frame have the same origin, this must be treated as .
Examples of sites currently using the directive:
3. directive
The directive allows the page to only be loaded in a frame on the specified origin and or domain. Below is what the header request will look like if this is enabled.
This allows you to lock down your site to only trusted origins. But be careful with this directive. If you apply it and the browser does not support it, then you will have NO clickjacking defense in place.
Как настроить X-Frame-Options на Nginx
1. Найти секцию server, отвечающую за обработку запросов нужного сайта. Как правило это файлы в /etc/nginx/site-enabled/*.conf
Для версий Bitrix VM ниже 7.0 и чистого nginx скорее всего это будет файл /etc/nginx/nginx.conf или etc/nginx/bx/conf/bitrix.conf
Для Bitrix VM 7.0 и выше заголовок вынесен в отдельный файл /etc/nginx/bx/conf/http-add_header.conf
2. В секцию server нужного сайта добавить или закомментировать строку в зависимости от того хотите вы включить использование заголовка или выключить:
add_header X-Frame-Options SAMEORIGIN;
или
#add_header X-Frame-Options SAMEORIGIN;
3. Перезапустить nginx
systemctl restart nginx.service
или
service nginx restart
Демонстрация
Вот как выглядит вредоносная страница. Для наглядности полупрозрачный (на реальных вредоносных страницах он полностью прозрачен):
Полная демонстрация атаки:
Здесь у нас есть полупрозрачный , и в примере мы видим его висящим поверх кнопки. Клик на кнопку фактически кликает на ифрейм, но этого не видно пользователю, потому что ифрейм прозрачный.
В результате, если пользователь авторизован на сайте Facebook («Запомнить меня» обычно активировано), то он добавляет «лайк». В Twitter это будет кнопка «читать», и т.п.
Вот тот же пример, но более приближенный к реальности с для :
Clickjacking-атака для кликов мыши, а не для клавиатуры
Эта атака срабатывает только на действия мыши (или аналогичные, вроде нажатия пальцем на мобильном устройстве).
Клавиатурный ввод гораздо сложнее перенаправить. Технически, если у нас есть текстовое поле для взлома, мы можем расположить ифрейм таким образом, чтобы текстовые поля перекрывали друг друга. Тогда посетитель при попытке сфокусироваться на текстовом поле, которое он видит на странице, фактически будет фокусироваться на текстовом поле внутри ифрейм.
Но есть одна проблема. Всё, что посетитель печатает, будет скрыто, потому что ифрейм не виден.
Обычно люди перестают печатать, когда не видят на экране новых символов.
Installation
re-frame-10x configuration is per-project, only one person in your team needs to configure a project to use it, and then everyone else can benefit.
If you are using leiningen, modify in the following ways. When puzzling over the various possible leiningen configurations, it’s often helpful to look at a sample project.clj.
IMPORTANT PREREQUISITES
- You must be running with the Closure define as . This is the default under .
- You must be using .
- You should be using re-frame 0.10.5 or later. Earlier versions may partly work, but are not supported.
Easy setup
-
Update your re-frame dependency to at least — .
-
Add re-frame-10x as a dev dependency by placing within , where is the version shown above. For example:
:profiles
   {:dev
      {:dependencies
                      [day8.re-frame/re-frame-10x "VERSION (see version above)"]] }}
For versions < 0.4.0: If your project uses React 16 and Reagent 0.8.0-alpha2 (or higher) then you will need to add the qualifier to the version, e.g. .
-
Locate your compiler config for your development build and add and to enable re-frame-10x.
For example using cljsbuild and Leiningen update your :
:profiles
{:dev
  {:cljsbuild
    {:builds

        :compiler     {...
                       :closure-defines      {"re_frame.trace.trace_enabled_QMARK_" true}
                       :preloads
                       :main                 "myapp.core" ;; You must specify a :main or follow the advanced setup ^^^
                       }}]}}}
If you’re using figwheel-main, update your file:
^{:watch-dirs   ["src/main/cljs"]
  :ring-handler "...}
{:main            "myapp.core" ;; You must specify a :main or follow the advanced setup ^^^
 :closure-defines {"re_frame.trace.trace_enabled_QMARK_" true}
 :preloads        }
The key things you need to add are:
cljs-devtools is not required to use re-frame-10x, but it is highly recommended.
Code Tracing
re-frame-10x includes an experimental code tracing feature for tracing the code in your event handlers. See day8/re-frame-debux for instructions on how to set it up.
II. Server headers that leak information
1. Server:
This header contains information about the backend server (type and version). For instance, the screenshot below shows that the webserver that runs Nike’s web page is , version .

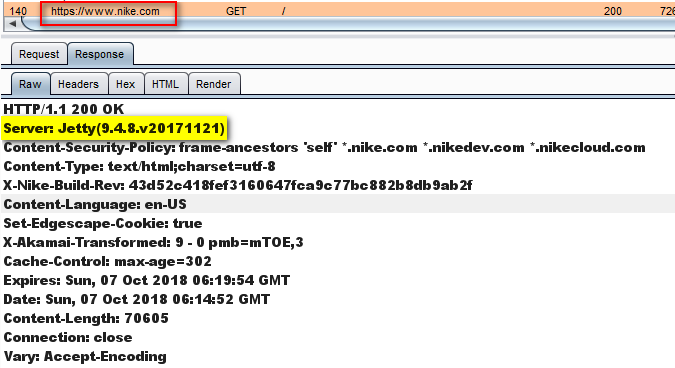
An adversary with this knowledge may look for vulnerabilities specific to the version 9.4.8 of Jetty. This information can be found in public databases such as:
- https://nvd.nist.gov
- https://cve.circl.lu
- https://www.securityfocus.com/bid
You just need to search for the specific product and version. Here are the vulnerabilities affecting the Jetty web server:
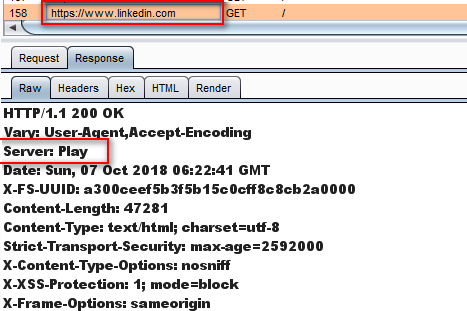
Good example
The server information can be masked by re-configuring the webserver. For example, here is a good configuration on Linkedin’s website (the server name was modified to “Play”):

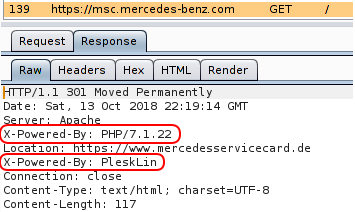
2. X-Powered-By:
It contains the details of the web framework or programming language used in the web application. For instance, the web application at https://msc.mercedes-benz.com was built with and is hosted with .

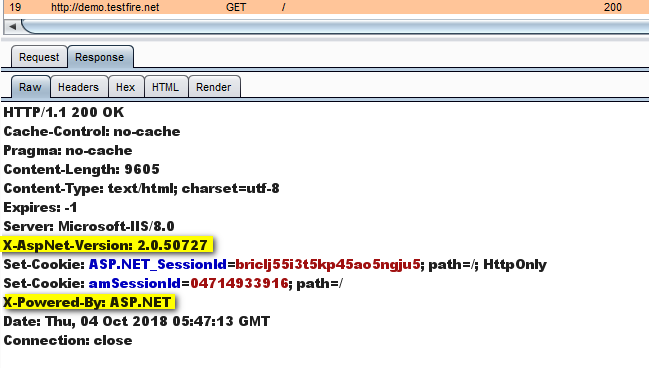
3. X-AspNet-Version:
As the name suggests, it shows the version details of the ASP .NET framework. This information may help an adversary to fine-tune its attack based on the framework and its version.
Here is such an example header from the server at http://demo.testfire.net

Conclusion
HTTP headers can be configured on the server to enhance the overall security of the web application. These headers do not make the application more secure but they prevent exploitation of the potential vulnerabilities of the application.
Преимущества фреймов
Среди преимуществ фреймовой технологии – простота использования, высокая скорость работы, возможность точного позиционирования информации в определенных местах окна.
Применение фреймов обеспечивает экономию на объеме передаваемого трафика в процессе работы с сайтом. Ведь при обращении к другому разделу информации обычно происходит обновление только одного участка страницы, а не всего ее кода.
Такая структура обеспечивает интересные возможности навигации по контенту ресурсов. Ведь внутри окна браузера в соседних фреймах можно просматривать различные информационные блоки
Пользователям важно знать, что поиск по фрейму равнозначен выполнению такой операции на отдельной странице.
В процессе работы с сайтом можно динамически менять размеры отдельного участка, что тяжело реализовать с использование других технологических решений.
X-Frame-Options
Purpose
This header is for configuring which sites are allowed to frame the loaded resource. Its primary purpose is to protect against UI redressing style attacks. Internet Explorer has supported the ALLOW-FROM directive since IE8 and Firefox from 18. Both Chrome and Safari do not support ALLOW-FROM, however WebKit is currently discussing it.
Valid Settings
- DENY — Denies any resource (local or remote) from attempting to frame the resource that also supplied the X-Frame-Options header.
- SAMEORIGIN — Allows only resources which are apart of the Same Origin Policy to frame the protected resource.
- ALLOW-FROM http://www.example.com — Allows a single serialized-origin (must have scheme) to frame the protected resource. This is only valid in Internet Explorer and Firefox. The default of other browsers is to allow any origin (as if X-Frame-Options was not set).
Common Invalid Settings
- ALLOW FROM http://example.com — The ALLOW-FROM directive must use the hyphen character, not a space between allow and from.
- ALLOW-FROM example.com — The ALLOW-FROM directive must use an URI with a valid scheme (http or https).
Что такое iframe и зачем мы его используем?
Разработчики в основном используют тег iframe для встраивания другого HTML-документа в текущий.
Скорее всего, вы пересекались с ним, когда вам нужно было добавить сторонний виджет (например, знаменитую кнопку «Нравится» на Facebook), видео с YouTube, или рекламный раздел на вашем веб-сайте.
Например, приведенный ниже код будет отображать квадрат размером 500px с главной страницей Google:
Вот еще один пример, в котором мы показываем кнопку, чтобы твитнуть вашу веб-страницу в Twitter:
Когда вы думаете о iframe, вы должны иметь в виду, что он позволяет вам встраивать независимый HTML-документ с его контекстом просмотра.Таким образом, он будет изолирован от JavaScript и CSS родительского элемента. Это одна из веских причин использования iframe — обеспечить определенную степень разделения между вашим приложением и содержимым iframe.
Тем не менее, как вы увидите дальше в этом руководстве, разделение не так что б идеально.Iframe все еще может вести себя раздражающим или злонамеренным образом.
Как пример — вызывать всплывающее окно или автоматически воспроизводить видео.
(*Привет онлайн-казино, и сайтам любителей клубники )
Чтобы проиллюстрировать, насколько удобна эта изоляция от JavaScript и CSS, давайте взглянем на эти две ситуации:
1)В приложении пользователь может создавать электронные письма и сохранять их в качестве шаблонов. На определенной странице мне нужно было перечислить их, чтобы он мог просмотреть и выбрать одно из них. Но чтобы не допустить влияния CSS-кода текущего сайта на стиль этих шаблонов, я поняла, что необходимо использование iframe с атрибутом srcdoc . Это представилось самым чистым решением.
2)Другая ситуация, когда iframe спасли мне жизнь, возникла, когда пришлось создавать WYSIWYG-редактор для клиента. Проблема была связана с тем, что при помощи этих редакторов вы должны найти способ сохранить возможность производить фокус и выделение, когда пользователь нажимает на любые кнопки в интерфейсе.
Поскольку iframe предлагает изолированную среду, это означает, что фокус или выделение никогда не теряются, когда вы щелкаете за его пределами. Используя события связи между iframe и родителем (подробнее об этом позже в этой статье), мне удалось в одно мгновение создать мощный редактор.


