Wubi
Содержание:
Getting started
Running Ubuntu directly from either a USB stick or a DVD is a quick and easy way to experience how Ubuntu works for you, and how it works with your hardware. Most importantly, it doesn’t alter your computer’s configuration in any way, and a simple restart without the USB stick or DVD is all that’s needed to restore your machine to its previous state.
With a live Ubuntu, you can do almost anything you can from an installed Ubuntu:
- Safely browse the internet without storing any history or cookie data
- Access files and edit files stored on your computer or USB stick
- Create new office suite documents and save them remotely
- Fix broken configurations to get a computer running again
Requirements
All you need is either a USB stick or DVD with Ubuntu pre-installed. For instructions on how to create these, take a look at one of the following tutorials:
- Create a bootable USB stick on Windows, Ubuntu or macOS
- Burn a DVD on Windows, Ubuntu or macOS
What is a Linux Distribution?
Well, now as you know that Linux is open-source, free to use kernel. It is used by programmers, organizations, profit and non-profit companies around the world to create Operating systems to suit their individual requirements.
To prevent hacking attempts, many organizations keep their Linux operating systems private.
Many others make their variations of Linux available publicly so the whole world can benefit at large.
These versions/ types /kinds of Linux operating system are called Distributions.
How many distributions are out there?

There are hundreds of Linux operating systems or Distributions available these days. Many of them are designed with a specific purpose in mind. For example, to run a web server or to run on network switches like routers, modems, etc.
The latest example of one of the most popular smartphone-based Linux Distribution is Android!
Many of these Distributions are built to offer excellent personal computing.
Here, are a few popular Linux Distributions (also called Linux Distro) —
| Linux Distribution | Name | Description |
|---|---|---|
| Arch | This Linux Distro is popular amongst Developers. It is an independently developed system. It is designed for users who go for a do-it-yourself approach. | |
| CentOS | It is one of the most used Linux Distribution for enterprise and web servers. It is a free enterprise class Operating system and is based heavily on Red Hat enterprise Distro. | |
| Debian | Debian is a stable and popular non-commercial Linux distribution. It is widely used as a desktop Linux Distro and is user-oriented. It strictly acts within the Linux protocols. | |
| Fedora | Another Linux kernel based Distro, Fedora is supported by the Fedora project, an endeavor by Red Hat. It is popular among desktop users. Its versions are known for their short life cycle. | |
| Gentoo | It is a source based Distribution which means that you need to configure the code on your system before you can install it. It is not for Linux beginners, but it is sure fun for experienced users. | |
| LinuxMint | It is one of the most popular Desktop Distributions available out there. It launched in 2006 and is now considered to be the fourth most used Operating system in the computing world. | |
| OpenSUSE | It is an easy to use and a good alternative to MS Windows. It can be easily set up and can also run on small computers with obsolete configurations. | |
| RedHat enterprise | Another popular enterprise based Linux Distribution is Red Hat Enterprise.It has evolved from Red Hat Linux which was discontinued in 2004. It is a commercial Distro and very popular among its clientele. | |
| Slackware | Slackware is one of the oldest Linux kernel based OS’s. It is another easy desktop Distribution. It aims at being a ‘Unix like’ OS with minimal changes to its kernel. | |
| Ubuntu | This is the third most popular desktop operating system after Microsoft Windows and Apple Mac OS. It is based on the Debian Linux Distribution, and it is known as its desktop environment. |
The Best Linux Distribution!
The term best is relative. Each Linux distribution is built for a specific purpose-built to meet the demands of its target users.
The desktop Distributions are available for free on their respective websites. You might want to try them one by one till you get to know which Distribution you like the most. Each one of them offers its own unique design, applications, and security.
We will be using Ubuntu for our learning purpose as it’s easy for a beginner to understand.
Implementation
The installer will be based on the Nullsoft Scriptable Install System, because it is flexible and open-source. It will use the BattleTorrent plugin to download ubuntu.img and swap.img via BitTorrent, in order to conserve bandwidth. As it is downloading, a progress bar will indicate how much longer it will take to download.
ubuntu.img will be the Ubuntu hard drive image. It will be used as a loopmounted EXT3 filesystem, and will be placed in the C:\ubuntu directory. ubuntu.img will be a preconfigured hard drive image, which already has all portions of the installation set up, except those specific to the hardware, such as the X11 configuration, and the user-specific portions, such as the home directory and timezone. swap.img will be a hard drive image of the swap partition. It will be placed in the C:\ubuntu directory.
The installer will ask the user to specify his desired username and password. It will also detect the time zone and locale based on information in the Windows registry. The installer will write this data into the file config.txt in the C:\ubuntu directory.
GRLDR, a modified version of GRUB, allows dual-booting the loopmounted hard drive image and Windows, and doesn’t require any changes to the MBR, as it writes to the Windows boot.ini, so it will be used as the bootloader. This bootloader will be installed at the end of the installation, and the original boot.ini file will be backed up. Once the bootloader is installed, the installer will have a «reboot into Ubuntu» button that will restart the system.
On the first bootup, the data from the config.txt file generated by the installer will be read, and will be used to set up the system. The hardware will be detected, and X11 and other hardware-dependent portions of the system will be configured. All of this will be done automatically, and will not require user interaction. Once this is done, booting will continue, and will boot into Ubuntu.
Backing Up
Before installing Ubuntu Server Edition you should make sure all data on the system is backed up.
If this is not the first time an operating system has been installed on your computer, it is likely you will need to re-partition your disk to make room for Ubuntu.
Any time you partition your disk, you should be prepared to lose everything on the disk should you make a mistake or something goes wrong during partitioning. The programs used in installation are quite reliable, most have seen years of use, but they also perform destructive actions.
Preparing install media
There are platform specific step-by-step examples for s390x LPAR, z/VM and ppc64el installations.
For amd64, download the install image from https://releases.ubuntu.com/20.04/.
There are many ways to boot the installer but the simplest and commonest way is to create a bootable USB stick to boot the system to be installed with (tutorials for other operating systems are also available).
Booting the installer
Plug the USB stick into the system to be installed and start it.
Most computers will automatically boot from USB or DVD, though in some cases this is disabled to improve boot times. If you don’t see the boot message and the “Welcome” screen which should appear after it, you will need to set your computer to boot from the install media.
There should be an on-screen message when the computer starts telling you what key to press for settings or a boot menu. Depending on the manufacturer, this could be , , or . Simply restart your computer and hold down this key until the boot menu appears, then select the drive with the Ubuntu install media.
If you are still having problems, check out the Ubuntu Community documentation on booting from
CD/DVD.
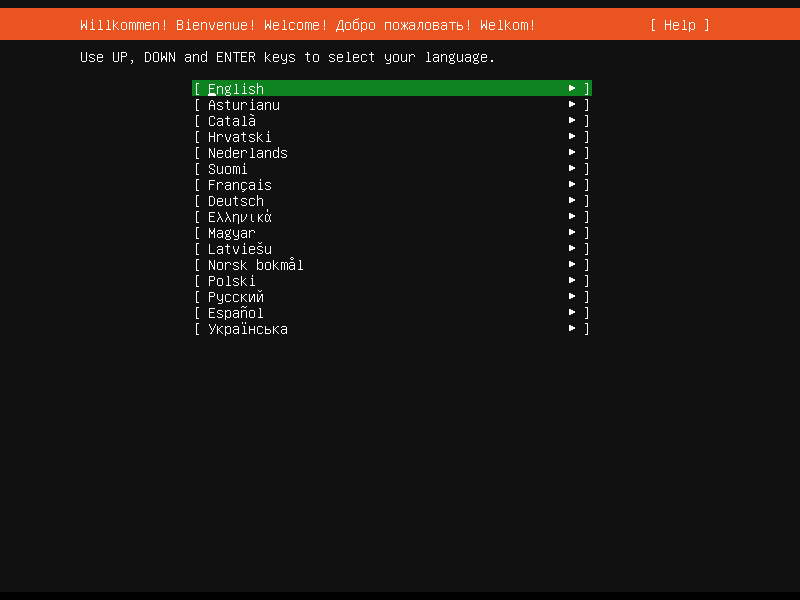
After a few moments, the installer will start in its language selection screen.
Using the installer
The installer is designed to be easy to use and have sensible defaults so for a first install you can mostly just accept the defaults for the most straightforward install:
- Choose your language
- Update the installer (if offered)
- Select your keyboard layout
- Do not configure networking (the installer attempts to configure wired network interfaces via DHCP, but you can continue without networking if this fails)
- Do not configure a proxy or custom mirror unless you have to in your network
- For storage, leave “use an entire disk” checked, and choose a disk to install to, then select “Done” on the configuration screen and confirm the install
- Enter a username, hostname and password
- Just select Done on the SSH and snap screens
- You will now see log messages as the install is completed
- Select restart when this is complete, and log in using the username and password provided
Run WUBI
Double-click on the downloaded program. This will launch the WUBI installer.
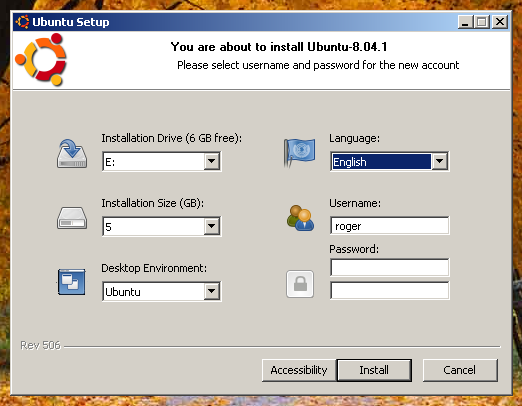
Now, you have a total of six items that you have to review:
Installation Drive
This is the Windows drive letter that you need to choose for the installation. WUBI will automatically limit
the options to drives with the sufficient free space (4GB minimum).
If you’re wondering where to install Ubuntu, simply review your layout. If you only have a single partition
(C:), the choice is obvious. Otherwise, you can try any other available drive with the sufficient space.
Installation Size
You can choose the size of the free space that you want to allocate to your installation. The more there is the
better, of course. Again, WUBI will present you with a drop-down list, with all the available options.
Desktop Environment
You have the ability to choose between several flavors of Ubuntu.
Language
I think this is rather self-evident.
Username
Choose a username for your Ubuntu account.
Password
Provide a password for your Ubuntu account. Choose a strong one.
That’s it! You’re ready to install.
Rationale
Approximately 90% of desktop computers in the world, the target audience of Ubuntu, run Microsoft Windows. Most Windows users are familiar with install.exe programs, and know how to use them. Few, however, know how to burn a CD from a .iso file, boot from a CD, shrink partitions, and install Ubuntu. By providing Windows users with an installer they are more familiar with, we can ease their learning curve, and open Ubuntu to the vast market of casual computer users.
The elimination of the need for partitioning, and thus the chance of data loss, will help Ubuntu gain acceptance in the corporate world.
The elimination of the need for an installation CD will allow users without CD burners or spare CDs to try Ubuntu, ease burdens on ShipIt, and allow installation on ultra-portable laptops with no CD drives.
TODO
-
Install to a real linux partition like debian.exe — Has already been completed, see UNetbootin
-
Automatic generation of /etc/fstab on first boot
- Read values from the config.txt file generated by the installer on the first boot and automatically configure the username, password, language, and timezone accordingly
- The user’s password in the config.txt file will have to be hidden or deleted, as it will be a security risk. This can be done by adding a startup script to Ubuntu that will delete the config.txt file on the first boot, after configurating the username, password, language, and timezone
-
A correct regeneration of initrd.img (with ntfs-3g enabled) when upgrading the kernel — NicolòChieffo
-
Installation to the USB keydrive, with the BootLoader and uninstaller in the USB stick.
- It can use and configure PPP modems and DHCP, to connect to the Internet.
Enabling WSL in Windows 10
Before you can install Ubuntu on WSL, WSL has to be enabled in one of the following ways:
Using the GUI for enabling Windows features
-
Open the Start Menu and search Turn Windows features on or off
-
Select Windows Subsystem for Linux
-
Click OK
- Restart your computer when prompted
Using PowerShell
-
Open PowerShell as Administrator and run:
Enable-WindowsOptionalFeature -Online -FeatureName Microsoft-Windows-Subsystem-Linux
- Restart your computer when prompted
Additional Installation Resources
-
WSL1 Installation Guide from Microsoft
-
WSL2 Installation Guide from Microsoft
-
Windows Server Installation Guide from Microsoft
Running Ubuntu on WSL
Starting Ubuntu on WSL
The Ubuntu on WSL terminal can be started via:
- The app tile in the Windows Start menu (or pinned to your taskbar)
-
WSL — Remote extension for Visual Studio Code.
-
The wsl command on the Windows command prompt or PowerShell
-
By running ubuntu1804.exe, etc. on the Windows command prompt or PowerShell
Installing Packages on Ubuntu
Package management on Ubuntu on WSL works the same as on desktop Ubuntu, using the apt package manager. apt will download and install packages from the Ubuntu archive.
First we check for updates:
sudo apt update
We use sudo because installing packages is an administrator task and requires elevated privileges. Enter the UNIX password you created when you installed Ubuntu on WSL. This will not be your Windows password.
Next we can install a package:
sudo apt install hello
For more information on managing packages with apt, see the following additional resources:
-
apt — Official Ubuntu documentation
Keeping Ubuntu Updated in WSL
WSL runs its own specialized init system instead of SystemD and does not run standard Ubuntu services. Due to the services not running software updates are not applied automatically. Please keep your WSL installation using regularly. This can be accomplished with an occasional:
sudo apt update
sudo apt upgrade -y
Hello World
Lets write and compile a very simple Linux application on WSL. It will announce ‘Hello World!’ and then count to 10.
First, we will update apt and then install the necessary tools, often called dependencies:
sudo apt update
sudo apt install nim
Next, we will create and open a file named helloworld.nim:
nano helloworld.nim
Copy and paste the following code snippet (click ‘Toggle Line Numbers’ to hide line numbers). You can paste into the Ubuntu on WSL terminal by right-clicking with the mouse or Shift+Ctrl+’V’:
echo "Hello World!"
for i in countup(1, 10):
  echo i
Exit nano with Control+’X’ then press ‘Y’ and Enter.
Next we will compile our application back at our shell prompt:
nim compile helloworld.nim
This compiles our Nim code snippet to C and then into a Linux binary named helloworld.
Then we can run our Linux binary:
./helloworld
You should see:
Hello World
1
2
3
4
5
6
7
8
9
10
But we are not just on Linux, we are on WSL.
We can build and test on both Linux and Windows at the same time, including compiling our Hello World application for Windows.
To do this we need to add a dependency, mingw-w64:
sudo apt install mingw-w64
Let’s compile our application again, this time creating a Windows binary:
nim compile --gcc.exe:x86_64-w64-mingw32-gcc --gcc.linkerexe:x86_64-w64-mingw32-gcc --cpu:amd64 --os:windows --out:helloworld.exe helloworld.nim
Then move our binary to Windows and run it from within WSL (your path by vary based on your Windows username):
mv helloworld.exe /mnt/c/Users/Hayden/OneDrive/Desktop/
cmd.exe /c "C:\Users\Hayden\OneDrive\Desktop\helloworld.exe"
Learn more about Nim.
Prepare to install Ubuntu
You will first be asked to select your keyboard layout. If the installer doesn’t guess the default layout correctly, use the ‘Detect Keyboard Layout’ button to run through a brief configuration procedure.
After selecting Continue you will be asked What apps would you like to install to start with? The two options are ‘Normal installation’ and ‘Minimal installation’. The first is the equivalent to the old default bundle of utilities, applications, games and media players — a great launchpad for any Linux installation. The second takes considerably less storage space and allows you to install only what you need.
Beneath the installation-type question are two checkboxes; one to enable updates while installing and another to enable third-party software.
- We advise enabling both and .
- Stay connected to the internet so you can get the latest updates while you install Ubuntu.
- If you are not connected to the internet, you will be asked to select a wireless network, if available. We advise you to connect during the installation so we can ensure your machine is up to date
Wubi Deinstallation
Um das mit Wubi installierte Ubuntu komplett zu deinstallieren, wählt man in der Windows-Systemsteuerung im Abschnitt «Programme deinstallieren» den Eintrag von «Ubuntu» (bzw. «Kubuntu») zur Deinstallation aus oder lässt es über die Anwendung uninstall-wubi.exe ausführen.
Sollten dennoch Reste auf dem Windowssystem zurückbleiben, so kann man diese wie folgt bereinigen:
-
Im Bootmenü erscheint immer noch «Ubuntu» zur Auswahl.
-
Ab Vista: Mit einem entsprechenden BCD-Bearbeitungsprogramm, z.B. den Bootmanager bearbeiten
-
Es gibt noch Dateien mit dem Namen wubildr* auf den Datenträgern.
Löschen der Dateien mit → «Löschen» im Kontexmenü
-
Es gibt noch Einträge in der Registry.
Manuelles Löschen der Schlüsselwerte über die Funktion «regedit». Dazu im regedit-Editor mit
Strg +
F die Suchfunktion aufrufen und wubi eingeben.
Check for updates
Update Manager will open a window to inform you that your computer is up to date. Click on the Settings button to open the main user-interface.
Select the tab called Updates, if not already selected. Then set the Notify me of a new Ubuntu version dropdown menu to either For any new version or For long-term support versions, if you’re wanting to update to the latest LTS release. You may be asked for your password to make this change. See the Ubuntu wiki for details on the differences between standard and LTS releases.
Click on Close to be taken back to the update pane and OK to close this.
We now need to open Update Manager one more time, only this time Update Manager will open up and tell you that a new distribution is available. Click Upgrade.


