Raspberry pi 4 model b. обзор, впечатления. установка raspbian (+видео)
Содержание:
- Can I mix packages from the Debian repositories with Raspbian?
- Is there documentation available for Raspbian?
- Troubleshooting
- What is Raspbian?
- What do I need in my sources.list file to access the Raspbian repository?
- Miscellaneous Notes
- Client? Server?
- Характеристики
- SD card size (capacity)
- Raspberry Pi gift card
- FAQs
- Introducing the new Raspberry Pi Imager
- BCM2837, BCM43438 and Raspberry Pi 3
- Supported devices
- Overview for devices prior to Pi 4
- Change your password
- Functional
- I’m new to Raspberry Pi and Raspbian. What should I know?
Can I mix packages from the Debian repositories with Raspbian?
The short answer is if you don’t know what you are doing you should not mix them. For the long answer read on.
Debian armel packages use the soft float ABI which is incompatible with the hard float ABI used by Raspbian. In theory it should be possible to install Debian armel packages in parallel with Raspbian packages using multiarch. However multiarch setups conflict with a hack we had to make to support the videocore libraries and there are other potential issues too. As such we don’t currently recommend or support multiarch configurations with Debian armel and Raspbian armhf.
Debian armhf packages should be compatible with Raspbian packages but a system with such a mixture WILL NOT RUN ON THE PI. Furthermore there may be corner cases where libraries build slightly differently on Raspbian. Such mixed systems can be useful for development (they were used heavily in the process of creating Raspbian) but are not recommended for general use.
Architecture independent («arch all») packages are compatible between Debian and Raspbian. Source packages should in general be compatible though some may need modification to adjust compiler settings (most Debian packages just use the compiler defaults but some use their own settings for various reasons). A test script for testing packages for armv7 contamination is available at http://pastebin.com/BtSdvrXM but the script is not perfect and can suffer from both false positives and false negatives.
Is there documentation available for Raspbian?
Because Raspbian is closely based on Debian, there is an enormous amount of documentation available for Raspbian. Aside from the Debian.org web site and the wealth of information there, a terrific source of documentation is the recently released The Debian Administrator’s Handbook which is available in hard-copy or as a free download. Note however that the current version of that handbook is based on debian squeeze while the first release of Raspbian is based on Debian wheezy. Therefore there may be differences in some areas.
Any slight differences between Debian and Raspbian or aspects of Raspbian that are unique to the Raspberry Pi hardware will be documented on this web site or on the Raspberry Pi section of the elinux.org wiki.
Troubleshooting
If your device doesn’t work at all
The first step is to see if it is detected at all. There are two commands that can be entered into a terminal for this: and . The first will print out all devices attached to USB, whether they are actually recognised by a device driver or not, and the second will print out the kernel message buffer (which can be quite big after booting — try doing then plug in your device and retype to see new messages).
As an example with a USB pendrive:
In this case, there are no error messages in and the pendrive is detected by the usb-storage driver. If your device did not have a driver available, then typically only the first 6 new lines will appear in the dmesg printout.
If a device enumerates without any errors, but doesn’t appear to do anything, then it is likely there are no drivers installed for it. Search around, based on the manufacturer’s name for the device or the USB IDs that are displayed in lsusb (e.g. 05dc:a781). The device may not be supported with default Linux drivers — and you may need to download or compile your own third-party software.
If your device has intermittent behaviour
Poor quality power is the most common cause of devices not working, disconnecting or generally being unreliable.
- If you are using an external powered hub, try swapping the power adapter supplied with the hub for another compatible power supply with the same voltage rating and polarity.
- Check to see if the problem resolves itself if you remove other devices from the hub’s downstream ports.
- Temporarily plug the device directly into the Pi and see if the behaviour improves.
What is Raspbian?
Raspbian is an unofficial port of Debian wheezy armhf with compilation settings adjusted to produce code that uses «hardware floating point», the «hard float» ABI and will run on the Raspberry Pi.
The port is necessary because the official Debian wheezy armhf release is compatible only with versions of the ARM architecture later than the one used on the Raspberry Pi (ARMv7-A CPUs and higher, vs the Raspberry Pi’s ARMv6 CPU).
The Debian squeeze image issued by the Raspberry Pi foundation was based on debian armel which uses software floating point and the «soft float» ABI. The foundation used the existing Debian port for less capable ARM devices. Therefore, it did not use of the Pi’s processor’s floating point hardware — reducing the Pi’s performance during floating point intensive applications — or the advanced instructions of the ARMv6 CPU.
What do I need in my sources.list file to access the Raspbian repository?
Your /etc/apt/sources.list file should look as follows:
deb http://archive.raspbian.org/raspbian wheezy main contrib non-free rpi
deb-src http://archive.raspbian.org/raspbian wheezy main contrib non-free rpi
When using apt-get, you will will want to install the Raspbian public key in your apt-get keyring, it should already be there if you used debootstrap from the Raspbian repository but if you need to add it manually this can be done with following command:
wget http://archive.raspbian.org/raspbian.public.key -O - | sudo apt-key add -
Mirrors of Raspbian that may be more suitable for users in different geographic locations can be found here.
Miscellaneous Notes
Disable Tool Tips
For MATE panel and MATE panel applets:
Edit the file (create if necessary) ~/.gtkrc-2.0 and add the line:
gtk-enable-tooltips = 0
Enable Reduced Resources Mode
Only works for MATE version 1.4 and below.
The Marco window manager has a reduced resources mode which renders windows as wireframes when you move and resize windows. When reduced resources mode is enabled, only the outline of windows is displayed when you move and resize windows. The contents of the window do not need to be updated during the move or resize. The contents of the window are displayed when the move or resize is complete. When reduced resources mode is enabled, windows are not animated when you move and resize the windows.
To enable reduced resources mode, execute the following command:
# mateconftool-2 --type bool --set /apps/marco/general/reduced_resources true
Turn Off Display of Icons in Menus
Only works for MATE version 1.4 and below.
Some items in menus display an icon beside the item. To turn off this feature and save CPU resources, execute the following command:
# mateconftool-2 --type bool --set /desktop/mate/interface/menus_have_icons false
Alternatively, users can use the Menus & Toolbars preference tool to deselect the Show icons in menus option.
Client? Server?
Before I go into more detail, let me quickly explain some terms.
- Server — the server is the computer that provides the file system, boot files, and password authentication to the client(s)
- Client — a client is a computer that retrieves boot files from the server over the network, and then uses a file system the server has shared. More than one client can connect to a server, but all clients use the same file system.
- User – a user is a username/password combination that allows someone to log into a client to access the file system on the server. Any user can log into any client with their credentials, and will always see the same server and share the same file system. Users do not have sudo capability on a client, meaning they cannot make significant changes to the file system and software.
Характеристики
| Предупреждения | |
| ПРЕДУПРЕЖДЕНИЕ | Необходимы приобретаемые отдельно блок питания USB и карта памяти — требуется для загрузки операционных систем |
| Основные характеристики | |
| Производитель | Raspberry |
| Модель | PI 3 Model B+найти похожий неттоп или клиент |
| Тип оборудования | Бюджетный одноплатный компьютер |
| Модификация | Raspberry PI 3 model B+ (компоновка платы = Raspberry PI model B+) |
|
Назад ВпередВсе подходящие аксессуары |
|
| Описание | Компактный ПК на базе единственной платы с новым, более мощным, четырехъядерным 64-битным процессором ARMv8 1.4 ГГц, а также встроенными модулями Wi-Fi 802.11n и Bluetooth 4.1 с поддержкой BLE. К другим особенностям можно отнести наличие выводов GPIO и поддержку HDMI CEC. Компоновка платы идентична версии Raspberry PI model B+. Благодаря использованию нового процессора и большему количеству оперативной памяти, Raspbery PI 3 поддерживает работу с дистрибутивами ARM GNU/Linux, включая Snappy Ubuntu Core, а также Microsoft Windows 10 IoT Core (инсталлер теперь встроен в Noobs). |
| Операционная система | Без ОС (может быть установлен DOS, Linux, другие бесплатные ОС или noOS); Загружается с сайта производителя — ссылка |
| Процессор | |
| Процессор компьютера | Broadcom BCM2837B0 ARMv8 Cortex-A53 (1.4 ГГц) |
| Видео | |
| Тип видео | Встроенное |
| Конфигурация | |
| Оперативная память | 1 ГБ |
| Тип памяти | LPDDR2 |
| Коммуникации | |
| Стандарты Wi-Fi | IEEE 802.11ac, IEEE 802.11n (2.4 ГГц + 5 ГГц)Двухдиапазонные Wi-Fi роутеры |
| Интегрированный Bluetooth | Есть, Bluetooth 4.2 |
| Сеть | 10/100/1000 Мбит/сек (подключена по шине USB 2.0, поэтому 300 Мбит/с максимум) |
| Интерфейс, разъемы и выходы | |
| Слоты для карт памяти | microSDHC, microSD |
| Разъемы компьютера | 4 x USB 2.0, HDMI, RJ-45, 1 x USB microB, AV-out, GPIO, разъем для камеры |
| Прочие характеристики | |
| Прочее | Поддержка работы с USB-хабами; поддержка PoE с помощью приобретаемого отдельно аксессуара PoE HAT |
| Сетевые характеристики | |
| Протоколы | RDP |
| Охлаждение | |
| Охлаждение | Безвентиляторная система охлаждения |
| Питание | |
| Блок питания | Приобретается отдельно (рекомендуется 2.5 А энергопотребление зависти от количества подключенного оборудования; для питания используется разъем micro USB 2.0) |
|
Назад ВпередПоказать списком |
|
| Потребление энергии | 0.5 — 1 Вт |
| Логистика | |
| Размеры (ширина x высота x глубина) | 87 x21 x56 мм |
| Размеры упаковки (измерено в НИКСе) | 9.5 x 7.1 x 2.8 см |
| Вес брутто (измерено в НИКСе) | 0.06 кг |
SD card size (capacity)
For installation of Raspberry Pi OS with desktop and recommended software (Full) via NOOBS the minimum card size is 16GB. For the image installation of Raspberry Pi OS with desktop and recommended software, the minimum card size is 8GB. For Raspberry Pi OS Lite image installations we recommend a minimum of 4GB. Some distributions, for example LibreELEC and Arch, can run on much smaller cards. If you’re planning to use a card of 64GB or more with NOOBS, see this page first.
Note: Only the Raspberry Pi 3A+, 3B+ and Compute Module 3+ can boot from an SD card larger than 256 GB. This is because there was a bug in the SoC used on previous models of Pi.
Raspberry Pi gift card
Full terms and conditions
- A Raspberry Pi gift card can be redeemed only in the official Raspberry Pi store in Cambridge as full or part payment for goods (exclusions apply).
- A Raspberry Pi gift card cannot be used to pay for purchases from the Raspberry Pi Press online store. Other exclusions may apply from time to time.
- Please protect your card. Lost, stolen or damaged cards will not be replaced. No exceptions apply.
- Your gift card will cease to be valid twelve months from the date of purchase.
- You can check your gift card balance in store by asking a member of the store team. We are unable to check gift card balances over the phone or via email.
- Gift cards can be activated with a minimum value of £5, and they can have a maximum value of £250. Customers who wish to add a gift card value of more than £250 will have to purchase an additional card or cards.
- A Raspberry Pi gift card cannot be exchanged for cash. We do not give change, cash, or debit/credit card refunds on gift card transactions.
Any balance remaining on a gift card after it has been used to make a purchase may be applied to future purchases, provided the card has not expired. - Raspberry Pi reserves the right to update and change the terms and conditions of Raspberry Pi gift cards at any time. This does not affect your legal rights.
- Where goods you have purchased with a Raspberry Pi gift card in our store are subsequently returned or exchanged for goods of a lower price, monies owing will be refunded to a Raspberry Pi gift card.
- We reserve the right to refuse to accept a Raspberry Pi gift card that we believe to have been tampered with or duplicated, or that is otherwise suspected of being affected by fraud.
- Raspberry Pi gift cards can be used in conjunction with other offers in store, including promotional events, introductory offers, and promotions run by the store.
FAQs
We’ll keep updating this list over the next couple of days, but here are a few to get you started.
Are you discontinuing earlier Raspberry Pi models?
No. We have a lot of industrial customers who will want to stick with the existing products for the time being. We’ll keep building these models for as long as there’s demand. Raspberry Pi 1B+, Raspberry Pi 2B, and Raspberry Pi 3B will continue to sell for $25, $35, and $35 respectively.
What about Model A+?
Raspberry Pi 1A+ continues to be the $20 entry-level “big” Raspberry Pi for the time being. We are considering the possibility of producing a Raspberry Pi 3A+ in due course.
What about the Compute Module?
CM1, CM3 and CM3L will continue to be available. We may offer versions of CM3 and CM3L with BCM2837B0 in due course, depending on customer demand.
Are you still using VideoCore?
Yes. VideoCore IV 3D is the only publicly-documented 3D graphics core for ARM‑based SoCs, and we want to make Raspberry Pi more open over time, not less.
Introducing the new Raspberry Pi Imager
From today, Raspberry Pi users will be able to download and use the new Raspberry Pi Imager, available for Windows, macOS and Ubuntu.
The utility is simple to use and super speedy, thanks to some shortcuts we’ve introduced into the mechanics.
Firstly, Raspberry Pi Imager downloads a .JSON file from our website with a list of all current download options, ensuring you are always installing the most up-to-date version.
Once you’ve selected an operating system from the available options, the utility reads the relevant file directly from our website and writes it straight to the SD card. This speeds up the process quite considerably compared to the standard process of reading it from the website, writing it to a file on your hard drive, and then, as a separate step, reading it back from the hard drive and writing it to the SD card.
During this process, Raspberry Pi Imager also caches the downloaded operating system image – that is to say, it saves a local copy on your computer, so you can program additional SD cards without having to download the file again.
BCM2837, BCM43438 and Raspberry Pi 3
For Raspberry Pi 3, Broadcom have supported us with a new SoC, BCM2837. This retains the same basic architecture as its predecessors BCM2835 and BCM2836, so all those projects and tutorials which rely on the precise details of the Raspberry Pi hardware will continue to work. The 900MHz 32-bit quad-core ARM Cortex-A7 CPU complex has been replaced by a custom-hardened 1.2GHz 64-bit quad-core ARM Cortex-A53. Combining a 33% increase in clock speed with various architectural enhancements, this provides a 50-60% increase in performance in 32-bit mode versus Raspberry Pi 2, or roughly a factor of ten over the original Raspberry Pi.
James Adams spent the second half of 2015 designing a series of prototypes, incorporating BCM2837 alongside the BCM43438 wireless “combo” chip. He was able to fit the wireless functionality into very nearly the same form-factor as the Raspberry Pi 1 Model B+ and Raspberry Pi 2 Model B; the only change is to the position of the LEDs, which have moved to the other side of the SD card socket to make room for the antenna. Roger Thornton ran the extensive (and expensive) wireless conformance campaign, allowing us to launch in almost all countries simultaneously. Phil Elwell developed the wireless LAN and Bluetooth software.
All of the connectors are in the same place and have the same functionality, and the board can still be run from a 5V micro-USB power adapter. This time round, we’re recommending a 2.5A adapter if you want to connect power-hungry USB devices to the Raspberry Pi.
Raspberry Pi 3 is available to buy today from our partners element14 and RS Components, and other resellers. You’ll need a recent NOOBS or Raspbian image from our downloads page. At launch, we are using the same 32-bit Raspbian userland that we use on other Raspberry Pi devices; over the next few months we will investigate whether there is value in moving to 64-bit mode.
Supported devices
In general, every device supported by Linux is possible to use with the Pi, subject to a few caveats detailed further down. Linux has probably the most comprehensive driver database for legacy hardware of any operating system (it can lag behind for modern device support as it requires open-source drivers for Linux to recognise the device by default).
If you have a device and wish to use it with a Pi, then plug it in. Chances are that it’ll «just work». If you are running in a graphical interface (such as the LXDE desktop environment in Raspberry Pi OS), then it’s likely that an icon or similar will pop up announcing the new device.
If the device doesn’t appear to work, then refer to the Troubleshooting section below.
General limitations (not Pi 4)
The OTG hardware on Raspberry Pi has a simpler level of support for certain devices, which may present a higher software processing overhead. The Raspberry Pi also has only one root USB port: all traffic from all connected devices is funnelled down this bus, which operates at a maximum speed of 480mbps.
The USB specification defines three device speeds — Low, Full and High. Most mice and keyboards are Low-speed, most USB sound devices are Full-speed and most video devices (webcams or video capture) are High-speed.
Generally, there are no issues with connecting multiple High-speed USB devices to a Pi.
The software overhead incurred when talking to Low- and Full-speed devices means that there are soft limitations on the number of simultaneously active Low- and Full-speed devices. Small numbers of these types of devices connected to a Pi will cause no issues.
Port power limits
USB devices have defined power requirements, in units of 100mA from 100mA to 500mA. The device advertises its own power requirements to the USB host when it is first connected. In theory, the actual power consumed by the device should not exceed its stated requirement.
The USB ports on a Raspberry Pi 1 have a design loading of 100mA each — sufficient to drive «low-power» devices such as mice and keyboards. Devices such as wireless LAN adapters, USB hard drives, USB pen drives all consume much more current and should be powered from an external hub with its own power supply. While it is possible to plug a 500mA device into a Raspberry Pi 1 and have it work with a sufficiently powerful supply, reliable operation is not guaranteed. In addition, hotplugging high-power devices into the Raspberry Pi 1’s USB ports may cause a brownout which can cause the Pi to reset.
From the Raspberry Pi 2 onwards, the total power supplied to all USB ports in aggregate is 1200mA.
See Power for more information.
Overview for devices prior to Pi 4
The number and type of USB ports on Raspberry Pi depends on the model. The Raspberry Pi Model B is equipped with two USB 2.0 ports; the B+, 2B, 3B and 3B+ have four USB 2.0 ports. The Pi 4 has two USB 2.0 ports and two USB 3.0 ports. In all models prior to the Pi 4, the USB ports connect to a combo hub/Ethernet chip, which is itself a USB device connected to the single upstream USB port on BCM2835. On the Pi 4, the USB hub chip is connected to the SoC using a PCIe bus.
On the Model A and Zero range, the single USB 2.0 port is directly wired to the SoC.
The USB ports enable the attachment of peripherals such as keyboards, mice, webcams that provide the Pi with additional functionality.
There are some differences between the USB hardware on the Raspberry Pi and the USB hardware on desktop computers or laptop/tablet devices.
The USB host port inside the Pi is an On-The-Go (OTG) host as the application processor powering the Pi, BCM2835, was originally intended to be used in the mobile market: i.e. as the single USB port on a phone for connection to a PC, or to a single device. In essence, the OTG hardware is simpler than the equivalent hardware on a PC.
OTG in general supports communication to all types of USB device, but to provide an adequate level of functionality for most of the USB devices that one might plug into a Pi, the system software has to do more work.
Change your password
Once you’re logged in as the user, it is highly advisable to use the command to change the default password to improve your Pi’s security.
Enter on the command line and press . You’ll be prompted to enter your current password to authenticate, and then asked for a new password. Press on completion and you’ll be asked to confirm it. Note that no characters will be displayed while entering your password. Once you’ve correctly confirmed your password, you’ll be shown a success message (), and the new password will apply immediately.
If your user has permissions, you can change another user’s password with followed by the user’s username. For example, will allow you to set the user ‘s password, and then some additional optional values for the user such as their name. Just press to skip each of these options.
Functional
Maybe you’re looking to use your Raspberry Pi as a component of a larger project, such as a home automation system, learning suite, or makerspace. In that case you may need to attach it to a wall, under a desk, or behind a monitor.
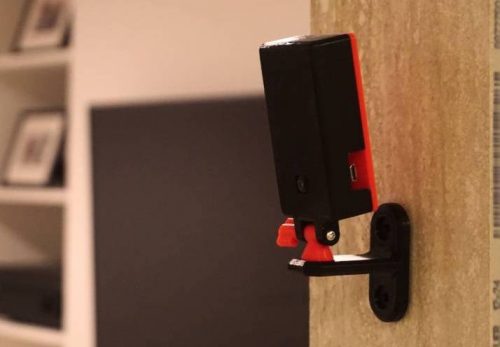
Coo! Coo!
The Pidgeon, shown above, allows you to turn your Zero W into a surveillance camera, while the piPad lets you keep a breadboard attached for easy access to your Pi’s GPIO pins.
Functional cases with added brackets are great for incorporating your Pi on the sly. The VESA mount case will allow you to attach your Pi to any VESA-compatible monitor, and the Fallout 4 Terminal is just really cool.
I’m new to Raspberry Pi and Raspbian. What should I know?
The goal of Raspbian is to become the leading OS of choice for all users of the Raspberry Pi. This goal has been largely achieved. There are still some rough edges but these are generally more related to the Pi’s hardware and kernel than Raspbian itself.
Raspbian images are produced by various people. For newcomers we recommend the images provided by the Raspberry Pi foundation, these are available from their download page Raspberry Pi Foundation’s download page.
Raspbian tries to stay as close to Debian as reasonably possible. Debian is used by millions of users around the globe on a daily basis and there is a vast store of knowledge and documentation about using Debian across the web. Any information you find that applies to Debian will almost certainly apply to the same version of Raspbian. Information for earlier versions of debian will often apply too but may need some tweaks just as it would when using it on a newer version of debian.


