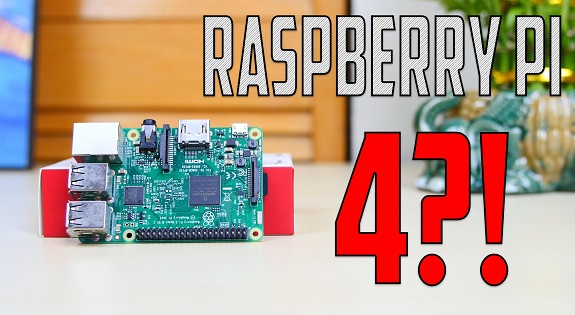
Raspberry pi 4
Содержание:
- Using Zoom
- Using PPTP
- Более компактный компьютер
- Raspberry Pi 4
- Dropping the price of 2GB
- Raspberry Pi 4 имеет гораздо более мощный процессор и возможность увеличения объема оперативной памяти.
- Day 1 | Monday
- Connecting a monitor, keyboard, and mouse
- Wrapping things up
- С новым макетом платы Raspberry Pi 4 не подойдет для старых образцов, но это небольшая цена за улучшения
- LCD display/touchscreen options
- Сравнение производительности
- Что такое Raspberry Pi
- Orca screen reader
- Using OpenVPN
- Read all about it
- Какие характеристики могут быть у Raspberry Pi 4
- Adding audio
Using Zoom
While there isn’t a Zoom desktop client for Raspberry Pi, you can run the Zoom client application, or even host a meeting, directly in the browser.
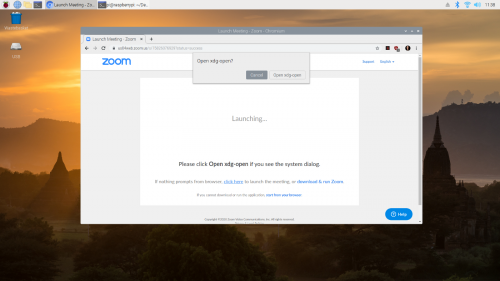
Click on the ‘Cancel’ button when prompted to ‘Open xdg-open’ by Zoom
Then, when you get asked to ‘Open xdg-open?’ in the system dialog that opens, click on ‘Cancel’.
Next click on the ‘click here’ link near the bottom of the page where it says “If nothing prompts from browser, click here to launch the meeting…”. Another ‘Open xdg-open?’ system dialog will open, and you need to click on ‘Cancel’ again.
Then you should see a new “start from your browser” link in really small font at the bottom of the page. Go ahead and click on the this link.
Your Zoom meeting should now start normally in your browser.
Using PPTP
The Point Tunneling Protocol (PPTP) is an older VPN protocols, and despite known vulnerabilities, it is still one of the more widely used ones because it’s integrated into Windows, macOS, and Linux. If your workplace offers other protocols, such as OpenVPN, I suggest that you choose one of these instead, since they are more secure. However, if you do need to use PPTP, you can do so on Raspberry Pi.
First you’ll need to install the PPTP package:
$ sudo apt-get install pptp-linux
Then go ahead and create a /etc/ppp/peers/pptp-config file to hold your PPTP configuration, and copy and paste the following into the file:
pty "pptp HOSTNAME --nolaunchpppd --debug"
name USERNAME
password PASSWORD
remotename PPTP
require-mppe-128
require-mschap-v2
refuse-eap
refuse-pap
refuse-chap
refuse-mschap
noauth
debug
persist
maxfail 0
defaultroute
replacedefaultroute
usepeerdns
Replace HOSTNAME, USERNAME, and PASSWORD with the name of your company’s VPN server, your own username, and your password.
Then in a terminal window, type:
$ sudo pon /etc/ppp/peers/pptp-config
You should then be connected to your company’s VPN via PPTP.
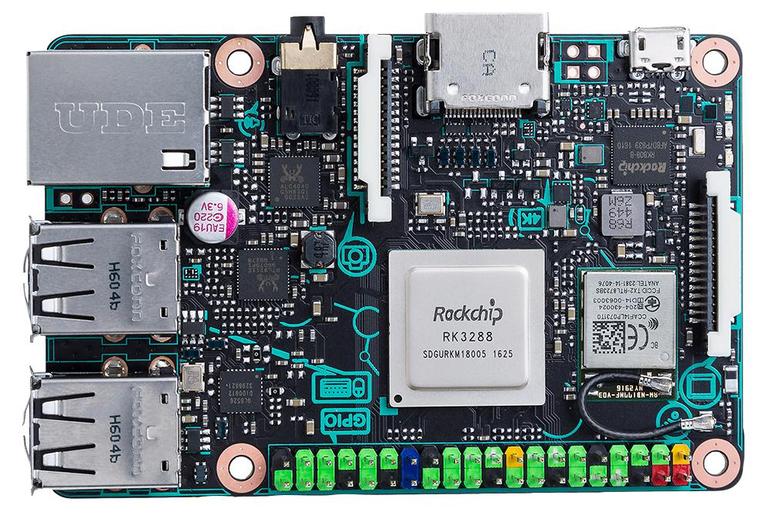
Более компактный компьютер
Несмотря на свои небольшие габариты, Odroid-C4 не является самым компактным на рынке. Для примера, в августе 2019 г. разработчики из китайской Shenzhen Xunlong выпустили одноплатный мини-компьютер Orange Pi Zero 2, размеры которого составляют 55х55 мм при массе около 34 граммов.
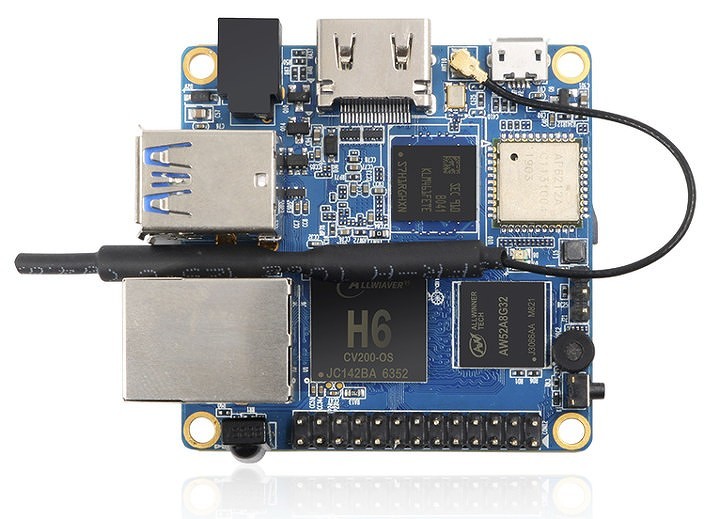
Orange Pi Zero 2
По своей производительности Orange Pi Zero 2 уступает Odroid-C4, но и стоит заметно дешевле – около $20. Мини-компьютер оснащен однокристальной системой Allwinner H6 на базе четырех ядер ARM Cortex-A53 с поддержкой 64-битных инструкций, графической подсистемой ARM Mali-T720, а также 512 МБ оперативной памяти LPDDR3, встроенным микрофоном, портом HDMI 2.0a, парой USB-портов (по одному – версий 2.0 и 3.0) и одним microUSB. Хранение данных обеспечивает флэш-модуль eMMC вместимостью 4 ГБ, и в дополнение к нему можно установить карту microSD емкостью до 32 ГБ.
- Короткая ссылка
- Распечатать
Raspberry Pi 4
When Raspberry Pi 4 came out, I was pleasantly surprised by how the more powerful processor and enhanced memory allowed it to be a serious contender for a desktop computer. However, what if you don’t have a permanent desk? What if you want a more portable option? There are plenty of designs around for laptops built using Raspberry Pi computers, but I’ve never been that keen on the laptop form factor. Joining the screen and keyboard together always makes me feel like I’m either slumped over the screen or the keyboard is too high. I set out to build a portable computer that fitted my way of working rather than simply copying the laptop design that’s been making our backs and fingers hurt for the past decade.
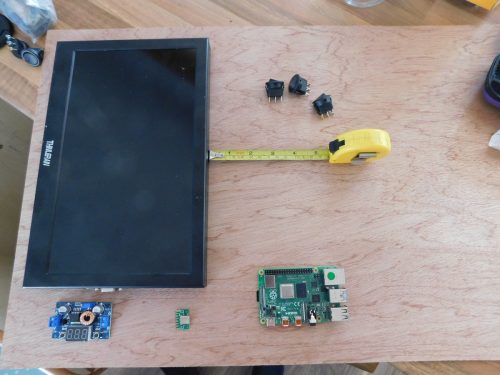
Deciding where to put the parts on the plywood backing
Dropping the price of 2GB
Which brings us to today’s announcement. The fall in RAM prices over the last year has allowed us to cut the price of the 2GB variant of Raspberry Pi 4 to $35. Effective immediately, you will be able to buy a no-compromises desktop PC for the same price as Raspberry Pi 1 in 2012. In comparison to that original machine, we offer:
- 40× the CPU performance
- 8× the memory
- 10× the I/O bandwidth
- 4× the number of pixels on screen
- Two screens instead of one
- Dual-band wireless networking
And of course, thanks to inflation, $35 in 2012 is equivalent to nearly $40 today. So effectively you’re getting all these improvements, and a $5 price cut.
We’re going to keep working to make Raspberry Pi a better desktop computer. But this feels like a great place to be, eight years in. We hope you’ve enjoyed the first eight years of our journey as much as we have: here’s to another eight!
Raspberry Pi 4 имеет гораздо более мощный процессор и возможность увеличения объема оперативной памяти.
Одно из ключевых отличий Raspberry Pi 4 Model B заключается в том, что он имеет более мощный процессор; четырехъядерный процессор Broadcom BCM2711 SoC. Этот чип работает на частоте 1,5 ГГц и работает на 100 МГц быстрее, чем четырехъядерный процессор Broadcom BCM2837 с тактовой частотой 1,4 ГГц используемый в модели Pi 3 модели B +, но разница в скорости между ними гораздо выше. Это связано с тем, что Pi 4 использует ядра ARM v8 Cortex-A72, а не более старый Cortex-A53, используемый Pi 3 Model B +.
Помимо повышения ЦП, Pi 4 также является первым в линейке, предлагающим различные объемы памяти, с возможностью выбора 1 ГБ, 2 ГБ и 4 ГБ. И Pi 4 также использует более современную память DDR4. Установка большего объема памяти делает Pi 4 лучше подходящим для более сложных проектов или для использования его в качестве настольного компьютера.
Запустив несколько тестов, вы можете начать видеть разницу между двумя системами. Используя Sysbench для вычисления всех простых чисел до 10 000, Raspberry Pi 3 Model B + завершила тест за 35,94 с; Pi 4 в 23,23 с. Переходя к тесту браузера Speedometer 2.0, модель Pi 3 Model B + завершила тестирование с результатом 8,813 балла, Pi 4 набрал 15,15.
Это все хорошие новости, но стоит упомянуть что Pi 4 очень сильно нагревается, и если вы слишком сильно надавите на него процессор замедлится, и на экране появится значок термометра, сообщающий что компьютер горячий. Ночью, я измерил внешнюю температуру Pi 4 при 61С; после запуска тестов внешний чип составил 71,3 ° C.
Это делает Pi 4 довольно теплым, и вы даже можете почувствовать тепло через корпус, поэтому вы должны быть осторожны с ним при этих температурах. Высокая температура оказывает влияние на производительность. Без охлаждения на Pi 4 тесту Sysbench потребовалось 28,78 секунды, чтобы закончить.
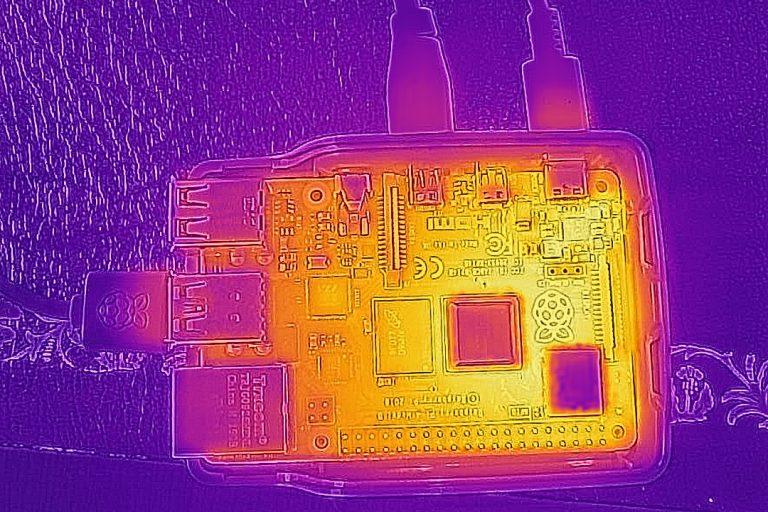
Работая на полную мощность, Pi 4 может нагреваться, и на плате становится слишком жарко, чтобы с ней было удобно работать
Pi 4 построен, как и в предыдущих моделях для непрерывной работы с достаточным запасом тепла для короткого спринта. Тем не менее если вы хотите в Pi 4 улучшить охлаждению, радиатор и корпус с вентилятором не сработают.
Помимо повышения производительности процессора, графический процессор Broadcom VideoCore VI в Pi 4 намного быстрее, чем графический процессор Pi 3. Запустив OpenArena и установив разрешение 1280 x 720, Pi 3 управлял встроенной демонстрацией времени со скоростью 27,8 кадр / с, а Pi 4 – 41,4 кадр / с.
Все эти улучшения означают, что Pi 4 обладает гораздо большими возможностями, чем его предшественник, особенно в области настольных ПК. Там, где продукты старшего поколения чувствовали себя немного медленными и вам приходилось ждать ответа, Pi 4 плавный и отзывчивый. Фактически, я напечатал весь этот обзор новой модели, используя Google Drive в Chromium, и не почувствовал, что однажды потянулся к своему Mac.
Day 1 | Monday
Decisions, decisions
Our new favourite single-board computer comes in a selection of RAM sizes: 1GB, 2GB, or 4GB. Given a price difference of £20 between the 1GB and 4GB versions, it made sense to go right for the top specification. That’s the version included in the official Desktop Kit that I went out and bought for £105 (inc. VAT) at the official Raspberry Pi store; it normally retails for $120 plus local taxes. My last laptop was £1900. I’m not suggesting that the two can be reasonably compared in terms of performance, but £1795 minus the cost of a monitor is a difference worth remarking upon.
Back at the office, I inspected the contents. For your money you get: a 4GB version of Raspberry Pi 4, thoughtfully already installed in the new official case; the official keyboard and mouse; the new USB-C power supply; a 16GB microSD card preloaded with the Raspbian Buster operating system; and a copy of The Official Raspberry Pi Beginner’s Guide 252-page book. It’s very well packaged and presented, with little plastic waste. The book is the icing on the cake if you are looking at this set for a young person’s first computer, short-circuiting the ‘now what do I do?’ stage. What pleased me, in particular, was the inclusion of two micro-HDMI cables in the kit, allowing me to set up a dual-screen system without delay.
First tests
I set up my new workstation next to my existing laptop, with two 1080p monitors that only had DVI connectors, so I had to get a couple of £2 adapters and an additional cable to get sound out of the audio jack of my Raspberry Pi. Time for an initial test-drive. Booting up into Raspbian Buster was quick, about ten seconds, and connection to WiFi easy. There’s no doubting the feel of the speed improvements. Yes, I’ve read all the benchmark tests, but I wanted to know how that translates to user experience. This new kit does not disappoint.
Raspbian has matured impressively as an OS. For my daily desktop scenario, the jewel in the crown is Chromium: having such a capable web browser is what makes this whole experiment feasible. Others have upped their game, too: Firefox has come a long way, and many other browsers are now available, such as Vivaldi. A check of some of my most visited sites showed Chromium to be just as capable as Chrome on my regular machine. Unsurprisingly, it wasn’t as snappy and I hit a few bumps, but we’ll get to that.
A day of impressions
I’m no expert when it comes to GPUs, but I was impressed with the dual-monitor support. The setup worked first time and didn’t seem to have any detrimental effect on the machine’s performance. I was expecting slow window drawing or things getting ‘stuck’, but this wasn’t the case.
By the end of the first day, I was getting used to the keyboard and mouse too. They are a nice mixture of being both functional and aesthetically pleasing. The keyboard comes with a three-port hub, so you can connect the mouse if you wish. It does not have the build quality and precision of my daily wireless keyboard and trackpad, but for a fraction of the price, I was surprised how much I got for my money. By the end of the week, I’d grown quite fond of it.
Connecting a monitor, keyboard, and mouse
I normally use my Raspberry Pis headless as a server. But working from home, and using Raspberry Pi as your primary computer, you’re going to need a monitor, keyboard, and mouse.
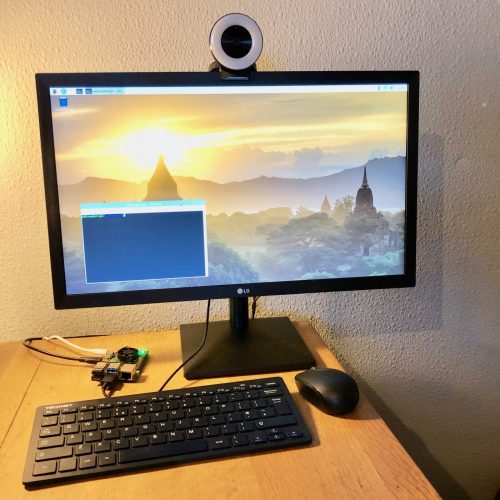
My Raspberry Pi 4, which I use for video calls, perched on the edge of my desk at home
Except for the monitor, the Raspberry Pi Desktop Kit has everything you need to get you going, including a USB-C power supply and all the necessary cables.
Connecting a keyboard and a mouse to your Raspberry Pi just involves plugging them in, although you should probably make sure you plug them into the USB 2 rather than the USB 3 sockets. You can tell these apart by their colour: USB 3 sockets have blue ‘tongues’, while USB 2 sockets have black ones.
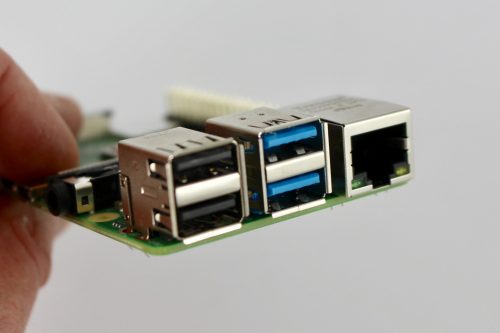
USB 2 sockets (left), USB 3 sockets (middle), and Ethernet socket (right)
Raspberry Pi 4 has two micro HDMI sockets, allowing you to use it with dual monitors if you wish: it supports one 4K screen at 60fps, or two 4K screens at 30fps.
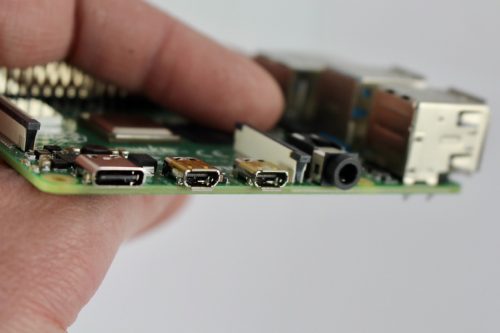
Power (USB-C) socket (left), two micro-HDMI sockets (middle), and the headphone jack (right)
You can connect Raspberry Pi to any HDMI monitor (or two) you have in the house — you’ll only need a micro-HDMI to HDMI cable (or two) to do it. There are two of these included in the Desktop Kit.
While the official Raspberry Pi keyboard and mouse are great, I’ve picked up a smaller wireless keyboard and mouse for added convenience and fewer wires.
Wrapping things up
I’d been a freelance journalist for years before joining Raspberry Pi, so I perfected my home-working setup a long time ago; but I’m still finding it incredibly useful having a Raspberry Pi set up at the corner of my desk.
A number of our colleagues here at Pi Towers are are using a Raspberry Pi as their main work-from-home computer, or as a supplementary device for conferencing and file-sharing. We’re also seeing a very large number of people, both in our team and out in the community, using Raspberry Pi as a computer for kids to do homework on (an absolute necessity in so many households where parents are using all the available computers to do their own work on!).
С новым макетом платы Raspberry Pi 4 не подойдет для старых образцов, но это небольшая цена за улучшения
Все изменения означают, что в макете платы есть некоторые изменения. Для начала порты USB и порт Gigabit Ethernet поменялись местами сзади. Теперь есть два порта micro-HDMI, а не один полноразмерный порт HDMI. И вход питания теперь USB-C, так как Pi 4 требуется 5 В 3 А питания, а не рекомендуемые 5 В 2,5 А питания более старых моделей.
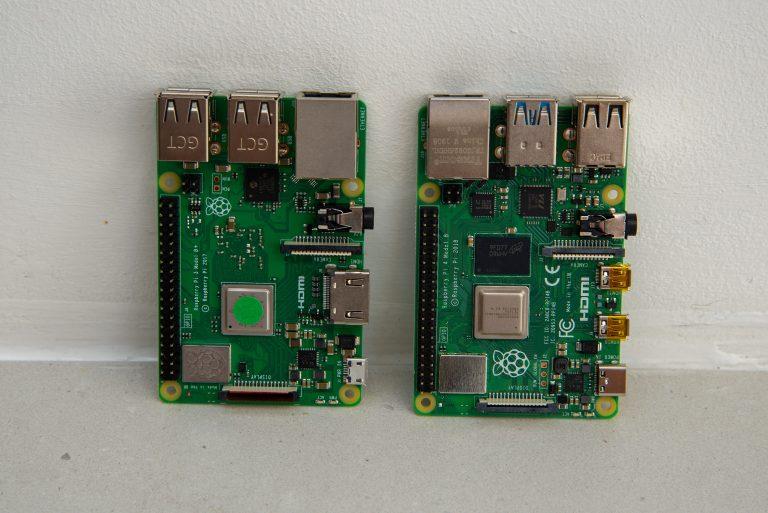
Макет изменился с Pi 3 (слева) на Pi 4 (справа)
Все это означает, что Pi 4 потребуется новый корпус, поскольку он не подходит для корпусов Pi 3. Это небольшая цена, и вы можете купить официальный чехол Raspberry Pi 4 Model B, украшенный красно-белым пластиком.
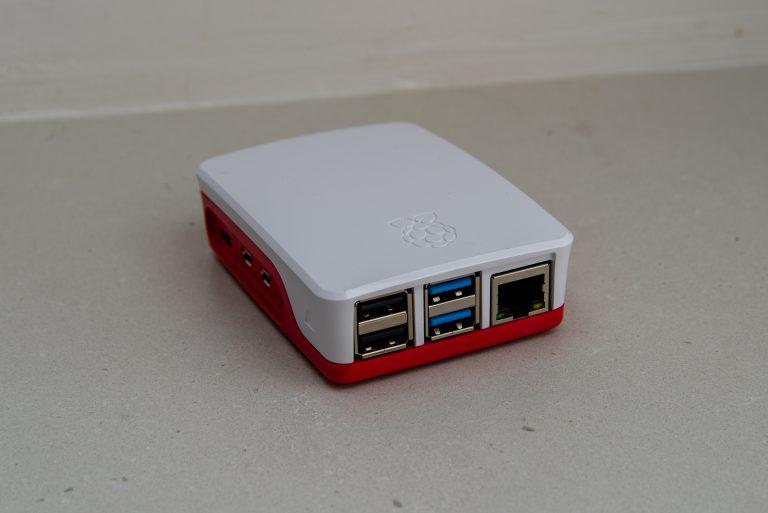
Официальная упаковка для нового Pi 4
То, что осталось прежним, помогает Pi 4. Таким образом, вы по-прежнему получаете 40-контактный порт GPIO (который теперь переключается быстрее), и внутри находятся те же разъемы для камеры и дисплея, поэтому вы можете продолжать использовать эти периферийные устройства в своих проектах. ,
Поддержание этих разъемов с предыдущих компьютеров Pi означает, что вы можете легко перенести свои старые проекты на новый Pi. Или если вы начинаете с нуля и ищете вдохновение, старые проекты которые вы найдете в интернете, будут работать с новой платой.
LCD display/touchscreen options
ignore_lcd
By default the Raspberry Pi LCD display is used when it is detected on the I2C bus. will skip this detection phase, and therefore the LCD display will not be used.
display_default_lcd
If a Raspberry Pi DSI LCD is detected it will be used as the default display and will show the framebuffer. Setting will ensure the LCD is not the default display, which usually implies the HDMI output will be the default. The LCD can still be used by choosing its display number from supported applications, for example, omxplayer.
lcd_rotate
This flips the display using the LCD’s inbuilt flip functionality, which is a cheaper operation that using the GPU-based rotate operation.
For example, will compensate for an upside down display.
Enable/disable the touchscreen.
will disable the touchscreen on the official Raspberry Pi LCD display.
enable_dpi_lcd
Enable LCD displays attached to the DPI GPIOs. This is to allow the use of third-party LCD displays using the parallel display interface.
dpi_group, dpi_mode, dpi_output_format
The and config.txt parameters are used to set either predetermined modes (DMT or CEA modes as used by HDMI above). A user can generate custom modes in much the same way as for HDMI (see section).
is a bitmask specifying various parameters used to set up the display format.
More details on using the DPI modes and the output format can be found here.
dpi_timings
This allows setting of raw DPI timing values for a custom mode, selected using and .
The aspect ratio can be set to one of eight values (choose the closest for your screen):
Сравнение производительности
Разработчики из Hardkernel провели ряд сравнительных тестов нескольких одноплатных компьютеров, в подавляющем большинстве из которых Odroid-С4 значительно опережал Raspberry Pi 4. К примеру, в бенчмарке Dhrystone-2, тестирующем производительность процессора, Odroid-C4 набрал 4309 баллов, тогда как его соперник – лишь 3396.
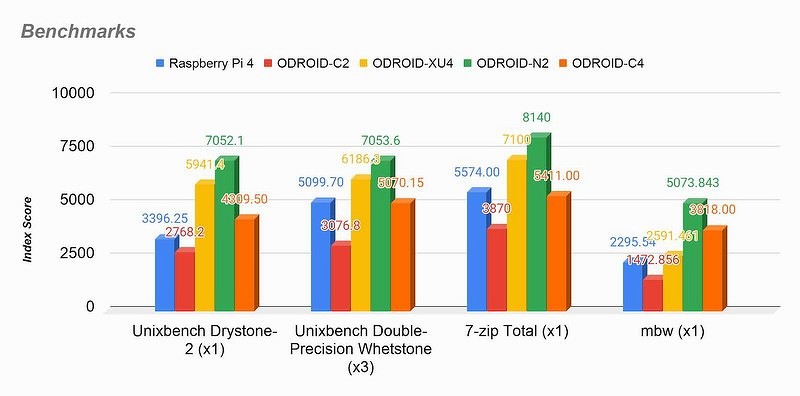
Тест производительности процессоров
Графическая подсистема тестировалась в бенчмарке Glmark2-es2. Полученные результаты: 192 балла у Odroid-C4, 154 балла у Raspberry Pi 4.
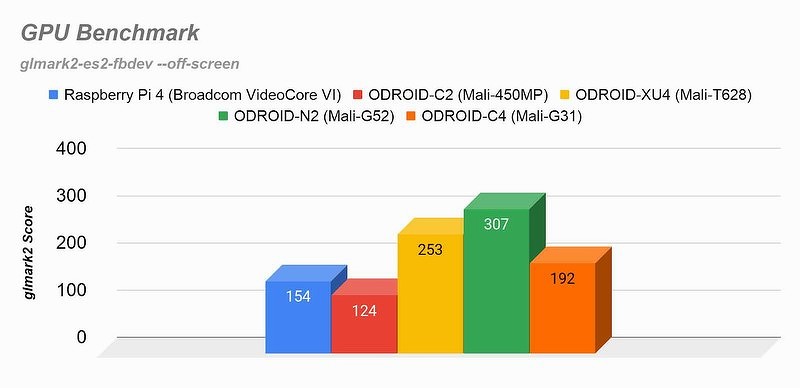
Тест видеоподсистемы
По заверениям разработчиков, Odroid-C4 также обходит Raspberry Pi 4 по скорости работы памяти, потребляя при этом меньше энергии.
Что такое Raspberry Pi
Raspberry Pi представляет собой настоящий компьютер, который выполнен в виде всего одной платы.

Raspberry Pi разрабатывается английской компанией Raspberry Pi Foundation.
Почему «малина»
«Raspberry» в переводе с английского, означает — «малина», поэтому компьютер очень часто называют малинкой.
Логотип Raspberry Pi — изображение ягоды малины. В символике платы и графическом оформлении материалов и аксессуаров часто применяют изображение малины.
Название «Raspberry» было выбрано по аналогии с названиями других компаний, которые также имеют съедобные названия — Apple (яблоко), Apricot (мандарин) Computers, Tangerine (мандарин) Computer Systems и другие.
«Pi» происходит от первоначальной идеи сделать маленький компьютер для работы с языком Python (Пайтон).
Модели Raspberry Pi
Система наименований различных моделей Raspberry Pi может немного запутать новичков, но на самом деле все очень просто.
Pi 1, Pi 2, Pi 3 и Pi 4 означают поколение модели.
- Pi 1 — это модели 2012-2014 г.
- Pi 2 — модели 2015-2016 г.
- Pi 3 — модели 2016-2018 г.
- Pi 4 — текущая модель 2019 г.
Индексы A, A+, B и B+ можно ассоциировать с характеристиками устройства. Модели B, в рамках одного поколения, более производительные и более «навороченные», чем модели A.
«+» добавлялся к моделям, которые имели совсем незначительные изменения по сравнению с моделью без индекса «+», например, Pi 1 B отличается от Pi 1 B+ наличием функции POE (Power over Ethernet).
Также есть Zero-версии платы. Они в прямом и переносном смысле «урезаны».
Orca screen reader
One area of the desktop which we have been wanting to improve for some time is accessibility, particularly for those with visual impairments. To this end, we asked the accessibility charity AbilityNet to assess the Raspberry Pi Desktop to see how usable it was for those with disabilities, and where we could make improvements.
They gave us a lot of very helpful feedback, and their number one suggestion was that we needed to make the Orca screen reader work with the desktop.
Orca is an application which uses synthesised speech to read out menus, window titles, button labels, and the like. It’s a standard Linux application, but people who have tried it on Raspberry Pi found that it didn’t actually work with Raspbian. (When I first installed it, all it did was to make slightly alarming growling noises instead of speaking!)
After quite a bit of fiddling and head-scratching, Orca now works as intended. It will read out many of the pre-installed applications, and should work with a lot of other Linux software packages as well.
Unfortunately, there are a few areas where it won’t work. Orca hooks into various user interface toolkits — the software which is used to draw buttons, menus, etc. on the screen. It is fully compatible with the GTK toolkit (which is used for most of the desktop) and Qt (which is used for the VLC media player and the qpdfview PDF viewer). But many applications (such as Thonny, Sonic Pi, and Scratch) are built on toolkits which are not compatible with the screen reader. Also, the current release of Chromium is not compatible with Orca, but the forthcoming version 80 release, which should be available in a few months, will be Orca-compatible. In the meantime, if you want an Orca-compatible browser, you can install Firefox by entering the following into a terminal window:
sudo apt install firefox-esr
(Please note that we do not recommend using Firefox on Raspbian unless you need Orca compatibility, as it is not optimised for video playback on the Pi in the same way as Chromium.)

Orca doesn’t have a menu entry — the settings dialog shown above can be opened by holding down the Insert key and then pressing the space bar, or by typing orca -s into a terminal window.
Please note that Orca currently doesn’t work with Bluetooth audio devices, so we recommend using it with either the Pi’s own HDMI output or headphone socket, or with a USB or HAT external audio device.
Orca can either be installed from Recommended Software, in the Universal Access category, or by entering the following into a terminal window:
sudo apt install orca
This is hopefully just the start of making the Raspberry Pi Desktop more accessible for those with disabilities, as we are planning to do more work in this area in the future.
Using OpenVPN
The OpenVPN protocol is one of the youngest VPN protocols; it is open-source and generally considered one of the more secure protocols.
To get OpenVPN working on Raspberry Pi, first you’ll need to install the OpenVPN package:
$ sudo apt-get install openvpn
Then you’ll need to create a client.conf configuration file in /etc/openvpn.
client
dev tun

proto udp
remote HOSTNAME PORT

resolv-retry infinite
nobind

user nobody
group nogroup

persist-key
persist-tun

# Path to your certificates (ca.crt, client.crt, and client.key)
ca FILEPATH_CA
cert FILEPATH_CRT
key FILEPATH_KEY

ns-cert-type server
comp-lzo
verb 3
Replace HOSTNAME and PORT with the name and port number of your company’s VPN server, and FILEPATH_CA, FILEPATH_CRT, and FILEPATH_KEY with the fully resolved path to your ca.rt, client.crt, and client.key certificate files; you can obtain this information from your company’s IT people. While these files normally live alongside your configuration file in /etc/openvpn, it isn’t necessary to have them saved there if you really want them to live somewhere else.
Then in a terminal window, type:
$ sudo openvpn /etc/openvpn/client.conf
You should then be connected to your company’s VPN via OpenVPN.
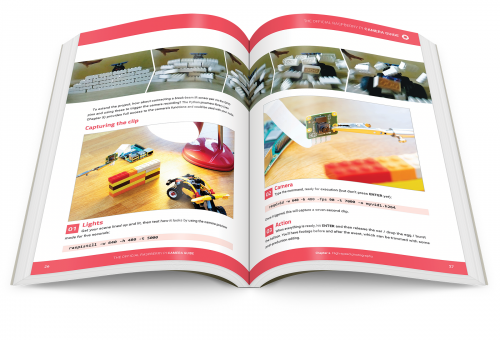
Read all about it
Also out today is our new Official Raspberry Pi Camera Guide, covering both the familiar Raspberry Pi Camera Module and the new Raspberry Pi High Quality Camera.

We’ll never not be in love with Jack’s amazing design work.
Our new guide, published by Raspberry Pi Press, walks you through setting up and using your camera with your Raspberry Pi computer. You’ll also learn how to use filters and effects to enhance your photos and videos, and how to set up creative projects such as stop-motion animation stations, wildlife cameras, smart doorbells, and much more.
Aardman ain’t got nothing on you.
You can purchase the book in print today from the Raspberry Pi Press store for £10, or download the PDF for free from The MagPi magazine website.
Какие характеристики могут быть у Raspberry Pi 4
Характеристики Raspberry Pi 4 тоже пока неизвестны. Но их опять-таки можно предугадать. Вероятнее всего, новая «Малина» получит 8-ядерный процессор и 2 гигабайта ОЗУ. Почему именно так?
8-ядерные процессоры и 2 гигабайта оперативки – это железо, которое уже сейчас стоит относительно недорого, а в ближайшие годы подешевеет еще больше, так как на смартфонах такой мощности уже начинает не хватать, а у производителей на складах имеется большое количество соответствующего железа, которое нужно как-то реализовывать.
С другой стороны, для «Малины» 2 гигабайта и 8 ядер ЦПУ – более чем достаточно. Так, Linux и приложения для соответствующих систем работают на ней напрямую, а не под виртуальной машиной Java. При этом, в отличие от того же Android, сами ОС для RPi являются не очень требовательными и к тому же их можно гибко настраивать.
В Сети есть информация о том, что в новом Raspberry будет 4 гигабайта ОЗУ. Но это, скорее, пользователи выдают желаемое за действительное. Крайне маловероятно, что разработчики одноплатника сделают такой резкий скачок в своем продукте. Да и включать соответствующий объем совершенно нет никакого смысла, так как многими он будет не востребован. Кроме того, установка 4 гигабайт ОЗУ сделает одноплатник значительно дороже. Тогда он будет стоить более 50 долларов. А главная особенность «Малины» заключается как раз в том, что цена почти каждой её версии составляет $35.
Теперь о том, что касается интерфейсов. Разработчик, скорее всего, в RPi4 не поменяет следующее:
- количество пинов GPIO – их по-прежнему останется 40;
- число USB-портов тоже останется прежним – 4 штуки;
- WiFi будет работать по тому же стандарту.
Единственное, велика вероятность, что в новой малине будут присутствовать USB 3.0, а не 2.0, как в модели 3B+. Но это пока под вопросом. Также, скорее всего, в RPi4 будет поставлен Bluetooth обновленной версии.
Вероятность того, что одноплатник обзаведется своей постоянной памятью тоже очень низка. Во-первых, это приведет к удорожанию продукта, а, во-вторых, сделает его менее комфортным в использовании. Хотя MicroSD-карточки и сравнительно медленные, они все-таки дают пользователю большой простор. Так, можно взять несколько флешек и записать на каждую из них определенный дистрибутив. В случае с постоянной памятью это будет сделать труднее.
Adding audio
Setting up audio out for your Raspberry Pi is normally fairly easy. You can just plug a set of headphones into the audio jack, or use the speakers in your computer monitor connected via HDMI, and Raspberry Pi should just figure things out for you.
If you’re not getting sound out of your Raspberry Pi, either via the audio jack or the built-in speakers in your monitor, you might need to set audio output manually using the raspi-config tool.
Unfortunately, Raspberry Pi doesn’t have any native audio input capability. The simplest way to to add audio input is to use a USB microphone. These range from a cheap and cheerful mini USB microphone, designed for basic sound capture, to much more impressive ones designed for podcasting.
Alternatively, you can get a , which means that you may be able to use a wired headset and microphone with a standard audio jack. But be warned, most USB sound cards don’t provide any gain for passive mics, so you’ll need to provide a good signal.


