Как пользоваться putty для ssh-подключений
Содержание:
- What is SSH (PuTTY) Commands?
- Using telnet is not recommended
- Install SuperPuTTY
- SSH Academy
- Terminal window and login credentials
- Using SSH in PuTTY (Windows)
- 1. Manage Session in PuTTY
- 2. What is Logging in PuTTY?
- 3. What is Terminal in PuTTY?
- 4. Configure Keyboard setting in PuTTY.
- 6. Features of PuTTY
- 7. Adjust the size of Window in PuTTY.
- 8. Change the Appearance of PuTTY
- 11. What is Selection in PuTTY?
- 13. Configure Connection in PuTTY.
- 14. Manage Data in PuTTY.
- 16. What are Telnet, Rlogin, and SSH in PuTTY?
- Using the built-in SSH client in Mac OS X
- Инструкция по применению программного обеспечения PuTTY
- Left pane configuration options
- Как пользоваться PuTTY
- Особенности программы
- Creating a new key pair for authentication
- SSH Academy
What is SSH (PuTTY) Commands?
The Secure Shell (SSH) Protocol lets a user connect to a remotely located computer from one computer. This communication takes place through a secured encryption process. This kind of connection can be used for file transfer and issuing other remote commands. The SSH Protocol follows a client-server model in which connection is established by SSH Client to the SSH server. The SSH client uses public key cryptography to ensure a safe connection to the SSH server. After setting up the connection, the SSH client also ensures that the privacy and integrity of data are maintained throughout the network by using symmetric encryption, asymmetric encryption, and hashing algorithms.
Image showing a basic ssh commands
The client-server based model of SSH commands or PuTTY commands allows the authentication of two remotely located systems while encrypting the data that passes through them. By default, SSH operates on TCP port 22, but it can be changed if required. The client connects with the server by performing a TCP handshake with the server, which is for verifying whether the information provided by the user matches with the previous record of information that is stored in an RSA key store file. Before establishing a connection, both the client and the server have to agree upon the encryption standards to ensure safe and secured communication and then the user must perform the authentication check. Now, to make use of PuTTY commands, a terminal emulator that connects the client to the server is required. PuTTY is one such emulator which is open-source and free to download. Also, windows don’t have a pre-installed SSH server or client. So, the prerequisites for being able to use SSH (PuTTY) commands are as follows:
- A Linux based server that you would be connecting to.
- PuTTY for facilitating the connection process.
- The server’s IP address that acts as the location of the server to which you are trying to connect.
- Username and Password to make sure that you are authorized to connect to the server.
Using telnet is not recommended
In addition to SSH, the PuTTY can be used as a telnet client. Telnet is insecure. Its use is not recommended.
The main problem with is that it transmits all passwords and any transmitted data in the clear. Anyone with access to any computer on the same network can steal user names and passwords that are transmitted. Such password sniffing attacks were very common on the Internet already in the 1990s.
sessions can also be hijacked in the network. Attackers can inject their own commands into sessions. Protection from such attacks was the main reason why Tatu Ylonen developed SSH as a replacement for in the first place. Use of has not been recommended for 20 years.
Install SuperPuTTY
Installing SuperPutty is very simple, as it comes with an installer. It is packaged as a ZIP file, so users have to just unzip the downloaded application to where you want to store it on the local disk. Although, it is advised that the program is unzipped to a directory that retains the version number of the application as it follows a semantic version numbering system.
For example, the directory could look something like this – “C:\SuperPuTTY\SuperPutty-v1.2.0.8”.
Based on the version a user downloads, the extracted files could look as below:-
- License.txt
- SuperPutty.exe
- README.txt
- SuperPutty.exe.config
- WeifenLuo.WinFormsUI.Docking.dll
- log4net.dll
- ReleaseNotes.txt
- SuperPutty.pdb
- themes
Apart from the tab GUI user interface, there is a number of other features that SuperPutty package comes with such as it supports SSH, RLogin, Telnet and RAW protocols. Other features include tab customizations and export/import session configuration.
SSH Academy
IAM
IAM Zero Trust Framework
Gartner CARTA
Standing Privileges
Zero Standing Privileges (ZSP)
Ephemeral access
PrivX lean PAM
Identity management
Active Directory
Administrators
Domain administrators
Local administrators
Jump server
IAM Just in time
Just-in-time security tokens
Multi-Factor Authentication (MFA)
OpenID Connect (OIDC)
PAM (Privileged Access Management)
Legacy PAM
Password generator
Password strength
Password vaults
Privileged accounts
PASM
Privilege Elevation and Delegation Management
Privileged session management
Radius
Root accounts
Service accounts
System accounts
Sudo
Users
User IDs
Superuser
Vagrant
Cloud
Cloud applications
Cloud computing
Cloud computing characteristics
Cloud computing companies
Cloud computing definition
Cloud computing models
Cloud computing pros and cons
Cloud computing security
Cloud storage
Cloud technology
IaaS
PaaS
SaaS
SaaS companies
SaaS security
Secure Shell
Secure Shell
Secure Shell protocol
SSH software downloads
SSH certificate authentication
Ipsec
Network monitoring
Port 22
RCP
rlogin
RSH
SCP
Session key
Automated connections
SSH command
SSH configuration
SSHFS SSH File System
SSH for Windows
SSH servers
Tectia SSH Server
SSH server configuration
SSO using SSH agent
Telnet
WinSCP
SSH keys
CAC and PIV smartcards
OpenSSH key authorization
Passphrases
Passphrase generator
Copy ID
Host key
Authorized key
Authorized key file
SSH key basics
SSH key identities
SSH key management
Universal SSH Key Manager
SSH key proliferation
SSH keygen
SSH keys for SSO
Public key authentication
SSH compliance
SSH key compliance
Basel III
COBIT
Cybersecurity framework
Fips 140
Fips 199
Fips 200
GDPR
HIPAA
ISACA
ISACA SSH guide
ISO 27001
NERC-CIP
NIS directive
NIST 7966
NIST 7966 download
NIST 800-53
PCI-DSS
Sans Top 20
Sarbanes Oxley
sshd OpenSSH server process
PuTTY
PuTTY download
PuTTY manuals
PuTTY for Windows
PuTTY for Mac
PuTTY for Windows
PuTTY for Windows installation
PuTTY public keys
PuTTYgen for Linux
PuTTYgen for Windows
SSH tunneling example
Terminal window and login credentials
After the security alert, you should get a terminal window. By default, this is a black, very bland window. It should first ask for your user name and then password. After these, you should get a command line on the server.
You can then type into the terminal Window. You are now connected to the server, and anything you type in the Window is sent to the server. Server’s responses are displayed in the Window. You can run any text-based applications on the server using the window. The session terminates when you exit the command-line shell on the server (typically by typing ) to the command line or pressing . Alternatively, you can forcibly terminate the session by closing the terminal window.
Using SSH in PuTTY (Windows)
Following the successful installation, navigate to the location folder where you have installed the application and run the .exe file.
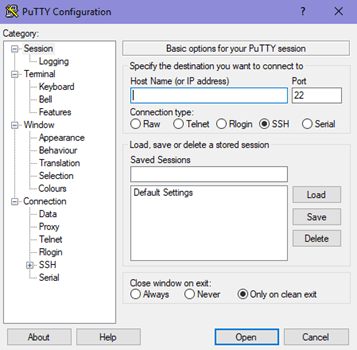 PuTTY Configuration
1. Manage Session in PuTTY
It is the preliminary panel where you get to specify specific options to open a session.
- The Host Name (or IP Address) bar is where a user will input the name or IP address of the server they want to connect.
- Connection type of radio buttons allows users to choose from the kind of network they are planning to connect.
- The Port bar is the section that is filled automatically on selecting the type of connection. However, if you choose the Raw type, the bar stays blank and requires the user to enter the port manually.
- Upon selecting Serial as the connection type, the Host Name and Port bars will be replaced by Serial Line and Speed.
The “Load, save or delete a stored session” section is to set some connection setting without having to type all the details again when needed.
- Once you save it, it can just select on the saved session and click on Load. The saved settings will appear on their respective boxes in the configuration panel.
- The panel permits to modify a saved session by first loading a session, editing everything you want to change and then clicking on “save” button.
- Users have the option to delete a session as well.
The Close Window On Exit option helps in deciding whether the PuTTY terminal will close as soon as the session ends or restarts the session on the termination.
2. What is Logging in PuTTY?
This configuration panel saved the log files of your PuTTY sessions which can be used for debugging and analysis purposes. Users can choose the type of data you want to log in this window.
3. What is Terminal in PuTTY?
The section has a variety of options to decide how the texts in the window should appear. Whether you want the text to come in the next line as soon as it reaches the right edge of the window or you want to interpret the cursor position.
4. Configure Keyboard setting in PuTTY.
With the option, users can modify the behavior of ‘backspace,’ ‘home’ and ‘end’ keys, and several other keys to coordinate with the server settings.
6. Features of PuTTY
Users can choose to disable or enable some of the advanced terminal features of PuTTY like disabling cursor keys, etc. using the function.
7. Adjust the size of Window in PuTTY.
The option allows to predefine a fixed size of the PuTTY window and control the scrolling. Many other configurations can be made using this feature.
8. Change the Appearance of PuTTY
Under this panel, the appearance of the cursor, the font in the terminal window or even control the window border can be changed.
11. What is Selection in PuTTY?
Users can change the course of copy-pasting or the actions of mouse-buttons in Unix environment by making appropriate changes in this panel.
13. Configure Connection in PuTTY.
The panel has options that solve any issues when closing of connections while a window is idle. With the option, users can select between the old and new protocols.
14. Manage Data in PuTTY.
The auto-login option dismisses the need to type the username every time. It can also specify the terminal needs using this panel.
16. What are Telnet, Rlogin, and SSH in PuTTY?
These panels allow configuration of session-related options like changing the mode for negotiation between the server and client, allowing an automated form of login on the server, etc.
The above were details about the panels and the steps to install PuTTY client on windows.
PuTTY, the open-source and free to download software, provides an easy way to access a Unix shell environment from a windows system. Unlike Unix, Windows don’t have any SSH server or client pre-installed. The network file transfer application supports many protocols including the popular SSH and Telnet clients.
Using the built-in SSH client in Mac OS X
Mac OS X includes a command-line SSH client as part of the operating system. To use it, goto Finder, and selext Go -> Utilities from the top menu. Then look for Terminal. Terminal can be used to get a local terminal window, and also supports SSH connections to remote servers.
Running SSH from the terminal command line
Once you have the terminal window open, you have two alternatives. The first approach is to type or into the terminal window. This is more familiar for Linux and Unix users who are used to using a command line.
Running SSH with a graphical user interface
The second option is to select New Remote Connection… from the Shell menu of Terminal. This opens a graphical dialog asking for the host to connect to and the user name. This also allows saving connections. This is recommended for users who are not accustomed to using a command line.
How to use PuTTY SSH keys with the built-in OpenSSH
If you have a PuTTY format private key and want to use it with the built-in OpenSSH on Mac on the command line or in scripts, you can use the following commands.
First, install PuTTY for Mac using or (see below). This will also install the command-line version of puttygen, the PuTTY key generator tool.
Then, use the following command to convert the format private key to a standard PEM format private key:
Make sure permissions on the private key file are set properly. It should only be readable by the user that owns it.
You can now use the key for logins from scripts and command line with:
Инструкция по применению программного обеспечения PuTTY
Скачать программу PuTTY можно через бесплатный сервис Торрент. После загрузки на компьютер нужно открыть папку и найти файл с названием скачки «putty.exe». Программа имеет англоязычный интерфейс, поэтому ниже приведены подсказки для облегчения работы с меню. Установка PuTTY в среднем занимает около 10-20 минут.
Host name – это поле, где нужно вводить личный ip адрес своего устройства (для которого настраивается подключение)
Важно помнить, что перед установкой на устройстве необходимо разрешить доступ на подключение через выбранный тип и порт. Connection type – это поле для выбора оптимального типа коннекта
Например, если пользователь хочет подключиться к устройству через маршрутизатор cisco 1861, то во время настройки по умолчанию устанавливают коннектор telnet порт 23.

Port – это поле, в котором нужно указать порт для подключения устройства. После этого нужно сохранить все введенные данные, чтобы не прописывать их каждый раз при открытии программы. В поле «saved sessions» необходимо указать название выполняемого подключения. Это может быть work 1, work 2 и т.д.

Далее можно нажимать на кнопку «Open». На рабочем столе открывается окно, где пользователь должен ввести данные для дальнейшей авторизации. Во время первого открытия программы PuTTY и подключения к серверу по протоколу SSH пользователь должен согласиться с записью ключа для удаленного сервера.

Вся информация сохраняется в кеш программного обеспечения. После этого можно вводить данные для входа.

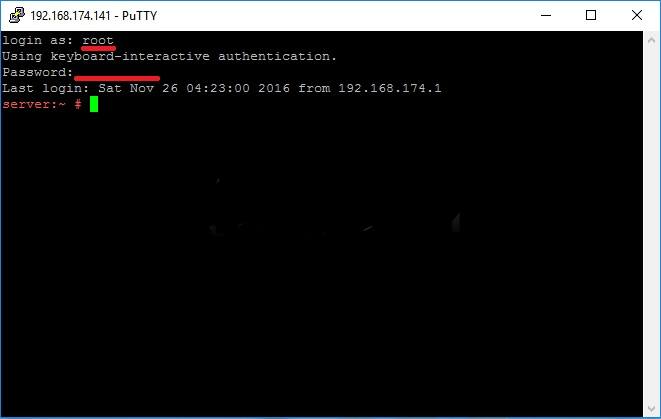
В появившемся окно вводится имя клиента, например: root и нажимается Enter. Программа предложит задать пароль для входа. Далее клиент перенаправляется на удаленный сервер Linux. Ниже представлен снимок входа на сервер Linux через используемый протокол SSH при помощи программного обеспечения PuTTY.

Благодаря такой инструкции пользователи смогут загрузить и выполнить вход в программное обеспечение, добавить один из удаленных серверов и сохранить введенные параметры кодирования. Они будут сохранены в программном обеспечении, и клиенты смогут подключаться к удаленному серверу.
Если в доме или квартире есть маршрутизатор с установленным программным обеспечением Linux и открытым доступом к порту SSH, необходимо скачать PuTTY на Windows и выполнить подключение. Благодаря таким настройкам во время работы с сервером можно будет выполнять подключение к интернету. Пользователи не смогут применять модем, чтобы обеспечить корректную работу. Именно эта программа была специально разработана для установки удаленного подключения, что значительно облегчает работу клиентов и пользователей.
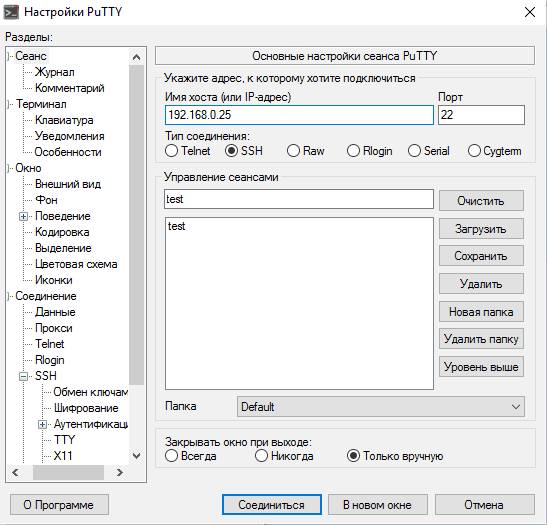
Left pane configuration options
More options can be found in the left pane titled Category. Select a category from the tree, and the right pane will change to show configuration options for that category. The initally shown options belong to the Session category.
Only the more relevant options are described here. There are lots of options, and most of them would never be used.
Terminal options
The options in this category influence terminal emulation and keyboard mappings. They are largely self-explanatory, and will not be covered here. Very few people need to touch these. Some people may change how the bell character is handled; people using exotic operating systems might change what is sent by the backspace or delete character.
Window options
The window options influence the appearance and behavior of the terminal window. It can also specify how characters are translated on output and to select fonts and colors for the window.
Как пользоваться PuTTY
Первый запуск и настройки
При первом запуске приложения нужно внести некоторые настройки для корректной работы:
- Запустить программу.
- Заполнить поле «Имя хоста». Нажать «Соединиться». Стоит указать соответствующий порт, который не блокирован на удаленном сервере.
- При правильном вводе данных хоста будет предложено указать информацию об учетной записи (имя пользователя и пароль).
- После этого авторизированному пользователю будет предоставлена возможность ввода команд, разрешенных удаленным сервером.
- В случае надобности, можно провести настройку кодировки. Для этого нужно перейти в главное меню, пункт «Окно», подпункт «Кодировка». При неправильно установленной кодировке будут отображены непечатные символы.
- В этом же меню «Окно» можно выбрать начертание шрифта. Для этого нужно выбрать подпункт «Внешний вид».
В отличие от своих аналогов, Путти имеет больше возможностей, и несмотря на свой сложный интерфейс – настройки, выставленные по умолчанию, дают возможность подключиться к удаленному серверу даже неопытному пользователю ПК.
Способы нумерации страниц в Open Office Writer
Внешне, программа выглядит следующим образом:
- В левой части расположено меню с выбором настроек.
- В правой части выводится содержание выбранного пункта.
После создания подключения появляется окно в виде консоли, в которой происходит ввод команд для сервера.
Подключение по SSH
Работа с данным типом протоколов для подключения к удаленному серверу обоснована тем, что SSH полностью шифрует передаваемые данные (к ним относятся и пароли, передающиеся при подключении).
Сама процедура подключения по SSH аналогична всем типам соединения. Достаточно ввести IP-адрес и порт, после чего должно произойти подключение. Если этого не происходит, значит данные введены неверное.
После подключения доступны к выполнению все команды UNIX-систем.
Как сохранить сессию
Данная операция подразумевает сохранение информации об удаленном сервере, а также типе подключения.
Все что нужно – ввести название в поле ввода и нажать «Сохранить».
Сохранение имени пользователя
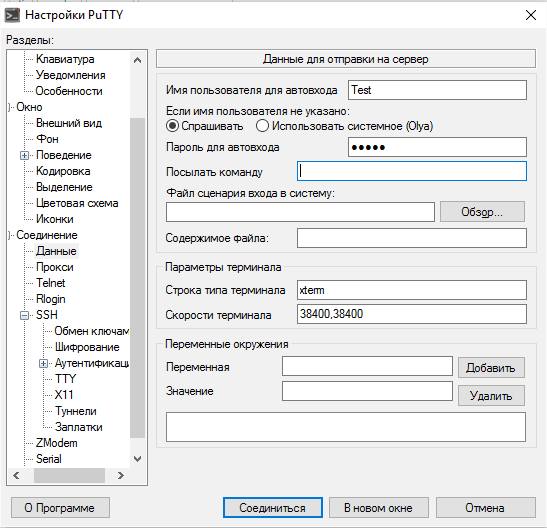
Для сохранения имени пользователя и пароля нужно перейти в пункт меню «Соединение», затем «Данные». Имя ввести в поле «Имя пользователя для автовхода», пароль, соответственно в форму «Пароль для автовхода».
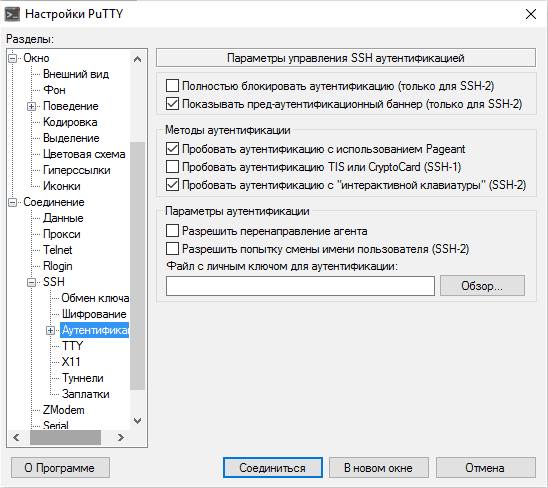
Авторизация по ключу SSH
Также, в PuTTY есть возможность авторизации по выданному сервером ключу. Ввести его можно в том же пункте «SSH», но уже в меню «Аутентификация», поле «Файл с личным ключом для аутентификации».
Для загрузки нужно нажать кнопку «Обзор» и выбрать ключ на накопителе или в папке.
Передача файлов через SCP
SCP – это утилита работающая по протоколу SSH. По сути – это команда, используя которую можно копировать и перемещать файлы по сети. Для передачи файлов с использованием SCP следует:
- Нажать на клавиатуре комбинацию клавиш «Win+R», и вписать в открывшееся поле «cmd».
- Элемент будет отправлен при условии соблюдения правильности ввода команды. Она имеет вид:
pscp опции путь_файлу имя_пользователя@хост:/путь_к_файлу_на_удаленном_хосте
- Для отправки тестового документа с названием «test.txt» от пользователя «root» нужно ввести следующую команду:
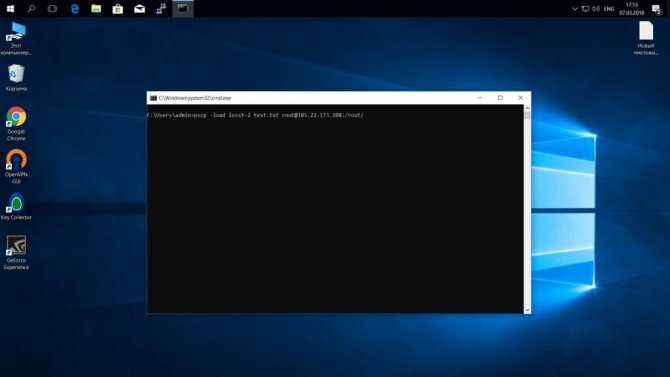
- Для того чтобы задать номер удаленного порта, нужно после фразы «pscp» добавить «—P», далее ввести имя порта и продолжить ввод описанной выше команды.
- Для восстановления настроек сессии нужно ввести фразу «-load» после «pscp».
Выбираем программу для моделирования и проектирования в 3D
Особенности программы
После установки программного обеспечения PuTTY на собственный компьютер, можно подключиться к маршрутизатору или модему, выполнять управление удаленным узлом. Разработчики задействовали современные технологии и реализовали исключительно клиентскую версию для отображения. Главные функции осуществляются на основном сервере.
Разработчики создавали программное обеспечение PuTTY для работы на операционной системе Microsoft Windows. Но спустя некоторое время платформу усовершенствовали и доработали для системы Unix. Сейчас лучшие специалисты трудятся над разработкой версий для Mac OS. Сторонними разработчиками уже выпущены неофициальные программы, которые можно устанавливать на смартфоны и мобильные устройства.
Пакет включает в себя исполняемые файлы, которые могут устанавливаться на любом локальном диске. Представленное программное – это приложение для свободного доступа клиентов. Оно оснащено открытой исходной кодировкой. Неофициальные разработчики предлагают скачать русскую версию PuTTY для работы.
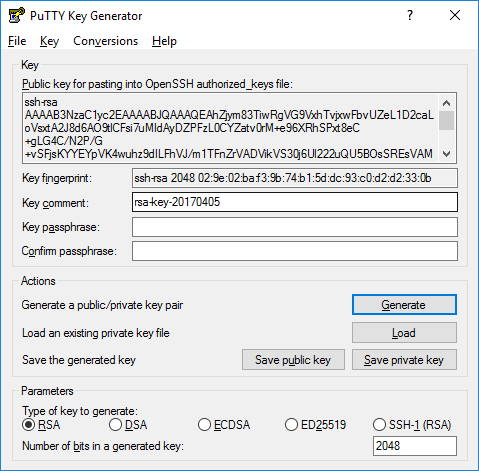
Creating a new key pair for authentication
To create a new key pair, select the type of key to generate from the bottom of the screen (using with 2048 bit key size is good for most people; another good well-known alternative is ).
Then click Generate, and start moving the mouse within the Window. Putty uses mouse movements to collect randomness. The exact way you are going to move your mouse cannot be predicted by an external attacker. You may need to move the mouse for some time, depending on the size of your key. As you move it, the green progress bar should advance.
Once the progress bar becomes full, the actual key generation computation takes place. This may take from several seconds to several minutes. When complete, the public key
should appear in the Window. You can now specify a passphrase for the key.
You should save at least the private key by clicking Save private key. It may be advisable to also save the public key, though it can be later regenerated by loading the private key (by clicking Load).

We strongly recommended using a passphrase be for private key files intended for interactive use. If keys are needed for automation (e.g., with WinSCP, then they may be left without a passphrase.
SSH Academy
IAM
IAM Zero Trust Framework
Gartner CARTA
Standing Privileges
Zero Standing Privileges (ZSP)
Ephemeral access
PrivX lean PAM
Identity management
Active Directory
Administrators
Domain administrators
Local administrators
Jump server
IAM Just in time
Just-in-time security tokens
Multi-Factor Authentication (MFA)
OpenID Connect (OIDC)
PAM (Privileged Access Management)
Legacy PAM
Password generator
Password strength
Password vaults
Privileged accounts
PASM
Privilege Elevation and Delegation Management
Privileged session management
Radius
Root accounts
Service accounts
System accounts
Sudo
Users
User IDs
Superuser
Vagrant
Cloud
Cloud applications
Cloud computing
Cloud computing characteristics
Cloud computing companies
Cloud computing definition
Cloud computing models
Cloud computing pros and cons
Cloud computing security
Cloud storage
Cloud technology
IaaS
PaaS
SaaS
SaaS companies
SaaS security
Secure Shell
Secure Shell
Secure Shell protocol
SSH software downloads
SSH certificate authentication
Ipsec
Network monitoring
Port 22
RCP
rlogin
RSH
SCP
Session key
Automated connections
SSH command
SSH configuration
SSHFS SSH File System
SSH for Windows
SSH servers
Tectia SSH Server
SSH server configuration
SSO using SSH agent
Telnet
WinSCP
SSH keys
CAC and PIV smartcards
OpenSSH key authorization
Passphrases
Passphrase generator
Copy ID
Host key
Authorized key
Authorized key file
SSH key basics
SSH key identities
SSH key management
Universal SSH Key Manager
SSH key proliferation
SSH keygen
SSH keys for SSO
Public key authentication
SSH compliance
SSH key compliance
Basel III
COBIT
Cybersecurity framework
Fips 140
Fips 199
Fips 200
GDPR
HIPAA
ISACA
ISACA SSH guide
ISO 27001
NERC-CIP
NIS directive
NIST 7966
NIST 7966 download
NIST 800-53
PCI-DSS
Sans Top 20
Sarbanes Oxley
sshd OpenSSH server process
PuTTY
PuTTY download
PuTTY manuals
PuTTY for Windows
PuTTY for Mac
PuTTY for Windows
PuTTY for Windows installation
PuTTY public keys
PuTTYgen for Linux
PuTTYgen for Windows
SSH tunneling example


