Настройка phpmyadmin и mysql на локальном хостинге денвер
Содержание:
Sponsorship
We welcome corporations (or individuals) to sponsor phpMyAdmin in a recurring way. The company can
receive various benefits depending on sponsorship level.
Sponsorship conditions and advantages
- A sponsor has to commit to a yearly amount depending on the sponsorship level
- Sponsorships are always on an annual basis and are not refundable once paid
- Within a sponsorship level, sponsors are listed in the chronological order of their joining the sponsorship program
- We reserve the right to change sponsorship levels in the future
- The logo (if applicable) needs to be a static image, PNG is preferred
- The link needs to point to the sponsor’s homepage
- The text (for text link or alternative text for image) can contain only your company name
- We’re not accepting sponsors in the following areas: adult content, gambling-related, binary options sites, or sites linking to illegal content
- The sponsorship terms are non negotiable and we do not provide any discounts to the sponsorship levels
Sponsorship levels
| Level | Yearly amount (USD) | Logo/link |
|---|---|---|
| Diamond | $20000 | 250×250 logo on home page and sponsors page |
| Platinum | $10000 | 250×130 logo on home page and sponsors page |
| Gold | $5000 | 250×70 logo or text link on home page and sponsors page |
| Silver | $2500 | 250×70 logo only on sponsors page |
| Bronze | $1000 | text link on sponsors page |
Sponsorship process
- Before starting the process make sure your sponsorship fits our . If unsure ask us at <donate@phpmyadmin.net>.
-
Please get in touch with us by
writing to <donate@phpmyadmin.net>
and we will provide you payment information together with invoice. -
The invoice can be paid by wire transfer, ACH, or
paper check, and instructions for payment will be provided with the
invoice. These methods of payment save the phpMyAdmin project a lot
in credit card processing fees, and puts more of your sponsorship to
work in supporting our project. For Bronze level you can pay conveniently
using PayPal. -
Received payment is processed by Software
Freedom Conservancy. This usually takes about one week, but might be
delayed in times they are heavily loaded. - Your link and/or logo is placed to our website (depending on your ).
New sponsors
phpMyAdmin is a member project of Software
Freedom Conservancy. Conservancy is
a not-for-profit organization that provides financial and administrative
assistance to open source projects. Since Conservancy is a 501(c)(3) charity
incorporated in New York, donors can often deduct the donation on their USA
taxes.
If you use phpMyAdmin or offer it to your customers, please consider
sponsoring the project with a yearly donation. The money will be used to
improve phpMyAdmin, bring phpMyAdmin developers to conferences and to cover
costs for services required to run the project.
Please note that we might refuse to link to some sites which
we consider unethical or inappropriate.
Thank you for your support!
phpMyAdmin 4.6.0-rc1 is released
2016-02-29
The phpMyAdmin team is pleased to announce release candidate version 4.6.0-rc1.
Notable changes since 4.6.0-alpha1 include security fixes and fixes to parsing of certain queries with the SQL parser library.
phpMyAdmin 4.6.0 will be a regular maintenance release including over 35 improvements. Please note that this release ends support for old versions of Microsoft Internet Explorer, which are no longer supported by Microsoft. There is a new configuration directive, $cfg which is useful in some cases with self-signed certificates. The ForceSSL and PmaAbsoluteUri configuration directives have been removed (the functions of both of these should better be handled by the webserver than the application).
A complete list of new features and bugs that have been fixed is available in the ChangeLog file or changelog.php included with this release.
A few highlights:
- Allow setting routine-wise privileges
- UI for defining partitioning in create table window
- Support JSON data type
- Editing partitions in table Structure
- Copy results to clipboard
- Reactivate cut&paste possibility in print view
- Display binary strings as text if they are valid UTF-8
- Copy multiple tables to database
- Show MySQL error messages in user language
There are many more improvements; please refer to the ChangeLog for full details.
As always, downloads are available at http://www.phpmyadmin.net/.
As always, thanks to our sponsors for helping to make this work possible!
The phpMyAdmin Team
phpMyAdmin 4.6.0 is released
2016-03-22
Welcome to phpMyAdmin 4.6.0, a regular maintenance release including over 60 new features and bug fixes. Please note that this release ends support for old versions of Microsoft Internet Explorer, which are no longer supported by Microsoft. There is a new configuration directive, $cfg which is useful in some cases with self-signed certificates. The ForceSSL and PmaAbsoluteUri configuration directives have been removed (the functions of both of these should better be handled by the webserver than the application).
A complete list of new features and bugs that have been fixed is available in the ChangeLog file or changelog.php included with this release.
A few highlights:
- Allow setting routine-wise privileges
- UI for defining partitioning in create table window
- Support JSON data type
- Editing partitions in table Structure
- Copy results to clipboard
- Reactivate cut&paste possibility in print view
- Display binary strings as text if they are valid UTF-8
- Copy multiple tables to database
- Show MySQL error messages in user language
- Add new configuration directive ‘ssl_verify’ for self-signed certificates with mysqlnd and PHP >=5.6
- Remove ForceSSL and PmaAbsoluteUri configuration directives (these are better handled by proper webserver configuration)
- Fixed several bugs relating to exporting, particularly with DEFAULT and COMMENT fields
There are many more improvements; please refer to the ChangeLog for full details.
As always, downloads are available at http://www.phpmyadmin.net/.
As always, thanks to our sponsors for helping to make this work possible!
phpMyAdmin 4.0.10.16, 4.4.15.7, and 4.6.3 are released
2016-06-23
The phpMyAdmin project announces the release of phpMyAdmin versions
4.0.10.16, 4.4.15.7, and 4.6.3. All versions feature many security fixes
that are announced as PMASA-2016-17 through PMASA-2016-28 which are
posted at https://www.phpmyadmin.net/security/.
Furthermore, version 4.6.3 includes the regularly scheduled maintenance
improvements and bug fixes. In addition to bugs affecting particular
version combinations, some of the other bugs fixed include:
- Fixing cookie path on Windows
- Fix MySQL SSL connections with some PHP versions
- Fix listing of routines for non-privileged user
As well as several more. Complete details are available in the ChangeLog.
We highly recommend updating all affected versions immediately.
Downloads are available at https://www.phpmyadmin.net/downloads.
We thank the many security researchers who found and reported these flaws.
phpMyAdmin 4.7.1 is released
2017-05-26
Welcome to phpMyAdmin 4.7.1, a regular maintenance release containing bug fixes.
A complete list of new features and bugs that have been fixed is available in the ChangeLog file or
changelog.php included with this release.
Notable changes since 4.7.0:
Fix broken links in setup script
Fix pagination while browsing results
Do not include developer dependencies when creating the release
Fix handling of errors in AJAX requests
Fix PHP error on password change
Fix refresh of long queries
Improved handling of logout with disabled LoginCookieDeleteAll
Add support for MySQL 8.0 collations
Fixed detection of Amazon RDS
Fix for grid editing repeating action after error
There are many more improvements; please refer to the ChangeLog for full details.
As always, downloads are available at https://www.phpmyadmin.net
Thanks to our sponsors for helping to make this work possible!
The phpMyAdmin Team
Настройка виртуального домена
Настройка виртуального домена зависит от веб-сервера, который мы используем. Разберем примеры для NGINX и Apache.
NGINX
Создаем конфигурационный файл для виртуального домена:
vi /etc/nginx/conf.d/phpMyAdmin.conf
server {
listen 80;
server_name phpmyadmin.dmosk.local;
set $root_path /usr/share/phpMyAdmin;
location / {
root $root_path;
index index.php;
}
location ~ \.php$ {
#fastcgi_pass 127.0.0.1:9000;
fastcgi_pass unix:/run/php-fpm/www.sock;
fastcgi_index index.php;
fastcgi_param SCRIPT_FILENAME $root_path$fastcgi_script_name;
include fastcgi_params;
fastcgi_param DOCUMENT_ROOT $root_path;
fastcgi_read_timeout 300;
}
}
* где:
listen — порт, на котором слушает nginx для данного домена.
server_name — домен для которого применяются настройки server. В данном примере phpmyadmin.dmosk.local.
root_path — переменная, в которую мы заносим наш путь до phpMyAdmin.
location / — настройки для запросов к серверу. В конкретном случае, мы используем root_path в качестве корневой директории для скриптов сайта; опция index нужна для поиска скрипта по умолчанию, если нет явного обращения клиентом.
location ~ \.php$ — параметры для обработки скриптов php. В нашем случае, мы обрабатываем скрипты с помощью php-fpm
Стоить обратить внимание, что последний может слушать на порту (по умолчанию, 9000) или через сокет-файл. В примере выше используется последний вариант, а способ с портом закомментирован.
fastcgi_pass — данный параметр важен и зависит от настройки php-fpm
Если последний слушает на порту, мы задаем первый вариант (который закомментирован), иначе — указываем путь до сокетного файла.
Проверяем корректность настройки nginx:
nginx -t
… и если ошибок нет, перезапускаем сервис:
systemctl restart nginx
Apache
Создаем конфигурационный файл для виртуального домена:
vi /etc/httpd/conf.d/phpMyAdmin.conf
<VirtualHost *:80>
Define root_domain phpmyadmin.dmosk.local
Define root_path /usr/share/phpMyAdmin
ServerName ${root_domain}
ServerAlias www.${root_domain}
DocumentRoot ${root_path}
<Directory /usr/share/phpMyAdmin>
AllowOverride All
Options Indexes ExecCGI FollowSymLinks
Require all granted
</Directory>
</VirtualHost>
Проверяем корректность настройки apache:
apachectl configtest
… и если ошибок нет, перезапускаем сервис:
systemctl restart httpd
Шаг 2 — Настройка аутентификации и прав пользователя
При установке phpMyAdmin на ваш сервер автоматически создал пользователь базы данных с именем phpmyadmin, который отвечает за определенные базовые процессы программы. Вместо того, чтобы выполнять вход с помощью этого пользователя и пароля администратора, которые вы задали при установке, рекомендуется войти с использованием вашего пользователя root MySQL или пользователя, предназначенного для управления базами данных через интерфейс phpMyAdmin.
Настройка доступа по паролю для учетной записи root в MySQL
В системах Ubuntu при запуске MySQL 5.7 (и более поздние версии) для пользователя root MySQL по умолчанию устанавливается аутентификация с помощью h_socket, а не пароля. Это позволяет обеспечить большую безопасность и удобство во многих случаях, однако это также может осложнить ситуацию, когда вам нужно предоставить внешней программе, например, phpMyAdmin, доступ к пользователю.
Чтобы войти в phpMyAdmin с пользователем root MySQL, вам нужно переключить метод аутентификации с на метод. использующий пароль, если вы еще не сделали этого. Для этого откройте командную строку MySQL через терминал:
Затем проверьте, какой метод аутентификации используют ваши аккаунты пользователей MySQL с помощью следующей команды:
В этом примере вы можете видеть, что пользователь root действительно использует метод аутентификации с помощью плагина . Чтобы настроить для учетной записи root аутентификацию с помощью пароля, выполните следующую команду . Обязательно измените значение на надежный пароль по вашему выбору:
Примечание. Предыдущее выражение устанавливает аутентификацию пользователя root MySQL с помощью плагина . , считается предпочтительным плагином аутентификации MySQL, так как он обеспечивает более защищенное шифрование пароля, чем более старая, но все еще широко используемая версия .
Однако некоторые версии PHP работают ненадежно с . Как сообщается, эта проблема была устранена в версии PHP 7.4, но если вы получите ошибку при попытке выполнить вход в phpMyAdmin позднее, вы можете задать для root аутентификацию с помощью :
Затем проверьте методы аутентификации, применяемые для каждого из ваших пользователей, чтобы подтвердить, что пользователь root больше не использует для аутентификации плагин :
В этом выводе вы можете увидеть, что пользователь root user будет использовать аутентификацию по паролю. Теперь вы можете выполнить вход в интерфейс phpMyAdmin с помощью пользователя root с паролем, который вы задали ранее.
Настройка доступа по паролю для выделенного пользователя MySQL
Некоторые могут посчитать, что для их рабочего процесса лучше подходит подключение к phpMyAdmin с помощью специально выделенного пользователя. Чтобы сделать это, снова откройте командную строку MySQL:
Если вы активировали аутентификацию по паролю для вашего пользователя root, как описано в предыдущем разделе, вам нужно запустить следующую команду и ввести пароль при запросе для подключения:
Создайте нового пользователя и придумайте для него надежный пароль:
Примечание. В зависимости от версии PHP, которую вы установили, вы можете задать для вашего нового пользователя аутентификацию с помощью вместо :
Затем предоставьте вашему новому пользователю соответствующие права. Например, вы можете предоставить пользователю права доступа ко всем таблицам в базе данных, а также можете добавлять, изменять и удалять права пользователя с помощью этой команды:
После этого закройте командную строку MySQL:
Теперь вы можете получить доступ к веб-интерфейсу, набрав доменное имя или открытый IP-адрес вашего сервера и добавив :
Выполните вход в интерфейс с помощью пользователя root или с новым именем пользователя и паролем, которые вы только что задали.
При входе вы увидите пользовательский интерфейс, который будет выглядеть следующим образом:
Теперь, когда вы можете подключаться и взаимодействовать с phpMyAdmin, осталось только установить более жесткие правила безопасности системы, чтобы защитить ее от атак.
phpMyAdmin 4.7.7 is released
2017-12-23
Welcome to phpMyAdmin 4.7.7, a regular maintenance release containing bug fixes and a security fix.
The security vulnerability is a XSRF/CSRF flaw; you can read more at https://www.phpmyadmin.net/security/PMASA-2017-9/
As a result of this, we recommend all users upgrade immediately. This attack has been designated CVE-2017-1000499.
A complete list of new features and bugs that have been fixed is available in the ChangeLog file or
changelog.php included with this release.
Notable changes since 4.7.6:
- Fixed displaying of formatted numeric values for some locales
- Fixed PHP error when browsing certain results
There are several more improvements; please refer to the ChangeLog for full details.
As always, downloads are available at https://www.phpmyadmin.net
Thanks to our sponsors for helping to make this work possible!
The phpMyAdmin Team
Шаг 1 — Установка phpMyAdmin
Вы можете использовать APT для установки phpMyAdmin из репозиториев Ubuntu по умолчанию.
Обновите индекс пакетов вашего сервера от имени пользователя без прав root с привилегиями sudo:
После этого вы можете установить пакет . Помимо этого пакета, официальная документация также рекомендует установить несколько расширений PHP на ваш сервер для возможности использования определенной функциональности и улучшения производительности.
Если вы выполнили предварительное требования руководства для стека LAMP, ряд из этих модулей уже был установлен вместе с пакетом . Однако рекомендуется также установить следующие пакеты:
- : модуль для работы с строками, не поддерживающими кодировку ASCII, и конвертации таких строк в другие кодировки
- : это расширение поддерживает загрузку файлов в phpMyAdmin
- : поддержка библиотеки GD Graphics
- : поддержка сериализации JSON для PHP
- : позволяет PHP взаимодействовать с разными типами серверов, используя разные протоколы
Запустите следующую команду для установки этих пакетов в систему
Обратите внимание, что процесс установки требует, чтобы вы ответили на ряд вопросов для корректной настройки phpMyAdmin. Мы кратко пробежимся по этим параметрам:
Здесь представлены параметры, которые вы должны выбрать при запросе для корректной настройки вашей установки:
-
Для выбора сервера вы можете выбрать
Предупреждение. При появлении запроса вариант «apache2» выделен, но не выбран. Если вы не нажмете для выбора Apache, установщик не будет перемещать необходимые файлы при установке. Нажмите , затем , а потом для выбора Apache. - Выберите при ответе на вопрос о том, необходимо ли использовать для настройки базы данных.
- Затем вам будет предложено выбрать и подтвердить пароль приложения MySQL для phpMyAdmin
Примечание. Если вы установили MySQL, следуя указаниям , вы, возможно, активировали плагин Validate Password. На момент написания этого руководства активация этого компонента будет вызывать ошибку при попытке задать пароль пользователя phpmyadmin:

Для устранения этой проблемы выберите опцию abort для остановки процесса установки. Затем откройте командную строку MySQL:
Либо, если вы активировали аутентификацию по паролю для пользователя с правами root MySQL, запустите эту команду, а затем введите пароль при запросе:
Из командной строки запустите следующую команду для отключения компонента Validate Password
Обратите внимание, что в этом случае выполняется не удаление, а простая остановка загрузки компонента на ваш сервер MySQL:. После этого вы можете закрыть клиент MySQL:
После этого вы можете закрыть клиент MySQL:
Затем попробуйте еще раз установить пакет , после чего все будет работать ожидаемым образом:
После установки phpMyAdmin вы можете открыть командную строку MySQL еще раз с помощью или , а затем запустить следующую команду для повторной активации компонента Validate Password:
В процессе установки будет добавлен файл конфигурации phpMyAdmin в каталог , где он будет считываться автоматически. Для завершения настройки Apache и PHP для работы с phpMyAdmin выполните последнюю оставшуюся задачу этого раздела руководства и явно активируйте расширение PHP с помощью следующей команды:
Перезапустите Apache для вступления изменений в силу.
Теперь phpMyAdmin установлен и настроен для работы с Apache. Однако, прежде чем вы сможете войти и начать взаимодействие с базами данных MySQL, вам нужно убедиться, что у пользователей MySQL есть права, необходимые для взаимодействия с программой.
phpMyAdmin 4.9.3 is released
2019-12-26
Welcome to phpMyAdmin 4.9.3, a routine bugfix release. This release is occurring simultaneously with the release of phpMyAdmin 5.0.0, which is our recommended version except for users with older PHP installations.
This is planned as the final bugfix release of phpMyAdmin version 4. Version 4 works with PHP versions 5.5 through (at least) 7.4,
and MySQL versions 5.5 and newer (and the corresponding MariaDB versions). Version 5 will require PHP 7.1 or newer, but
we plan to maintain security fixes for version 4 as part of our LTS program. For end of life details and supported
versions, please see the «Supported versions» grid at https://www.phpmyadmin.net/downloads/.
This release includes fixes for many bugs, including:
- Several PHP notices and warnings including «Undefined index table_create_time,»
a notice about error_reporting() being disabled for security reasons, and several Undefined Index errors. - Support CloudFront-Forwarded-Proto header for Amazon CloudFront proxy
- Early compatibility with development versions of PHP 8
- Fix replication actions (start, stop, etc)
There are many, many more bug fixes thanks to the efforts of our developers and other contributors.
For full details, you can see the ChangeLog file included with this release.
phpMyAdmin’s Google Summer of Code 2018 projects
2018-04-23
The phpMyAdmin project is please to announce the students and projects that have been selected for participation in Google Summer of Code 2018.
This year the final selections were exceptionally difficult; we received applications from many students that were worthy of being selected. We wish the best to the students who were not selected and hope they’ll continue to stay involved and apply again next year.
The students and projects are:
- Lakshya Arora, working on general improvements and project enhancements
- Piyush Vijay, modernizing the JavaScript used throughout the project
- Saksham Gupta, improving themes through an automated theme generating tool
- Leonardo Strozzi, improving the use of the Twig templating engine
Security fix: phpMyAdmin 4.8.3 is released
2018-08-22
The phpMyAdmin team is pleased to announce the release of phpMyAdmin version 4.8.3. Among other bug fixes, this contains a security fix for an issue that can be exploited when importing files.
A flaw was discovered with how warning messages are displayed while importing a file. This attack requires a specially-crafted file but can allow an attacker to trick the user in to executing a cross-site scripting (XSS) attack. We recommend updating immediately to mitigate this attack.
In addition to the security fixes, this release also includes these bug fixes and more as part of our regular release cycle:
- An error where a database is named 0
- Fix for NULL as default not being shown
- Fix for recent tables list
- Fix for slow performance with table filtering
- Two-factor authentication (2FA) fails if the GD PHP library is missing
- Event scheduler toggle does not work
- ERR_BLOCKED_BY_XSS_AUDITOR error when exporting a table
- PHP 7.3 warning: «continue» in «switch» is equal to «break»
And several more. Complete notes are in the ChangeLog file included with this release.
Предварительные требования
Прежде чем приступить к изучению данного руководства, вам нужно выполнить несколько базовых действий.
Во-первых, мы полагаем, что ваш сервер имеет пользователя user без root прав с привилегиями , а также брандмауэр с , как указано в руководстве по начальной настройке сервера для Ubuntu 18.04.
Мы также предполагаем, что вы выполнили установку LAMP (Linux, Apache, MySQL и PHP) на вашем сервере с Ubuntu 18.04. Если вы еще не сделали этого, вы можете воспользоваться данным руководством по установке стека LAMP на Ubuntu 18.04.
Наконец, существует ряд важных соображений безопасности при использовании таких программных средств, как phpMyAdmin, поскольку phpMyAdmin:
- напрямую связывается с установленной у вас версией MySQL;
- управляет аутентификацией, используя учетные данные MySQL;
- исполняет и возвращает результаты для произвольных SQL запросов.
По этим причинам, и поскольку это широко применяемое PHP приложение, которое часто становится мишенью для атак, вы ни при каких условиях не должны запускать phpMyAdmin на удаленных системах, используя обычное HTTP-соединение. Если у вас нет существующего домена с настроенным SSL/TLS сертификатом, вы можете воспользоваться следующим руководством по обеспечению безопасности Apache с помощью Let’s Encrypt в Ubuntu 18.04. Для этого вам потребуется зарегистрировать доменное имя, создать DNS запись для вашего сервера и .
После завершения этих шагов вы будете готовы начать работу с данным руководством.
phpMyAdmin 4.7.6 is released
2017-12-01
Welcome to phpMyAdmin 4.7.6, a regular maintenance release containing bug fixes.
A complete list of new features and bugs that have been fixed is available in the ChangeLog file or
changelog.php included with this release.
Notable changes since 4.7.5
- Fixed ‘check all’ interaction with filtering
- Add SJIS-win to default list of allowed charsets
- Improve detection that MySQL server needs SSL connection
- Support JSON datatype on MariaDB 10.2.7 and newer
- Fixed constructing ALTER query with AFTER
- Fixed changing password on MariaDB cluster
There are several more improvements; please refer to the ChangeLog for full details.
As always, downloads are available at https://www.phpmyadmin.net
Thanks to our sponsors for helping to make this work possible!
phpMyAdmin 4.6.5.2 is released
2016-12-05
Welcome to phpMyAdmin version 4.6.5.2, a patch-level release which fixes an issue with exporting certain character sequences including a backslash (\), such as \r\n.
Because this issue #12765 affects export functionality, we do recommend updating when possible.
As always, downloads are available at https://www.phpmyadmin.net/downloads/
Previously fixed in 4.6.5.1:
- an issue affecting a small number of users using $cfg or $cfg.
- an issue affecting the create table dialog where the partition selection tool was overzealous and made it difficult to create a new table.
Highlights from the 4.6.5 release:
- Fix for expanding in navigation pane
- Reintroduced a simplified version of PmaAbsoluteUri directive (needed with reverse proxies)
- Fix editing of ENUM/SET/DECIMAL field structures
- Improvements to the parser
A full list of changes is available in the ChangeLog file included with every release.
Themes
phpMyAdmin supports themes since version 2.6.0. All themes are not compatible
with all phpMyAdmin versions; you should select below which version you are
using.
Please note that themes contain PHP code and you should download them only
from trusted servers. All themes available on this page have been checked by
phpMyAdmin team members.
To install a theme, unzip your downloaded theme into the directory /themes/ of
your phpMyAdmin folder. When you open phpMyAdmin, you should be able to select the theme.
Please read the documentation for more details.
You can try the themes in action on our demo server.
Since July 2015 all phpMyAdmin releases are cryptographically signed by the
releasing developer. You should verify that the signature matches the archive
you have downloaded. Verification instructions are placed in our
documentation in the chapter.
phpMyAdmin Project Successfully Completes Security Audit
2016-06-13
Code is Robust with No Serious Vulnerabilities Found
Software Freedom Conservancy congratulates its phpMyAdmin project on succesfuly completing completing a thorough security audit, as part of Mozilla’s Secure Open Source Fund. No serious issues were found in the phyMyAdmin codebase.
Mozilla launched the SOS Fund as part of its Open Source Support Program. The SOS Fund focuses on auditing, remediation, and verification for key open source software projects. Conservancy’s phpMyAdmin project was one of the first projects selected for the program. The security audit was performed by NCC Group. The phpMyAdmin team participated actively in the audit, making its key members available to the NCC Group team. As the audit states, the project has been one of the defacto tools for managing and maintaining MySQL databases for years. Its wide adoption matched with its potential for misuse, warrants
regular review from a security perspective.
While no serious issues were found, the audit team found 3 medium risk and 5 low risk vulnerabilities, plus one informational issue. Most of these issues are already fixed in 4.6.2 release, and the more severe issues were covered by PMASA-2016-14, PMASA-2016-15 and PMASA-2016-16. The fixes were backported to older releases as well.
We at the phpMyAdmin project are excited to have been one of the early
said project team member Isaac Bennetch,
programs selected by the Mozilla SOS Fund,We appreciate Mozilla’s dedication to ensuring making software more secure and are pleased that no serious flaws were found during the phpMyAdmin audit.
phpMyAdmin 4.7.5 is released
2017-10-23
Welcome to phpMyAdmin 4.7.5, a regular maintenance release containing bug fixes.
A complete list of new features and bugs that have been fixed is available in the ChangeLog file or
changelog.php included with this release.
Notable changes since 4.7.4:
- Fixed JavaScript error in server monitor
- Reload JavaScript translations when changing language
- Fixed error when browsing non-SELECT results
- Fixed export of table with VIRTUAL columns
- Fixed incorrectly selecting the next row when selecting multiple rows
- Fixes for input transformations
There are many more improvements; please refer to the ChangeLog for full details.
As always, downloads are available at https://www.phpmyadmin.net
Thanks to our sponsors for helping to make this work possible!
Как Установить phpMyAdmin на CentOS 7
Давайте рассмотрим пошагово процесс установки phpMyAdmin на CentOS 7:
1. Доступ к Вашему VPS
Прежде чем начать, нам нужно получить доступ к вашему VPS-серверу по SSH! Если у вас возникли проблемы, ознакомьтесь с нашим руководством по PuTTY!
2. Установка Веб-сервера Apache
Первым условием phpMyAdmin является веб-сервер Apache. Используйте следующую команду для установки Apache на ваш виртуальный частный сервер CentOS 7:
Затем проверьте статус Apache с помощью команды:
Далее мы должны убедиться, что Apache запущен. Введите IP-адрес вашего сервера в адресную строку браузера. Вы должны увидеть splash screen тестирования Apache:

3. Установка Репозитория EPEL
phpMyAdmin входит в репозиторий EPEL (дополнительные пакеты для корпоративного Linux). Для доступа к EPEL необходимо установить специальный пакет — epel-release. Используйте следующую команду для установки epel-release на CentOS:
Теперь, когда репозиторий EPEL доступен, мы можем приступить к установке phpMyAdmin на CentOS 7.
4. Установка phpMyAdmin на CentOS 7
Выполните следующую команду:
После завершения установки вам нужно будет отредактировать файл конфигурации phpMyAdmin.
5. Настройка Файла phpMyAdmin.conf
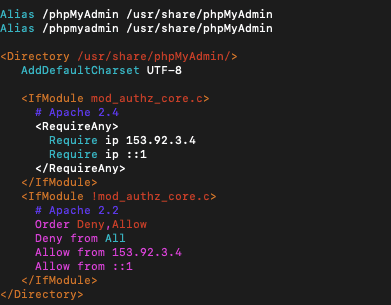
В результате редактирования вы получите удалённый доступ к клиенту phpMyAdmin. Мы откроем файл phpMyAdmin.conf, расположенный в каталоге /etc/httpd/conf.d/, с помощью редактора vim:
Здесь вы увидите четыре разные строки ip require, соответствующие длинным IP-адресам. Значением по умолчанию является 127.0.0.1. Замените это значение на IP-адрес компьютера, который вы будете использовать для доступа к phpMyAdmin. Вы можете использовать такой инструмент, как WhatsMyIP, чтобы проверить свой IP. Сохраните и выйдите из файла, нажав escape и напечатав :wq.
Вы можете увидеть пример файла phpMyAdmin.conf ниже:
7. Проверяем, Работает ли phpMyAdmin
Наконец, мы можем открыть утилиту phpMyAdmin, введя IP-адрес вашего сервера в адресной строке браузера с помощью строки добавления phpmyadmin, например, 127.0.0.1/phpmyadmin. Там вы должны увидеть экран входа в систему.
8. Найдите Своё Имя Пользователя и Пароль phpMyAdmin
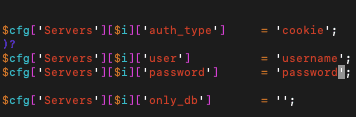
Ваше имя пользователя и пароль будут находиться в файле config.inc.php. Файл в свою очередь будет в установочном каталоге phpMyAdmin. Для нас это /etc/phpMyAdmin.
Откройте файл с помощью редактора vim:
Внутри вы можете установить имя пользователя и пароль, как показано на скриншоте ниже:
Сохраните и выйдите из файла, нажав esc и :wq, как и раньше.


