Getting started with obs studio development
Содержание:
Меню настроек
Данная область программы представляет собой набор настраиваемых параметров для организации ведения стримов и записи видео.
Общие
Включает в себя следующие разделы:
- «Общие». Содержит параметр выбора языков, темы (светлая или темная), отображения статистики и автоматической проверки обновления;
- «Вывод». Включает различные опции для работы с трансляцией;
- «Привязка расположения источника». Позволяет настроить чувствительность привязки и область экрана для нее;
- «Проекторы». Настройка параметров проектора в окне для вывода видео;
- «Система трей». Позволяет включить сокрытие окна в меню «Пуск»;
- «Режим студии». Содержит параметры для работы со сценами и мульти-обзором.
Вещание
- «Тип вещания». Позволяет настроить пользовательский сервис для вещания, либо выбрать из списка предложенных;
- «Сервис». Содержит список ресурсов для вещания (Twitch, YouTube и другие);
- «Сервер». Включает список серверов на различных континентах и их автоматический поиск;
- «Ключ потока». Область ввода спеицального кода с ресурса, на котором будет проводиться трансляция.
Вывод
- «Режим вывода». Включает в себя простой и расширенный режимы;
- «Потоковое вещание». Опции настройки качества стрима. В расширенном режиме позволяет настроить несколько потоков одновременно;
- «Запись». Выбор параметров пути, качества и формата видео;
- «Аудио». Опция, доступная при расширенном режиме вывода и отвечающая за качество используемых звуковых дорожек;
- «Буфер повтора». Позволяет активировать дополнительную опцию при расширенном режиме.
Содержит различные настройки по частоте дискретизации, каналам, подключаемым аудиоустройствам и микрофонам.
Раздел «Видео» включает в себя параметры по настройке разрешений, масштабированию и уровню FPS.
Горячие клавиши
Раздел позволяет настроить различные функциональные клавиши для быстрого управления записью, переключению сцен и работе со звуком.
Расширенные
- «Общие» — содержит настройки приоритета процесса;
- «Видео» — позволяет настроить функции рендера, цветового формата, пространства и диапазона;
- «Аудио» — выбор устройства прослушивания звука из имеющихся, а также функция отключения шума операционной системы;
- «Запись» — позволяет установить формат имени готового файла;
- «Задержка потока» — включение функции с настраиваемой продолжительностью;
- «Автопереподключение» — функция повторного подключения в случае потери соединения с сервисом для трансляции;
- «Сеть» — содержит в себе привязку к определенному IP-адресу с функцией подключения сетевого кода и режимом низкой задержки.
Properties
Properties (see libobs/obs-properties.h) are used to automatically
generate user interface to modify settings for a libobs object (if
desired). Each libobs object has a get_properties callback which is
used to generate properties. The properties API defines specific
properties that are linked to the object’s settings, and the front-end
uses those properties to generate widgets in order to allow the user to
modify the settings. For example, if you had a boolean setting, you
would use to allow the user to be
able to change that setting. See the Properties API Reference (obs_properties_t) for
more information.
An example of this:
static obs_properties_t *my_source_properties(void *data)
{
        obs_properties_t *ppts = obs_properties_create();
        obs_properties_add_bool(ppts, "my_bool",
                        obs_module_text("MyBool"));
        UNUSED_PARAMETER(data);
        return ppts;
}

...

struct obs_source_info my_source {
        .get_properties = my_source_properties,
        ...
};
The data parameter is the object’s data if the object is present.
Typically this is unused and probably shouldn’t be used if possible. It
can be null if the properties are retrieved without an object associated
with it.
Properties can also be modified depending on what settings are shown.
For example, you can mark certain properties as disabled or invisible
depending on what a particular setting is set to using the
function.
For example, if you wanted boolean property A to hide text property B:
Как настроить ведение стрима или запись изображения
Ведение стрима осуществляется через два основных раздела данного программного обеспечения – «Сцены» и «Источники».При желании, можно добавить несколько сцен с различными источниками (отображаемыми компонентами) для
более удобного проведения трансляции.
При первом запуске обс будет доступна одна пустая сцена, которую в дальнейшем можно настроить.
Для добавления нового источника необходимо нажать на «+» в соответствующем разделе и выбрать один из предлагаемых параметров. К примеру, для съемки обучающих видеороликов по пользованию программами можно использовать «Захват
экрана», а для игр подойдет «Захват игры».
Выбрав нужный параметр, откроется окно, в котором можно поменять название источника и настроить его отображение.
Добавив источник, в окне предварительно просмотра будет отображаться экран, игра или текст, в зависимости от типа этого источника.
Организация проведения трансляции
Для начала трансляции требуется зайти в «Настройки» и в разделе «Вещание» выбрать сервис, на который будет транслироваться видеозапись. Для всех сервисов трансляции необходимо будет ввести «Ключ потока», который привязан
к аккаунту пользователя.
Стоит отметить, что данный ключ не рекомендуется передавать третьим лицам, которые смогут транслировать на канал любой материал. Стоит также отметить, что выбор сервиса зависит от местоположения пользователя. Для
более качественной работы трансляции следует выбирать сервер, находящийся как можно ближе к месту проведения стрима.
После завершения всех необходимых настроек, в разделе «Управление» нужно нажать на кнопку «Запустить трансляцию». При правильных настройках вещание будет вестись на выбранный сервер.
Организация записи изображения
Запись видео не требует настроек сервиса для трансляции и осуществляется путем нажатия на кнопку «Начать запись» в разделе «Управление». После чего начнется запись, которую можно завершить кнопкой «Остановить запись».
Готовые видеозаписи можно просмотреть, нажав на «Файл» – «Показать записи». По умолчанию они сохраняются на диск с установленной операционной системой.
Core OBS Signals
source_create (ptr source)
source_destroy (ptr source)
source_remove (ptr source)
source_save (ptr source)
source_load (ptr source)
source_activate (ptr source)
source_deactivate (ptr source)
source_show (ptr source)
source_hide (ptr source)
source_rename (ptr source, string new_name, string prev_name)
source_volume (ptr source, in out float volume)
source_transition_start (ptr source)
source_transition_video_stop (ptr source)
source_transition_stop (ptr source)
channel_change (int channel, in out ptr source, ptr prev_source)
master_volume (in out float volume)
hotkey_layout_change ()
hotkey_register (ptr hotkey)
hotkey_unregister (ptr hotkey)
hotkey_bindings_changed (ptr hotkey)
Video, Audio, and Graphics
- void (void)
-
Helper function for entering the OBS graphics context.
- void (void)
-
Helper function for leaving the OBS graphics context.
- *(void)
-
Returns: The main audio output handler for this OBS context
- *(void)
-
Returns: The main video output handler for this OBS context
- void (uint32_t channel, *source)
-
Sets the primary output source for a channel.
- *(uint32_t channel)
-
Gets the primary output source for a channel and increments the reference
counter for that source. Use to release.
- *(enum obs_base_effect effect)
-
Returns a commoinly used base effect.
Parameters:
- void (void)
-
Renders the main view.
Note: This function is deprecated.
- void (void)
-
Renders the main output texture. Useful for rendering a preview pane
of the main output.
- void (float volume)
-
Sets the master user volume.
- float (void)
-
Returns: The master user volume
- void (obs_enum_audio_device_cb cb, void *data)
-
Enumerates audio devices which can be used for audio monitoring.
Relevant data types used with this function:
typedef bool (*obs_enum_audio_device_cb)(void *data, const char *name, const char *id);
- bool (const char *name, const char *id)
-
Sets the current audio device for audio monitoring.
- void (const char **name, const char **id)
-
Gets the current audio device for audio monitoring.
- void (void (*draw)(void *param, uint32_t cx, uint32_t cy), void *param)
- void (void (*draw)(void *param, uint32_t cx, uint32_t cy), void *param)
-
Adds/removes a main rendering callback. Allows custom rendering to
the main stream/recording output.
OBS is dropping frames. How can I fix this?
When the «Dropped frames» counter is increasing and the connection square is yellow or red, this means that your connection to the server* isn’t stable or that it can’t keep up with your set bitrate. Because of this, OBS was forced to drop some of the video frames in order to compensate. OBS opts to drop the frames to avoid buffering and keep your stream playing. You can check out our detailed guide here for more info, and what options you have to correct the issue: https://obsproject.com/wiki/Dropped-Frames-and-General-Connection-Issues
* When we say «server», this means the server of the service that you’re streaming to (eg Twitch, YouTube, etc). There are no OBS servers — the connection goes directly from your computer to the streaming service. Even if the OBS website and everything else run by us went offline, you can still stream with OBS as there is no dependency on anything run by the OBS Project. Any connection problems are between you and the service you’re streaming to.
Как пользоваться?
Важно. Перед тем как начать работать, необходимо скачать программу с официального сайта, она бесплатная.. После установки и запуска программы перед вами открывается главный экран
После установки и запуска программы перед вами открывается главный экран.
- Файл.
- Редактировать.
- Вид.
- Профиль.
- Коллекция сцен.
- Инструменты.
- Справка.
В нижней части расположены экраны:
- Сцены.
- Источники.
- Микшер.
- Переходы между сценами.
- Управление.
Справа внизу показывается сколько времени вы находитесь в прямом эфире, сколько записывается вообще видео, нагрузка вашего процессора, и частота обновления кадров (FPS).
Как сделать захват игры и начать запись с экрана:
- В графе сцена нажмите на «+» и в открывшемся окне придумайте свой сцене название.
- Далее необходимо выбрать источник для видео. После нажатия «+» в соответствующей графе перед вами откроется их список. Выбрать необходимо пункт «Захват окна». В новом окне поставьте галочку рядом с надписью «Сделать источник видимым». Далее требуется выбрать откуда будет записываться видео. Чтобы игра появилась в поле выбора окна, ее необходимо запустить.
- В микшере производится настройка звука. Здесь можно регулировать громкость, включать и выключать звук во время записи.
- После всех настроек в правой части экрана нажмите «Начать запись» и видео начнет записываться.
- В верхнем меню программы открыть настройки.
- Выбрать пункт кодировани, в котором необходимо указать «Максимальный битрейт» (скорость интернета). Узнать его можно в интернете.
- Перейти во вкладку трансляция и выбрать «Прямой эфир».
Затем нужно выбрать сервер (для России ближайшие сервера находятся в Праге, Стокгольме и Лондоне).
В графе Stream Key (ключ трансляции) указать ключ вашей трансляции на Твич.
Найти его можно в личном кабинете вашего аккаунта.
- Во вкладке видео необходимо выбрать видеокарту, с которой будет идти трансляция.
Если видеокарта одна, то она выберется автоматически и ничего менять не нужно.
- Вкладка аудио – здесь настройки выставляются автоматически.
- Расширенные – установить «Время буферизации» 400.
- Далее следует действовать по алгоритму записи экрана, но вместо записи необходимо нажать «Начать трансляцию».
Важно. Чтобы стримить разные игры создавайте сцены для каждой их них.
Установка
Чтобы установить программу на операционную систему Виндовс, необходимо запустить файл «OBS-Studio-18.0.1-Full-Installer». Дистрибутив можно найти в папке «Загрузки».
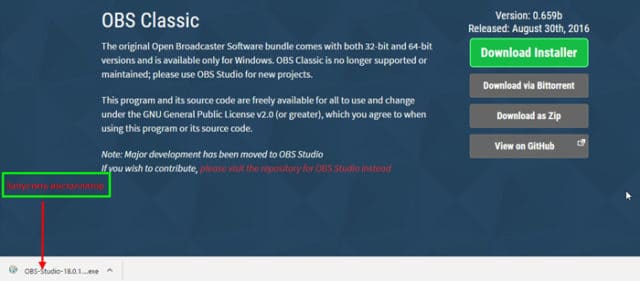
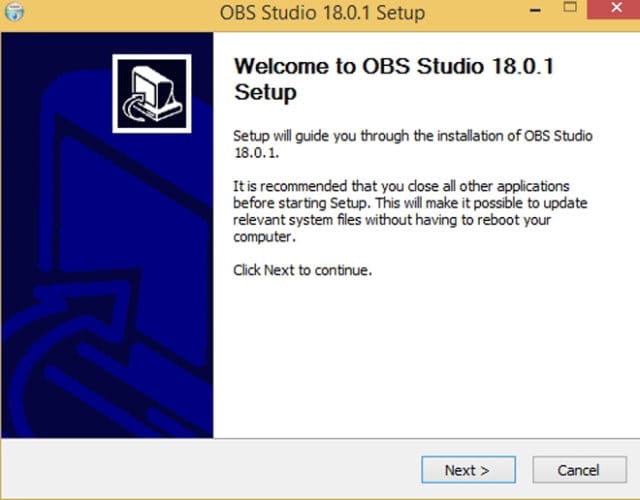
Сразу после запуска дистрибутива, появится окно мастера установки. Для продолжения инсталляционного процесса требуется кликнуть по кнопке «Next».
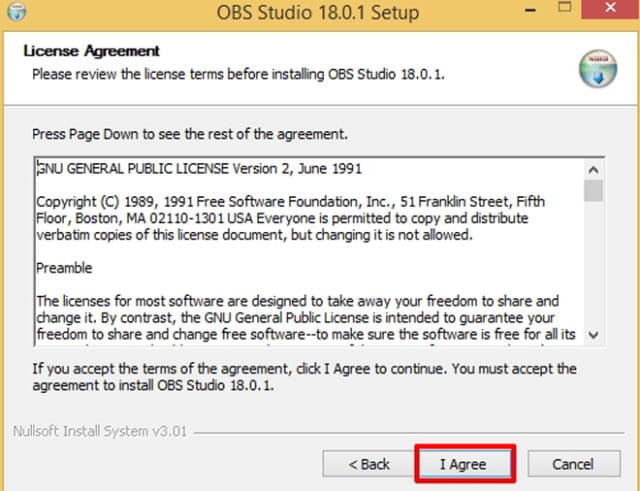
После этого откроется форма с текстом лицензионного соглашения. Чтобы принять его, требуется кликнуть по кнопке «I Agree». При желании можно прочитать текст, но он на английском языке, поэтому пользователям не владеющим языком, следует воспользоваться переводчиком.
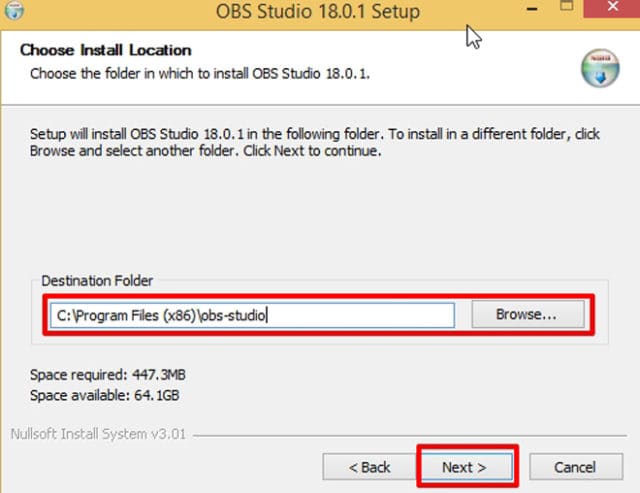
Когда откроется следующая форма, пользователям нужно будет выбрать директорию для установки. Следует отметить, что выбранную по умолчанию папку можно не изменять. Для продолжения установки достаточно кликнуть по кнопке «Next».
Завершающим этапом подготовки будет выбор плагинов, которые установятся вместе с программой.

Инсталляционный процесс занимает несколько минут. Чтобы разобраться с OBS рекомендуется дополнительно скачать мануал.
Functions
- void (struct *source_list)
-
Releases sources within a source list and frees the list.
Parameters:
- void *(void)
-
Returns: The QMainWindow pointer to the OBS Studio window.
- void *(void)
-
Returns: The native window handle of the OBS Studio window.
- char **(void)
-
Returns: The scene name list, ending with NULL. The list is stored
within one contiguous segment of memory, so freeing the
returned pointer with will free the entire
list.
- void (struct *sources)
-
Parameters:
- *(void)
-
Returns: A new reference to the currently active scene.
- void ( *scene)
-
Parameters:
- void (struct *sources)
-
Parameters:
- *(void)
-
Returns: A new reference to the currently active transition.
- void ( *transition)
-
Parameters:
- int (void)
-
Returns: The transition duration (in milliseconds) currently set in the UI.
- void (int duration)
-
Parameters:
- char **(void)
-
Returns: The list of profile names, ending with NULL. The list is
stored within one contiguous segment of memory, so freeing
the returned pointer with will free the
entire list.
- char *(void)
-
Returns: A new pointer to the current scene collection name. Free
with .
- void (const char *collection)
-
Parameters:
- char **(void)
-
Returns: The list of profile names, ending with NULL. The list is
stored within one contiguous segment of memory, so freeing
the returned pointer with will free the
entire list.
- char *(void)
-
Returns: A new pointer to the current profile name. Free with
.
- void (const char *profile)
-
Parameters:
- void ( callback, void *private_data)
-
Adds a callback that will be called when a frontend event occurs.
See on what sort of events can be
triggered.Parameters: - callback – Callback to use when a frontend event occurs.
- private_data – Private data associated with the callback.
- void ( callback, void *private_data)
-
Removes an event callback.
Parameters: - callback – Callback to remove.
- private_data – Private data associated with the callback.
- void ( callback, void *private_data)
-
Adds a callback that will be called when the current scene collection
is being saved/loaded.Parameters: -
callback – Callback to use when saving/loading a scene
collection. - private_data – Private data associated with the callback.
-
callback – Callback to use when saving/loading a scene
- void ( callback, void *private_data)
-
Removes a save/load callback.
Parameters: - callback – Callback to remove.
- private_data – Private data associated with the callback.
- void ( callback, void *private_data)
-
Adds a callback that will be called right before a scene collection
is loaded. Useful if youParameters: - callback – Callback to use when pre-loading.
- private_data – Private data associated with the callback.
- void ( callback, void *private_data)
-
Removes a pre-load callback.
Parameters: - callback – Callback to remove.
- private_data – Private data associated with the callback.
- void ( translate)
-
Pushes a UI translation callback. This allows a front-end plugin to
intercept when Qt is automatically generating translating data.
Typically this is just called with obs_module_get_string.Parameters:
- void (void)
-
Pops the current UI translation callback.
- void (void)
-
Starts streaming.
- void (void)
-
Stops streaming.
- bool (void)
-
Returns: true if streaming active, false otherwise.
- void (void)
-
Starts recording.
- void (void)
-
Stops recording.
- bool (void)
-
Returns: true if recording active, false otherwise.
- void (bool pause)
-
Pause: true to pause recording, false to unpause.
- bool (void)
-
Returns: true if recording paused, false otherwise.
- void (void)
-
Starts replay buffer.
- void (void)
-
Stops replay buffer.
- void (void)
-
Saves a replay if the replay buffer is active.
- bool (void)
-
Returns: true if replay buffer active, false otherwise.
- void (void)
-
Saves the current scene collection.
- *(void)
-
Returns: A new reference to the current streaming output.
- *(void)
-
Returns: A new reference to the current srecording output.
- *(void)
-
Returns: A new reference to the current replay buffer output.
- void ( *service)
-
Sets the current streaming service to stream with.
Parameters:
- *(void)
-
Returns: A new reference to the current streaming service object.
- void (void)
-
Saves the current streaming service data.
- bool (void)
-
Returns: true if studio mode is active, false otherwise.
- void (bool enable)
-
Activates/deactivates studio mode.
Parameters:
- void (void)
-
Triggers a preview-to-program transition if studio mode is active.
- *(void)
-
Returns: A new reference to the current preview scene if studio mode
is active, or the current scene if studio mode is not
active.
- void ( *scene)
-
Sets the current preview scene in studio mode, or the currently
active scene if not in studio mode.Parameters:
General Audio Pipeline Overview
The audio pipeline is run from a dedicated audio thread in the audio
handler (the function in libobs/media-io/audio-io.c);
assuming that is set to 1024, the audio thread
“ticks” (processes audio data) once every 1024 audio samples (around
every 21 millisecond intervals at 48khz), and calls the
function in libobs/obs-audio.c where most of the audio processing is
accomplished.
A source with audio will output its audio via the
function, and that audio data will be appended
or inserted in to the circular buffer .
If the sample rate or channel count does not match what the back-end is
set to, the audio is automatically remixed/resampled via swresample
. Before insertion, audio data is also run through any audio
filters attached to the source .
Each audio tick, the audio thread takes a reference snapshot of the
audio source tree (stores references of all sources that output/process
audio) . On each audio leaf (audio source), it takes the closest
audio (relative to the current audio thread timestamp) stored in the
circular buffer , and puts it in
.
Then, the audio samples stored in of the
leaves get sent through their parents in the source tree snapshot for
mixing or processing at each source node in the hierarchy .
Sources with multiple children such as scenes or transitions will
mix/process their children’s audio themselves via the
callback. This allows, for example,
transitions to fade in the audio of one source and fade in the audio of
a new source when they’re transitioning between two sources. The mix or
processed audio data is then stored in
of that node similarly, and the process is repeated until the audio
reaches the root nodes of the tree.
Finally, when the audio has reached the base of the snapshot tree, the
audio of all the sources in each output channel are mixed together for a
final mix . That final mix is then sent to any raw outputs or
audio encoders that are currently active .
If it’s sent to an audio encoder object (libobs/obs-encoder.c), it
encodes the audio data and sends the encoded packet off to the outputs
that encoder is connected to (which can be multiple). If the output
takes both encoded video/audio, it puts the packets in an interleave
queue to ensure encoded packets are sent in monotonic timestamp order
.
The encoded packet or raw audio data is then sent to the output.
Немного об авторских правах
Многим знакома ситуация, при которой YouTube или прочие сервисы блокируют трансляцию из-за воспроизведения в ней аудиозаписи с авторскими правами. Правообладатели против того, что их песня бесплатно транслировалось для широкого круга пользователей.
Тем не менее, стоит пропустить песню через небольшой фильтр, изменив фазу, как YouTube тут же перестает определять его как оригинальную композицию. Этот и многие другие способы заложены в принципе отчуждения прав OBS Studio.
Какую бы песню мы не воспроизводили (даже непосредственно из операционной системы) ни одна современная стрим— площадка не распознает её и жалоба на авторские права не будет создана.
ВНИМАНИЕ! Если вы популярный стример, и ваша стримы смотрят тысячами и миллионами, то пользователи сами могут пожаловаться на использование авторского материала. В этом случае правообладатель обратит внимание и сам лишит далек ваш трек от его оригинала или близок.. Главный и единственный конкурент у OBS Studio — это платная утилита XSplit
Она держится на рынке уже длительное время, и не намерена менять стратегию развития, несмотря на то что ей популярность с каждым годом падает
Главный и единственный конкурент у OBS Studio — это платная утилита XSplit. Она держится на рынке уже длительное время, и не намерена менять стратегию развития, несмотря на то что ей популярность с каждым годом падает.
Системные требования
- Intel Core i3 последнего поколения и выше (основной атрибут влияющий на качество стрима, поэтому если есть возможность, то берем Intel Core i5, i7 – не раздумывая)
- Видеокарта, которая поддерживает DirectX 10 (чем лучше – тем комфортнее стримить)
- 4-8 GB RAM (16 GB в самый раз)
- Монитор (желательно чтобы сразу с разрешением 1920х1080, но самое главное соотношение сторон 16:9)
- Другие стандартные железки и девайсы: жесткий диск, мышь, клавиатура, наушники, микрофон
- Безлимитный интернет 100 мбит/с , включая зарубежный трафик
- Windows 7 / MacOS / Linux (на оф сайте написано Windows 7+ , т.е. на win 8-10 должно работать)
Начало трансляции в OBS Studio
Наконец, останется вновь перейти в «OBS Studio» и нажать на клавишу «Начать трансляцию» (или воспользоваться горячими клавишами, если они были настроены). Если все было сделано верно, то в окне «YouTube» можно будет увидеть запущенную трансляцию. Рядом с ней расположен чат, в котором можно пообщаться со зрителями, статистика просмотра, а также множество подобной сервисной информации.
По завершении трансляции полный ролик можно будет увидеть в меню «Менеджер видео». Там же при желании доступно и редактирование, хотя никакими особыми возможностями в этом плане сервис и не обладает, но он позволит быстро обрезать начало или конец, если там имеется что-то нежелательное, например, переключение в «OBS Studio» для включения-выключения трансляции.
Мы старались оцени контент:
Рейтинг: 3.8/5 — 124
голосов
Следующие 10 статей которые будут Вам интересны:
- Сцены и источники в OBS Studio
- Гид по стримам, с чего начинать?
- Фильтры в OBS Studio
- Таблица настройки качества трансляции для OBS
- Устройство захвата видео. Веб камера в OBS Studio
- DonatePay лучшая альтернатива DonationAlerts
- Музыка для стримов
- Советы стримеру. Заработок на игре
- Как привлечь и удержать зрителей
- Популярный видеоблогер – летсплейщик Mr. Marmok
Вступайте в группы:PROstrimer – в группе публикуется релиз новых статей сайта, а также важные изменения в статьях.
OBS Studio настройка – в группе предоставляется помощь по настройке установке OBS Studio, в том числе и бесплатно за подписку
Внимание, комментарии проходят проверку на спам и прочую чушь, в правом верхнем углу появляется результат отправки сообщения
OBS is dropping frames. How can I fix this?
When the «Dropped frames» counter is increasing and the connection square is yellow or red, this means that your connection to the server* isn’t stable or that it can’t keep up with your set bitrate. Because of this, OBS was forced to drop some of the video frames in order to compensate. OBS opts to drop the frames to avoid buffering and keep your stream playing. You can check out our detailed guide here for more info, and what options you have to correct the issue: https://obsproject.com/wiki/Dropped-Frames-and-General-Connection-Issues
* When we say «server», this means the server of the service that you’re streaming to (eg Twitch, YouTube, etc). There are no OBS servers — the connection goes directly from your computer to the streaming service. Even if the OBS website and everything else run by us went offline, you can still stream with OBS as there is no dependency on anything run by the OBS Project. Any connection problems are between you and the service you’re streaming to.
Common Directory Structure and CMakeLists.txt
The common way source files are organized is to have one file for plugin
initialization, and then specific files for each individual object
you’re implementing. For example, if you were to create a plugin called
‘my-plugin’, you’d have something like my-plugin.c where plugin
initialization is done, my-source.c for the definition of a custom
source, my-output.c for the definition of a custom output, etc. (This
is not a rule of course)
This is an example of a common directory structure for a native plugin
module:
my-plugindatalocaleen-US.ini
my-pluginCMakeLists.txt
my-pluginmy-plugin.c
my-pluginmy-source.c
my-pluginmy-output.c
my-pluginmy-encoder.c
my-pluginmy-service.c
This would be an example of a common CMakeLists.txt file associated with
these files:


