Raspberry pi blog
Содержание:
The new Stretch releases
As with the Jessie release, you can either run this as a live image from a DVD, USB stick, or SD card or install it as the native operating system on the hard drive of an old laptop or desktop computer. Please note that installing this software will erase anything else on the hard drive — do not install this over a machine running Windows or macOS that you still need to use for its original purpose! It is, however, safe to boot a live image on such a machine, since your hard drive will not be touched by this.
We’re also pleased to announce that we are releasing the latest version of Raspbian Stretch for your Pi today. The Pi and PC versions are largely identical: as before, there are a few applications (such as Mathematica) which are exclusive to the Pi, but the user interface, desktop, and most applications will be exactly the same.
For Raspbian, this new release is mostly bug fixes and tweaks over the previous Stretch release, but there are one or two changes you might notice.
Why use an SPI EEPROM?
- Raspberry Pi 4 bootup procedure and SDRAM setup is considerably more complicated than on the previous Raspberry Pi models, so there is more risk inherent in code that’s permanently incorporated in the ROM of the SoC.
- USB has moved to a PCIe bus, and the Gigabit Ethernet driver is completely different to previous models, so again, having it permanently fixed into the ROM of the SoC was not feasible.
- A small SPI EEPROM allows bugs to be fixed and features to be added after launch, in the field.
- The local modifiable state means that OTP bootmode settings will not be required for network or USB mass storage boot on the Raspberry Pi 4. There are no user-modifiable OTP bootmode bits on Pi 4.
Какой из дистрибутивов лучше устанавливать на Raspberry Pi 3
Выбор конкретной системы зависит от того, какие задачи станут возлагаться на RPi. В 95% случаев отличным вариантом является Raspbian – фактически официальный дистрибутив для «Малины». Он имеет множество преимуществ по сравнению с другими вариантами. Например, в нем все функционирует из коробки, так как система полностью сконфигурирована для работы на рассматриваемом одноплатнике.

Кроме того, практически нет вещей, которые можно было бы сделать на одном дистрибутиве, но нельзя на другом. Разные системы отличаются друг от друга по большей части следующими вещами:
- предустановленным ПО;
- наличием уникальных патчей ядра;
- пакетным менеджером и типом этих самых пакетов.
И, например, если какая-то программа или библиотека отсутствует в официальных или неофициальных репозиториях, её можно собрать из исходников.
Но есть исключения. К примеру, если «Малина» станет использоваться исключительно для проведения пен-тестов, то в этом случае можно воспользоваться специализированной системой. Kali Linux для Raspberry Pi 3 поддерживается официально. Этот дистрибутив включает в себя обширный набор инструментов для тестирования чего-либо на проникновение.
Другой вариант – наличие желания с минимальными усилиями превратить RPi в игровую консоль или медиа-центр. Для этого разумно воспользоваться специализированным дистрибутивом. Хотя, если потратить некоторое количество времени и сил, можно и Raspbian превратить в TV-приставку.
Manually checking if an update is available
Running the command with no parameters indicates whether an update is required. An update is required if the timestamp of the most recent file in the firmware directory (normally ) is newer than that reported by the current bootloader.
The images under are part of the package and are only updated via .
If an update is available, you can install it using :
Firmware release status
The firmware release status corresponds to a particular subdirectory of bootloader firmware images (), and can be changed to select a different release stream. By default, Raspberry Pi OS only selects critical updates (security fixes or major hardware compatiblity changes) since most users do not use alternate boot modes (TFTP, USB etc)
- critical — Default — rarely updated
- stable — Updated when new/advanced features have been successfully beta tested.
- beta — New or experimental features are tested here first.
Since the release status string is just a subdirectory name then it’s possible to create your own release streams e.g. a pinned release or custom network boot configuration.
Changing the firmware release
You can change which release stream is to be used during an update by editing the file and changing the entry to the appropriate stream.
EEPROM write protect
Write protecting the EEPROMs on the Raspberry Pi 4 Model B requires both a software change and a small board modification.
This is only recommended for advanced users or industrial customers.
By default, neither the bootloader nor the VL805 SPI EEPROMs are write-protected.
If is defined in then will define the write protect regions such that all of both EEPROMS are write-protected. The write-protect region configuration is then made read-only when the write-protect () pin is pulled low. If is defined then the write-protect regions are cleared. If is not defined then the write-protect bits are not modified.
- The property requires the from the bootloader release or newer.
- The pin on these EEPROMs only prevents writes to the non-volatile bits of the status register. Therefore, the write regions must be defined in addition to being pulled low.
- The pin must not be pulled low whilst attempting to change the write-protect status.
- The pin for the EEPROMs may be pulled low by connecting test point 5 () to ground.
- The bootloader self-update mechanism also supports the property. However, the bootloader must have already have been upgraded to or newer before the property will be recognised.
N.B does not support clearing of the write-protect regions and will fail to update the EEPROM if write-protect regions are defined.
Adding the network details to the Raspberry Pi
Open the configuration file in nano:
Go to the bottom of the file and add the following:
The password can be configured either as the ASCII representation, in quotes as per the example above, or as a pre-encrypted 32 byte hexadecimal number. You can use the utility to generate an encrypted PSK. This takes the SSID and the password, and generates the encrypted PSK. With the example from above, you can generate the PSK with . Then you will be asked for the password of the wireless network (in this case ). The output is as follows:
Note that the plain text version of the code is present, but commented out. You should delete this line from the final file for extra security.
The tool requires a password with between 8 and 63 characters. To use a more complex password, you can extract the content of a text file and use it as input for . Store the password in a text file and input it to by calling . For extra security, you should delete the afterwards, so there is no plain text copy of the original password on the system.
To use the –encrypted PSK, you can either copy and paste the encrypted PSK into the file, or redirect the tool’s output to the configuration file in one of two ways:
- Either change to by executing , then call and enter the testing password when asked
- Or use and enter the testing password when asked; the redirection to prevents from also outputting to the screen (standard output).
If you want to use one of these two options, make sure you use , or use with — either will append text to an existing file. Using a single chevron , or omitting when using , will erase all contents and then append the output to the specified file.
Now save the file by pressing , then , then finally press .
Reconfigure the interface with .
You can verify whether it has successfully connected using . If the field has an address beside it, the Raspberry Pi has connected to the network. If not, check that your password and ESSID are correct.
On the Raspberry Pi 3B+ and Raspberry Pi 4B, you will also need to set the country code, so that the 5GHz networking can choose the correct frequency bands. You can do this using the application: select the ‘Localisation Options’ menu, then ‘Change Wi-Fi Country’. Alternatively, you can edit the file and add the following. (Note: you need to replace ‘GB’ with the 2 letter ISO code of your country. See Wikipedia for a list of 2 letter ISO 3166-1 country codes.)
Note that with the latest Buster Raspberry Pi OS release, you must ensure that the file contains the following information at the top:
Добавление русской раскладки клавиатуры
К сожалению, процесс добавления дополнительных раскладок клавиатуры в Raspbian отработан не совсем хорошо. Можно использовать разные подходы, но я использую следующий метод.
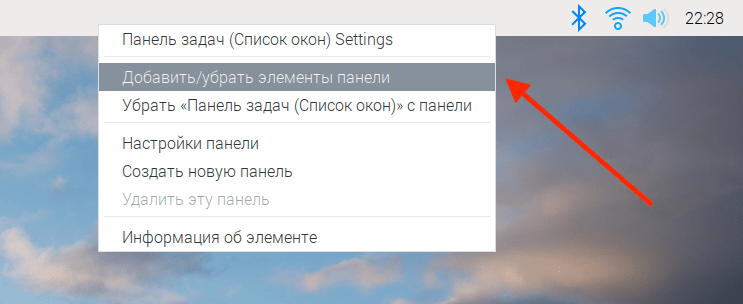
Щелкните правой кнопкой мыши по верхней панели и выберите пункт Добавить/убрать элементы панели
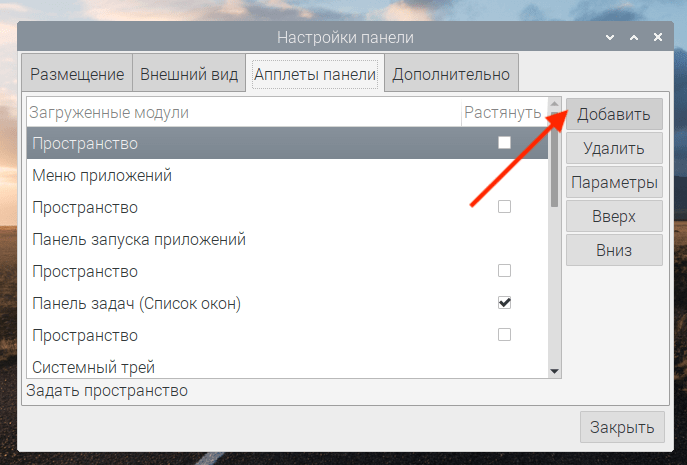
В открывшемся окне перейдите на вкладку Апплеты панели. Нажмите кнопку Добавить
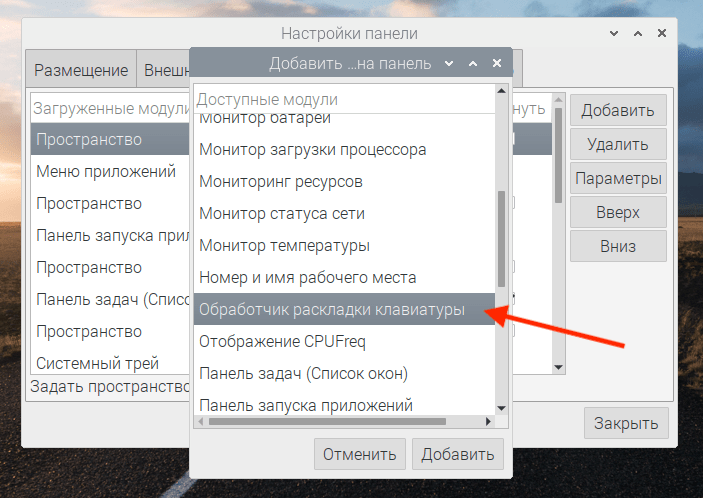
Выберите из списка пункт Обработчик раскладки клавиатуры
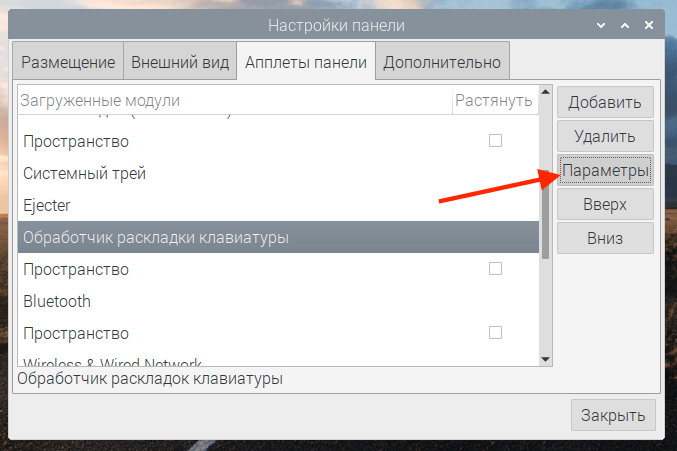
На панели появится флаг, который соответствует текущей раскладке.
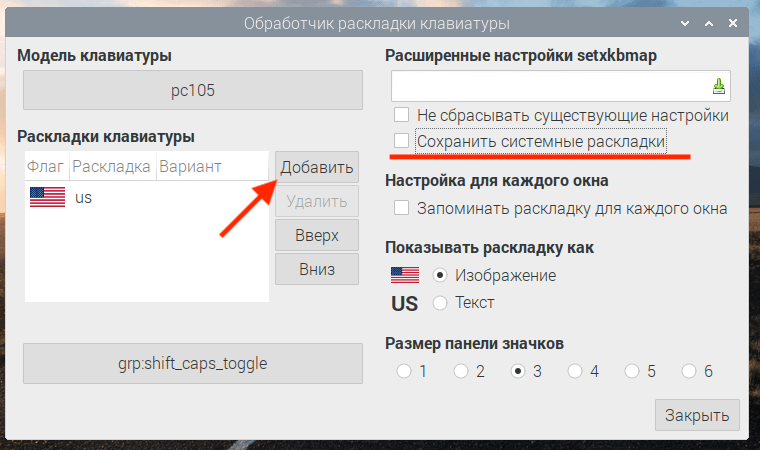
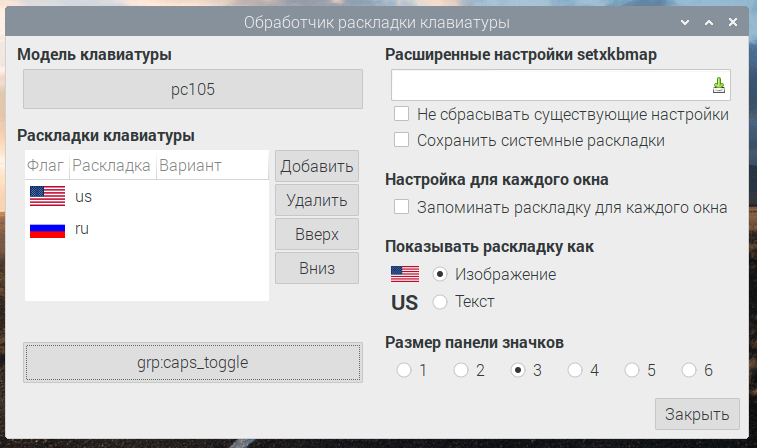
Убедитесь, что в списке апплетов выбран пункт Обработчик раскладки клавиатуры. Нажмите кнопку Параметры
Откроется окно, в котором можно редактировать список раскладок. Снимите галочку у пункта Сохранить системные раскладки и нажмите кнопку Добавить
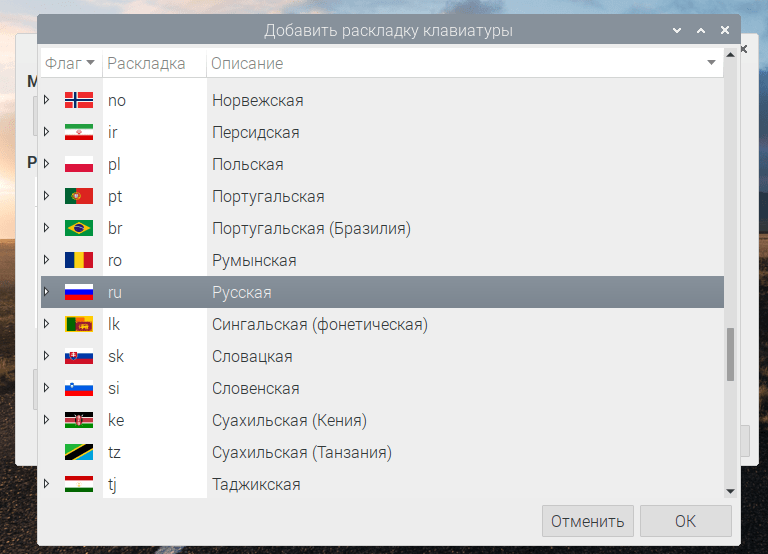
В открывшемся окне выберите раскладку, которую вы хотите добавить и нажмите ОК
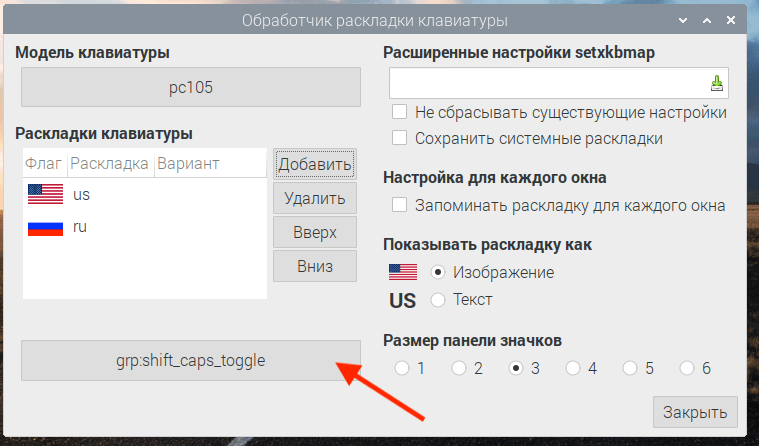
Новая раскладка появится в списке. Под списком раскладок нажмите кнопку, которая откроет окно выбора сочетания клавиш для смены раскладки.
Выберите в списке желаемое сочетание и нажмите ОК. По умолчанию используется сочетание Shift+CapsLock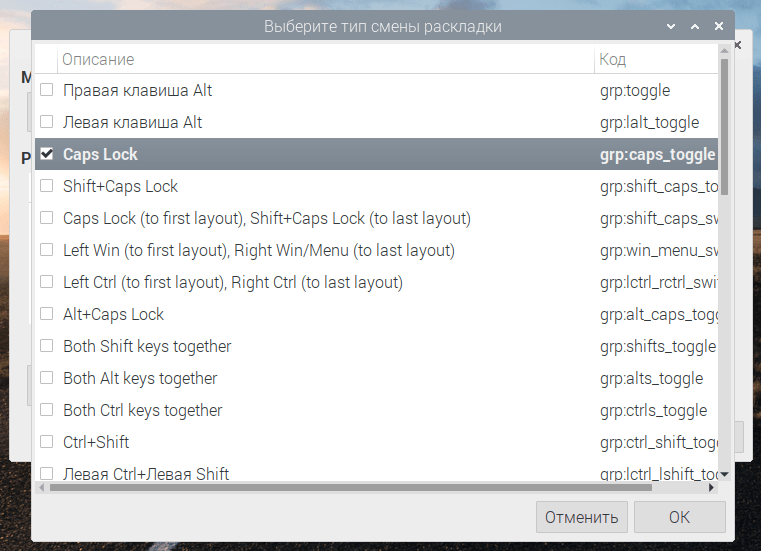
Закройте окно нажав крестик (кнопка Закрыть у меня почему-то не работала).
Установка Linux на «Малину»
Так как систем для RPi существует много, то рассмотрение процесса инсталлирования каждой из них отняло бы очень много времени. Да, и к тому же это бессмысленно, так как принцип установки всегда более или менее одинаков. Поэтому ниже будет описан процесс инсталлирования только одной ОС – Raspbian.
Установка Noobs
Поставить систему на «Малину» можно несколькими способами. Один из них – это использование специальной утилиты. Noobs для Raspberry Pi 3 можно скачать с официального сайта Респберри, из раздела Downloads.
Указанную программу нужно ставить на MicroSD, объем которой не меньше 8 гигабайт. Карту нужно установить в кардридер, а затем скинуть на неё файлы, которые лежат в скаченном архиве Noobs. Когда процесс копирования будет завершен, можно будет вытащить флэшку из кардридера и установить ее в RPi.
Установка Raspbian через Noobs
После включения «Малины» на подключенном к ней мониторе появится радужная картинка – если она отображается, то видеочип работает нормально. Мгновением позже на экране отобразится окно со списком систем. Из него следует выбрать Raspbian. Но, конечно, при желании можно остановиться и на другой.

Далее всплывет диалоговое окно, в котором следует просто нажать Yes. После этого начнется процесс копирования нужных файлов. В большинстве случаев он занимает 15-20 минут. Когда прогресс-бар заполнится, появится окошко с кнопкой OK. Клик по ней приведет к перезагрузке компьютера.
При следующем включении загрузится не Noobs, а уже непосредственно Raspbian. Система будет практически полностью готова к использованию. Но при желании ее можно дополнительно сконфигурировать. Для этого следует обратиться к официальной документации.
Что следует сделать после установки Raspbian
После того, как система инсталлирована, рекомендуется выполнить всего одну вещь – провести обновление пакетов, системы и BIOS. Для этого нужно зайти в консоль и вначале ввести там sudo -i и указать пароль (Raspberry). После этого до окончания сеанса не потребуется перед каждой командой вводить sudo.
Теперь непосредственно о том, как выполняются апдейты. Команда apt update – загружает и устанавливает самые свежие пакеты, apt upgrade – обновляет систему в целом, rpi-update – инсталлирует последнюю версию BIOS.
Как можно убедиться, в развертывании Linux на RPi3 нет абсолютно ничего сложного. Зная о том, как установить Noobs на Raspberry Pi 3, можно инсталлировать любой популярный дистрибутив, поддерживаемый «Малиной». Единственная трудность, с которой способен столкнуться новичок – это выбор ОС. Но если вы не знаете, на какой системе остановиться, тогда просто устанавливайте Raspbian.
Настраиваем сеть
После перезагрузки настраиваем сеть (например так):
vi /etc/network/interfaces
# interfaces(5) file used by ifup(8) and ifdown(8)

# Please note that this file is written to be used with dhcpcd
# For static IP, consult /etc/dhcpcd.conf and 'man dhcpcd.conf'

# Include files from /etc/network/interfaces.d:
source-directory /etc/network/interfaces.d

auto lo
iface lo inet loopback

#iface eth0 inet manual

allow-hotplug eth0
iface eth0 inet static
    address 192.168.0.100
    netmask 255.255.255.0
    gateway 192.168.0.1
    # dns-* options are implemented by the resolvconf package, if installed
    dns-nameservers 8.8.8.8 8.8.4.4

allow-hotplug wlan0
iface wlan0 inet manual
    wpa-conf /etc/wpa_supplicant/wpa_supplicant.conf
В составе Raspberry Pi 3 также имеется Wi-Fi модуль, что настраивается редактированием файла
Например так:
vi /etc/wpa_supplicant/wpa_supplicant.conf
ctrl_interface=DIR=/var/run/wpa_supplicant GROUP=netdev
update_config=1
country=UA

network={
	ssid="MyNet"
	psk="MyMegaSecurePassword"
}
Или сделать это через удобную встроенную тулзу для конфигурации Raspbian (через которую много делать ещё много чего)
raspi-config
Я обычно выключаю поддержку IPv6.
И оборудование пока не 100% всё готово для его поддержки и памяти больше сэкономите.
vi /etc/sysctl.conf
net.ipv6.conf.all.disable_ipv6 = 1
net.ipv6.conf.default.disable_ipv6 = 1
net.ipv6.conf.lo.disable_ipv6 = 1
net.ipv6.conf.eth0.disable_ipv6 = 1
net.ipv6.conf.wlan0.disable_ipv6 = 1
sysctl -p
А также раскоментируйте в файле строчку и добавьте (чтобы наверняка)
vi /etc/modprobe.d/ipv6.conf
Получится как-то так:
alias net-pf-10 off
alias ipv6 off
blacklist ipv6
Активируем при загрузке системы (по-умолчанию он отключен) и запускаем его и дальше уже можем работать с Raspberry Pi удаленно через .
systemctl enable ssh
Synchronizing state of ssh.service with SysV service script with /lib/systemd/systemd-sysv-install.
Executing: /lib/systemd/systemd-sysv-install enable ssh
# systemctl start ssh
# systemctl status ssh
● ssh.service - OpenBSD Secure Shell server
   Loaded: loaded (/lib/systemd/system/ssh.service; enabled; vendor preset: enabled)
   Active: active (running) since Fri 2018-01-19 18:46:51 EET; 48s ago
 Main PID: 684 (sshd)
   CGroup: /system.slice/ssh.service
           └─684 /usr/sbin/sshd -D
APT (Advanced Packaging Tool)
To update software in Raspberry Pi OS, you can use the apt tool in a terminal. Open a terminal window from the taskbar or application menu:

First, update your system’s package list by entering the following command:
Next, upgrade all your installed packages to their latest versions with the following command:
Note that is used in preference to a simple , as it also picks up any dependency changes that may have been made.
Generally speaking, doing this regularly will keep your installation up to date for the particular major Raspberry Pi OS release you are using (e.g. Stretch). It will not update from one major release to another, for example, Stretch to Buster.
However, there are occasional changes made in the Foundation’s Raspberry Pi OS image that require manual intervention, for example a newly introduced package. These are not installed with an upgrade, as this command only updates the packages you already have installed.
Updating the kernel and firmware
The kernel and firmware are installed as a Debian package, and so will also get updates when using the procedure above. These packages are updated infrequently and after extensive testing.
Running out of space
When running , it will show how much data will be downloaded and how much space it will take up on the SD card. It’s worth checking with that you have enough free disk space, as unfortunately will not do this for you. Also be aware that downloaded package files ( files) are kept in . You can remove these in order to free up space with ( in older releases of apt).
Upgrading from Jessie to Stretch
Upgrading an existing Jessie image is possible, but is not guaranteed to work in every circumstance. If you wish to try upgrading a Jessie image to Stretch, we strongly recommend making a backup first — we can accept no responsibility for loss of data from a failed update.
To upgrade, first modify the files and . In both files, change every occurrence of the word to . (Both files will require sudo to edit.)
Then open a terminal window and execute:
Answer ‘yes’ to any prompts. There may also be a point at which the install pauses while a page of information is shown on the screen – hold the space key to scroll through all of this and then press q to continue.
Finally, if you are not using PulseAudio for anything other than Bluetooth audio, remove it from the image by entering:
If moving to a new Pi model (for example the Pi 3B+), you may also need to update the kernel and the firmware using the instructions above.
Compatibility
As a software developer, one of the most awkward things to deal with is what is known as platform fragmentation: having to write code that works on all the different devices and configurations people use. In my spare time, I write applications for iOS, and this has become increasingly painful over the last few years. When I wrote my first iPhone application, it only had to work on the original iPhone, but nowadays any iOS application has to work across several models of iPhone and iPad (which all have different processors and screens), and also across the various releases of iOS. And that’s before you start to consider making your code run on Android as well…
The good thing about developing for Raspberry Pi is that there is only a relatively small number of different models of Pi hardware. We try our best to make sure that, wherever possible, the Raspberry Pi Desktop software works on every model of Pi ever sold, and we’ve managed to do this for most of the software in the image. The only exceptions are some of the more recent applications like Chromium, which won’t run on the older ARM6 processors in the Pi 1 and the Pi Zero, and some applications that run very slowly due to needing more memory than the older platforms have.
Raspberry Pi настройка
Чтобы мини-ПК Raspberry Pi корректно работал, его необходимо правильно настроить. На новое устройство необходимо установить сначала операционную систему. В базовом варианте устройство работает на Linux, но для новичков и тех, кто планирует в дальнейшем подстроить Raspberry Pi под свои нужды рекомендуется устанавливать Raspbian (все ее сборки сделаны на основе Debian). Информации об этой ОС на просторах интернета большое множество, так что даже начинающий пользователь ARM-компьютера сможет разобраться. Кроме того, сам образ «операционки» можно скачать с официального сайта. После установки системы на карту памяти (она должна быть вставлена в настольный ПК), необходимо будет вставить ее в устройство и немного подкорректировать файл config.txt в корне «флешки».
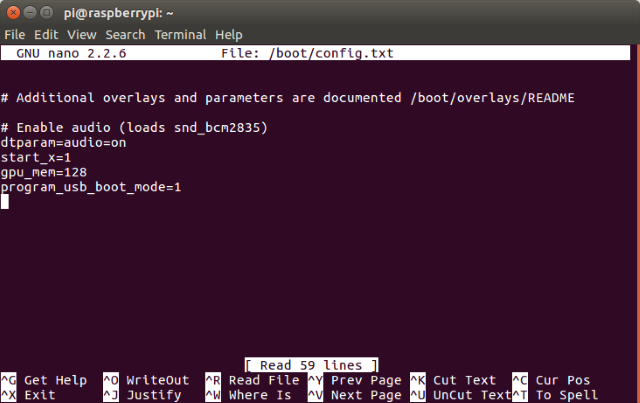
Настройка config txt Raspberry Pi имеет большое значение, ведь это основной конфигурационный файл, в котором лучше всего установить фиксированное разрешение экрана (строки hdmi_group и hdmi_mode). Подробную информацию о параметрах файла можно найти на любом форуме, посвященном Raspberry Pi.
Первая загрузка мини-ПК автоматически запускает настройки raspi_config. Мы не будем описывать каждый из параметров, т. к. информацию о них можно легко найти в интернете. Все эти параметры отвечают за разные настройки. К примеру:
- включенная команда expand_rootfs расширяет root-раздел карты памяти;
- set_timezone позволит настроить часовой пояс;
- boot_behaviour запускет графический интерфейс.
После настройки, необходимо перезагрузить устройство. На этом и заканчивается первичная настройка. В дальнейшем необходимо будет поменять язык, т. к. в стандартном варианте будет установлен английский. После того как пользователь увидит родной язык, он может смело настраивать операционную систему на Raspberry Pi. В прошлом «Линуксоподобные» системы отличались исключительным неудобством. Управлять ими приходилось исключительно через командную строку. Сегодня ситуация изменилась: операционные системы, рассчитанные для использования на Raspberry Pi имеют приятную графическую оболочку, которая поможет без проблем настроить нужный параметр.


