Настройка роутера mikrotik
Содержание:
Введение
Как я уже сказал, у меня есть материал на тему настройки capsman в mikrotik. В наше время в связи со скоростью развития информационных технологий информация очень быстро устаревает. И хотя статья все еще актуальна, ее регулярно читают и используют, сейчас есть что к ней добавить.
Вышла новая версия технологии Controlled Access Point system Manager (CAPsMAN) v2. Я расскажу немного о ней. В своей работе буду опираться на опыт предыдущей статьи и на официальный Manual:CAPsMAN с сайта производителя микротиков.
В моем распоряжении будут 2 роутера wAP ac, которые настроены в соответствии с моими инструкциями на эту тему. Рекомендую на всякий случай ознакомиться с ними, чтобы было общее представление о базовых настройках роутеров. На одном из этих роутеров я настрою контроллер точек доступа, другую подключу к этому контроллеру. Обе точки образуют единую бесшовную wifi сеть с автоматическим переключением клиентов к ближайшей точке.
Примера из двух точек доступа будет достаточно для общего представления о работе технологии. Дальше эта настройка линейно масштабируется на необходимое количество точек доступа.
TCP/IP Related Questions
- I have two NIC cards in the MikroTik router and they are working properly. I can ping both networks from the router but can’t ping from one network through the router to the other network and to the Internet. I have no firewall setup.
- This is a typical problem, where you do not have routing set up at your main Internet gateway. Since you have introduced a new network, you need to ‘tell’ about it your main gateway (your ISP). A route should be added for your new network. Alternatively, you can ‘hide’ your new network by means of masquerading to get access to the Internet. Please take time to study the Basic Setup Guide, where the problem is described and the solution is given.
- There is an example how to masquerade your private LAN:
 ip firewall nat> add chain=srcnat action=masquerade out-interface=Public
 ip firewall nat> print
Flags: X - disabled, I - invalid, D - dynamic
 0   chain=srcnat out-interface=Public action=masquerade
- How can I change the TCP port number for telnet or http services, if I do not want to use the ports 23 and 80, respectively?
- You can change the allocated ports under /ip service.
- When I use the IP address/mask in the form 10.1.1.17/24 for my filtering or queuing rules, they do not work.
- The rules ‘do not work’, since they do not match the packets due to the incorrectly specified address/mask. The correct form would be:
   10.1.1.0/24 for the IP addresses in the range 10.1.1.0-10.1.1.255, or,
   10.1.1.17/32 for just one IP address 10.1.1.17.
- I need to set up DHCP client, but there is no menu ‘/ip dhcp-client’.
- The DHCP feature is not included in the system software package. You need to install the dhcp package. Upload it to the router and reboot!
- Can I statically bind IP’s to MAC addresses via DHCP?
- Yes, you can add static leases to the DHCP server leases list. However, DHCP is insecure by default, and it is better to use PPPoE for user authentication and handing out IP addresses. There you can request the user to log on from a specified MAC address as well.
- How can I masquerade two different subnets using two different external IP addresses for them?
- Use /ip firewall nat rule with chain=srcnat action=nat, specify the to-src-address argument value. It should be one of the router’s external addresses. If you use action=masquerade, the to-src-address is not taken into account, since it is substituted by the external address of the router automatically.
- I cannot surf some sites when I use PPPoE.
- Use /ip firewall mangle to change MSS (maximum segment size) 40 bytes less than your connection MTU. For example, if you have encrypted PPPoE link with MTU=1492, set the mangle rule as follows:
 / ip firewall mangle
 add chain=forward protocol=tcp tcp-flags=syn action=change-mss tcp-mss=!0-1448 new-mss=1448
Upgrading from RouterOS v3 (2009)
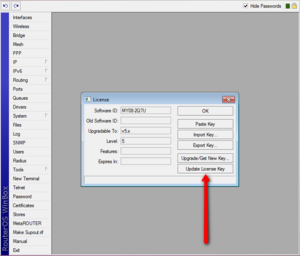
Since RouterOS 3.25 and 4.0beta3 new SoftID format is introduced. Your license menu will show both the old and the new SoftID. Even by upgrading to a new version, RouterOS will still work as before, but to use some of the new features, LICENSE UPDATE will be necessary. To do this, just click on «Update license key» button in Winbox (currently only in Winbox).
New SoftID’s are in the form of XXXX-XXXX (Four symbols, dash, four symbols).
The following actions will be taken:
- Winbox will contact www.mikrotik.com with your old SoftID
- www.mikrotik.com will check the database and see details about your key
- the server will generate a new key as «upgrade» and put it into the same account as old one
- Winbox will receive the new key and automatically License your router with the new key
- Reboot will be required
- New RouterOS features will be unlocked
Important Note!: If you see this button also in v3.24, don’t use it, it will not work.
If you ever wish to downgrade RouterOS, you will have to apply the OLD key before doing so. When RouterOS applies the NEW key, the OLD key is saved to a file, in the FILES folder, to make sure you have the old key handy.
Even more important: Don’t downgrade v4.0b3 to v3.23 or older. Use only v3.24 for downgrading, or you might lose your new format key.
SSH Keys
Sub-menu:
This menu allows to import public keys used for ssh authentication.
Warning: User is not allowed to login via ssh by password if ssh-keys for the user is added
Properties:
| Property | Description |
|---|---|
| user (string; Default: ) | username to which ssh key is assigned. |
Read-only properties:
| Property | Description |
|---|---|
| key-owner (string) |
When importing ssh key by command you will be asked for two parameters:
- public-key-file — file name in routers root directory containing the key.
- user — name of the user to which key will be assigned
Private keys
Sub-menu:
This menu is used to import and list imported private keys. Private keys are used to verify public keys of remote devices.
Read-only properties:
| Property | Description |
|---|---|
| user (string) | |
| key-owner (string) |
When importing ssh keys from this sub menu using import command you will be asked for three parameters:
- private-key-file — file name in routers root directory containing private key.
- public-key-file — file name in routers root directory containing public key.
- user — name of the user to which key will be assigned
RouterOS features
RouterOS is MikroTik’s stand-alone operating system based on linux v3.3.5 kernel. The following list shows features found in the latest RouterOS release:
Hardware Support
- i386 compatible architecture
- SMP – multi-core and multi-CPU compatible
- Minimum 32MB of RAM (maximum supported 2GB, except on Cloud Core devices and CHR installations, where there is no maximum)
- IDE, SATA, USB and flash storage medium with minimum of 64MB space
- Network cards supported by linux v3.3.5 kernel (PCI, PCI-X)
- Partial hardware compatibility list (user maintained)
- Switch chip configuration support
Note: NVMe storage is supported only for CHR, x86, Tile and MMIPS architecture. For specific information, please look at each product brochure or block diagram.
Installation
- Manual:Netinstall: Full network based installation from PXE or EtherBoot enabled network card
- Manual:CHR: RouterOS version intended for running as a virtual machine
- Netinstall: Installation to a secondary drive mounted in Windows
- CD based installation
Configuration
- MAC based access for initial configuration
- WinBox – standalone Windows GUI configuration tool
- M:Webfig — advanced web based configuration interface
- Powerful command-line configuration interface with integrated scripting capabilities, accessible via local terminal, serial console, telnet and ssh
- API — the way to create your own configuration and monitoring applications
Firewall
- Statefull filtering
- Source and destination NAT
- (h323, pptp, quake3, sip, ftp, irc, tftp)
- Internal connection, routing and packet marks
- Filtering by IP address and address range, port and port range, IP protocol, DSCP and many more
- Address lists
- Custom Layer7 matcher
- IPv6 support
- PCC — per connection classifier, used in load balancing configurations
- RAW filtering to bypass connection tracking.
Routing
- Static routing
- Virtual Routing and Forwarding (VRF)
- Policy based routing
- routing
- routing
- IPv4 dynamic routing protocols: RIP v1/v2, OSPFv2, BGP v4
- IPv6 dynamic routing protocols: RIPng, OSPFv3, BGP
- Bidirectional Forwarding Detection ( BFD)
MPLS
- Static Label bindings for IPv4
- Label Distribution protocol for IPv4
- RSVP Traffic Engineering tunnels
- VPLS MP-BGP based autodiscovery and signaling
- MP-BGP based MPLS IP VPN
- complete list of MPLS features
VPN
- IKEv2 support
- AES-NI hardware acceleration support for IPSec
- Point to point tunneling ( OpenVPN, PPTP, PPPoE, L2TP, SSTP)
- Advanced PPP features (MLPPP, BCP)
- Simple tunnels ( IPIP, EoIP) IPv4 andIPv6 support
- 6to4 tunnel support (IPv6 over IPv4 network)
- VLAN – IEEE802.1q Virtual LAN support, Q-in-Q support
Wireless
- IEEE802.11a/b/g wireless client and access point
- Full IEEE802.11n support
- Nstreme and Nstreme2 proprietary protocols
- NV2 protocol
- Wireless Distribution System (WDS)
- Virtual AP
- WEP, WPA, WPA2
- Access control list
- Wireless client roaming
- WMM
- HWMP+ Wireless MESH protocol
- MME wireless routing protocol
DHCP
- Per interface DHCP server
- DHCP client and relay
- Static and dynamic DHCP leases
- RADIUS support
- Custom DHCP options
- DHCPv6 Prefix Delegation (DHCPv6-PD)
- DHCPv6 Client
Hotspot
- Plug-n-Play access to the Network
- Authentication of local Network Clients
- Users Accounting
- RADIUS support for Authentication and Accounting
QoS
- Hierarchical Token Bucket ( HTB) QoS system with CIR, MIR, burst and priority support
- Simple and fast solution for basic QoS implementation — Simple queues
- Dynamic client rate equalization ( PCQ)
Proxy
- HTTP caching proxy server
- Transparent HTTP proxy
- SOCKS protocol support
- DNS static entries
- Support for caching on a separate drive
- Parent proxy support
- Access control list
- Caching list
Tools
- Ping, traceroute
- Bandwidth test, ping flood
- Packet sniffer, torch
- Telnet, ssh
- E-mail and SMS send tools
- Automated script execution tools
- CALEA
- File Fetch tool
- Advanced traffic generator
Other features
- Samba support
- OpenFlow support
- Bridging – spanning tree protocol (STP, RSTP), bridge firewall and MAC natting.
- Dynamic DNS update tool
- client/server and synchronization with GPS system
- VRRP v2 and v3 support
- SNMP
- M3P — MikroTik Packet packer protocol for wireless links and ethernet
- MNDP — MikroTik neighbor discovery protocol, supports CDP (Cisco discovery protocol)
- RADIUS authentication and accounting
- TFTP server
- Synchronous interface support (Farsync cards only) (Removed in v5.x)
- Asynchronous – serial PPP dial-in/dial-out, dial on demand
- ISDN – dial-in/dial-out, 128K bundle support, Cisco HDLC, x75i, x75ui, x75bui line protocols, dial on demand
Monitoring Active Users
Sub-menu:
command shows the currently active users along with respective statisics information.
Properties
All properties are read-only.
| Property | Description |
|---|---|
| address (IP/IPv6 address) | Host IP/IPv6 address from which the user is accessing the router. 0.0.0.0 means that user is logged in locally |
| group (string) | that user belongs to. |
| name (string) | User name. |
| radius (true | false) | Whether user is authenticated by RADIUS server. |
| via (local | telnet | ssh |winbox | api | web | tikapp | ftp) | User’s access method |
| when (time) | Time and date when user logged in. |
Example
To print currently active users, enter the following command:
 /user active> print detail
Flags: R - radius
 0   when=dec/08/2010 16:19:24 name="admin" address=10.5.8.52 via=winbox group=full

 2   when=dec/09/2010 09:23:04 name="admin" address=10.5.101.38 via=telnet group=full

 3   when=dec/09/2010 09:34:27 name="admin" address=fe80::21a:4dff:fe5d:8e56 via=api group=full
Что такое capsman v2
Capsman — технология для организации диспетчера (CAPsMAN) управляемых точек доступа. С его помощью можно централизованно управлять множеством беспроводных точек доступа (CAPs), объединяя их в единую беспроводную wifi сеть. Контроллер обеспечивает в том числе аутентификацию клиентов сети. Для точек требуется минимальная настройка. Достаточно указать адрес контроллера сети и они все необходимые настройки получат от него. Сами же точки выполняют только транспорт и шифрование пакетов от клиента к контроллеру.
Теперь расскажу, что такое capsman v2 и чем он отличается от первой версии. Сразу стоит сказать, что совместимости между двумя версиями нет. Если у вас контроллер v2, то к нему могут подключаться только точки доступа с такой же версией. И наоборот — если у вас точки v2, подключиться к контроллеру первой версии не получится. Сейчас это не очень актуальная информация, так как версия v2 вышла несколько лет назад и везде используется именно она. Такое предостережение было актуально на момент релиза v2 и переходного периода.
В момент появления в RouterOS функционала CAPsMAN v2, он был включен в отдельный пакет wireless-cm2, для того, чтобы не пересекаться с предыдущей версией. Это случилось в RouterOS v6.22rc7. У предыдущей версии capsman было название пакета — wireless-fp, он появился в версии v6.11. Далее в версии 6.37 capsman v1 был удален из системы и остался только один пакет wireless, в котором реализован функционал капсман второй версии. С тех пор путаницы с именами пакетов больше не возникает. Так что если у вас какая-то древняя версия прошивки, ее.
Список нововведений capsman v2:
- Возможность автоматически обновлять управляемые точки доступа.
- Усовершенствован протокол обмена информацией между контроллером и точками доступа.
- Добавлены поля «Name Format» и «Name Prefix» в настройках Provision rules.
- Улучшено логирование процесса переключения клиента от точки к точке.
- Добавлен L2 Path MTU discovery.
Если у вас в сети уже настроен capsman прошлой версии, то разработчики предлагают следующий путь обновления всей вашей сети до v2:
- Настраиваете в исходной сети временный контроллер capsman v2.
- Начинаете постепенно обновлять управляемые точки доступа. Все обновленные точки доступа будут подключаться к временному контроллеру.
- После того, как все управляемые точки доступа будут обновлены до последней версии, обновляете основной контроллер capsman. После того, как это случится, выключаете временный контроллер.
Есть более простой путь, если вам не критичен простой сети на некоторое время. Одновременно запускайте обновление на всех роутерах — и на контроллере и на точках. Как только они обновятся, все заработает на новой версии.
Сразу предупреждаю, если возникнут вопросы на эту тему. Я лично не проверял обновление до версии v2, не было в этом необходимости.
Системные требования и ограничения
Для настройки контроллера Capsman не обязательно наличие wifi интерфейса на устройстве. Так что в его качестве может выступать и виртуальная машина с установленной RouterOS. Единственное условие — уровень лицензии не ниже Level4. Как я уже раннее сказал, версия системы не ниже v6.22rc7. Вряд ли у кого-то еще такая древность осталась, так что требование чисто формальное.
Ограничение технологии Capsman:
- Максимум 32 беспроводных интерфейса на управляемой точке доступа (CAP — Controlled Access Points).
- Не более 32-х виртуальных интерфейсов на основной беспроводной интерфейс.
Настройка firewall в capsman
Я же просто покажу пример того, как можно ограничить доступ из гостевой сети в основную с помощью firewall. В данном случае Capsman не вносит каких-то нюансов в настройку firewall, так как это более высокий уровень. В фаерволе же мы работаем с протоколами, интерфейсами и ip адресами.
ip firewall filter
add action=drop chain=forward comment="block local Net" dst-address=10.1.3.0/24 src-address=10.1.31.0/24
- 10.1.3.0/24 — основная подсеть
- 10.1.31.0/24 — гостевая подсеть
Мы просто запретили доступ из гостевой сети в основную
Обращаю внимание, что у вас в гостевой сети должен быть свой DNS сервер. Иногда это не так
Видел такие ошибки, когда закрывают доступ из гостевой сети в основную, но при этом гостям выдают dns сервер из основной сети. Если это так, то не забудьте разрешить DNS запросы от гостей. Но лучше так не делать. Выдайте им публичные dns серверы из интернета, да и все.
Еще возможны ситуации, когда к гостевой сети подключаются личные смартфоны сотрудников. Я бы именно туда их и подключал, не пуская в основную сеть. Но у них могут быть настроены почтовые ящики от вашего почтового сервера, который располагается в локальной сети. В итоге из гостевой сети они не могут попасть на почтовый сервер. Тут их либо придется пускать на почтовый сервер из гостевой сети, либо строить им маршрут через интернет. Как лучше сделать, надо решать по месту.
Router Users
Sub-menu:
Router user database stores the information such as username, password, allowed access addresses and group about router management personnel.
Properties
| Property | Description |
|---|---|
| address (IP/mask | IPv6 prefix; Default: ) | Host or network address from which the user is allowed to log in |
| group (string; Default: ) | Name of the the user belongs to |
| name (string; Default: ) | User name. Although it must start with an alphanumeric character, it may contain «*», «_», «.» and «@» symbols. |
| password (string; Default: ) | User password. If not specified, it is left blank (hit when logging in). It conforms to standard Unix characteristics of passwords and may contain letters, digits, «*» and «_» symbols. |
| last-logged-in (time and date; Default: «») | Read-only field. Last time and date when user logged in. |
Notes
There is one predefined user with full access rights:
 user> print
Flags: X - disabled
  #   NAME                                             GROUP ADDRESS    LAST-LOGGED-IN
  0   ;;; system default user
      admin                                            full  0.0.0.0/0  dec/08/2010 16:19:24

 user>
There always should be at least one user with full access rights. If the user with full access rights is the only one, it cannot be removed.


