Интернет-банкинг укрэксимбанка
Содержание:
Spam scanning
There are several ways to detect spam.
Exim has default configuration for spamassassin (exim4-daemon-heavy required).
#apt-get install spamassassin
If you are using Debian Jessie or later (with systemd enabled by default), enable and start the service using systemctl;
#systemctl enable spamassassin.service
On earlier Debian releases, edit /etc/default/spamassassin …
ENABLED=1
…and then start the daemon.
#/etc/init.d/spamassassin start
On all systems, edit /etc/exim4/exim4.conf.template as required for your system.
First, if necessary, set the spamd_address:
# For spam scanning, there is a similar option that defines the interface to
# SpamAssassin. You do not need to set this if you are using the default, which
# is shown in this commented example. As for virus scanning, you must also
# modify the acl_check_data access control list to enable spam scanning.

spamd_address = 127.0.0.1 783
Next, edit the acl_check_data section to add suitable spam headers:
### acl/40_exim4-config_check_data
#################################

# This ACL is used after the contents of a message have been received. This
# is the ACL in which you can test a message's headers or body, and in
# particular, this is where you can invoke external virus or spam scanners.

acl_check_data:
...
...
...
# See the exim docs and the exim wiki for more suitable examples.
#
# warn
#   spam = Debian-exim:true
#   add_header = X-Spam_score: $spam_score\n\
#             X-Spam_score_int: $spam_score_int\n\
#             X-Spam_bar: $spam_bar\n\
#             X-Spam_report: $spam_report

# put headers in all messages (no matter if spam or not)
 warn  spam = debian-spamd:true
     add_header = X-Spam-Score: $spam_score ($spam_bar)
     add_header = X-Spam-Report: $spam_report

# add second subject line with *SPAM* marker when message
# is over threshold
  warn  spam = debian-spamd
      add_header = Subject: ***SPAM (score:$spam_score)*** $h_Subject:
For more information about configuring spam filters, see the exim wiki.
To test your spamassassin setup follow spamassassin https://wiki.apache.org/spamassassin/TestingInstallation and gtube.
Your own file
Simply install your own file in /etc/exim/exim4.conf and exim will use that file verbatim.
To have something to start with, you can either take /etc/exim4/exim4.conf.template, run update-exim4.conf —keepcomments —output /etc/exim4/exim4.conf, or use upstream’s default configuration file that is installed as /usr/share/doc/exim4-base/examples/example.conf.gz.
You are going to lose all magic you get from packaging though, so you need to be familiar with Exim to build an actually working config.
Note that /etc/exim4/exim4.conf is read directly by exim4 every time exim forks. So if you edit it in place, each smtp connection will actually read a different configuration file!
Установка exim на Debian/Ubuntu/Mint
Хочу рассказать в своей теме «Установка exim на Debian/Ubuntu/Mint» как я устанавливал и настраивал свой сервер почты — exim на Debian. Работать будет и на Ubuntu и Mint, так как имеет общие особенности.
Exim является агентом для пересылки почты (MTA) используется на Unix-подобных операционных системах. Exim бесплатно распространяется по условиям GNU General exim-logoPublic лицензии, и он стремится быть лучший почтовой утилитой со всеми удобствами и услугами для проверки входящей электронной почты.
Exim была портирована на большинстве Unix-подобных системах, а также на Microsoft Windows с использованием эмуляции слоя Cygwin. Exim 4 настоящее время, по умолчанию, устанавливается в Debian GNU / Linux.
Сначала проверяем есть ли у нас hostname в файле:
# cat /etc/hosts
127.0.0.1 localhost
192.168.1.10 my_home_domain home_domain
Install diagnostic tools
#apt-get install swaks libnet-ssleay-perl
Test the connection:
$swaks -a -tls -q HELO -s localhost -au your_user -ap '<>'
 === Trying localhost:25...
 === Connected to localhost.
 <-  220 debianwb ESMTP Exim 4.76 Thu, 04 Aug 2011 14:22:02 +0600
  -> EHLO debianwb
 <-  250-debianwb Hello localhost
 <-  250-SIZE 52428800
 <-  250-PIPELINING
 <-  250-STARTTLS
 <-  250 HELP
  -> STARTTLS
 <-  220 TLS go ahead
 === TLS started w/ cipher DHE-RSA-AES256-SHA
  ~> EHLO debianwb
 <~  250-debianwb Hello localhost
 <~  250-SIZE 52428800
 <~  250-PIPELINING
 <~  250 HELP
  ~> QUIT
 <~  221 evie closing connection
Note that above we are sending an empty password while testing with the swaks tool.
Some ISPs may block connecting to port 25, and also some broken clients insist TLS on Port 465.
To support these, change /etc/default/exim4 as:
SMTPLISTENEROPTIONS='-oX 465:25 -oP /var/run/exim4/exim.pid'
Also edit /etc/exim4/exim4.conf.template:
#####################################################
### main/03_exim4-config_tlsoptions
#####################################################
tls_on_connect_ports=465
### main/03_exim4-config_tlsoptions
#################################
Check for details.
Example stand-alone example
This configuration has been tested on a server and ought to be suitable for internal use:
# dpkg-reconfigure exim4-config
General type of mail configuration:  internet site; mail is sent and received directly using SMTP.
System mail name: yourdomain.com
IP-addresses to listen on for incomming SMTP connections: // leave blank
Other destinations for which mail is accepted: yourdomain.com
Domains to relay mail for: // leave blank
Machines to relay mail for: // leave blank
Keep number of DNS-queries minimal (Dial-on-Demand) ?: No
Delivery method for local mail: Maildir format in home directory
Split configuration into small files ? : No
This writes the configuration to /etc/exim4/update-exim4.conf.conf.
Вывести количество сообщений в очереди:
exim -bpc
| 1 | exim-bpc |
Заблокировать( заморозить ) сообщение:
exim -Mf
| 1 | exim-Mf… |
Получение базовой информации по Exim
Печать списка сообщений в очереди. Выводятся, время постановки в очередь, размер, ID сообщения, отправитель, получатель:
exim -bp
| 1 | exim-bp |
Печать суммарной информации. Выводимые колонки: количество, объем, старейшее, последнее, домен.
exim -bp | exiqsumm
| 1 | exim-bp|exiqsumm |
Чем в данный момент занимается Exim
exiwhat
| 1 | exiwhat |
Тестирование маршрута доставки до указанного адреса:
exim -bt alias@localdomain.com
user@thishost.com
<— alias@localdomain.com
router = localuser, transport = local_delivery
root@localhost# exim -bt user@thishost.com
user@thishost.com
router = localuser, transport = local_delivery
root@localhost# exim -bt user@remotehost.com
router = lookuphost, transport = remote_smtp
host mail.remotehost.com MX=0
|
1 |
exim-bt alias@localdomain.com user@thishost.com <—alias@localdomain.com router=localuser,transport=local_delivery root@localhost# exim -bt user@thishost.com user@thishost.com router=localuser,transport=local_delivery root@localhost# exim -bt user@remotehost.com router=lookuphost,transport=remote_smtp host mail.remotehost.com1.2.3.4MX= |
Эмитировать SMTP транзакцию из командной строки, как если-бы сообщение пришло с указанного IP адреса. При этом будет показано прохождение и срабатывание проверок, фильтров и листов доступа (ACL). На самом деле, никакое сообщение никуда доставлено не будет.
exim -bh 192.168.11.22
| 1 | exim-bh192.168.11.22 |
Листинг всех настроек конфигурации exim
exim -bP
| 1 | exim-bP |
Поиск очереди с помощью утилиты exiqgrep
Стандартная поставка сервера Exim включает в себя утилиту для поиска по очередям — exiqgrep, это самый оптимальный путь для решения данной задачи. Если вы используете конвейер команд, например из exim -bp в awk, grep, cut и т.д., вы просто усложняете себе жизнь. Различные ключи команды exiqgrep, позволяют достаточно тонко настроить критерии поиска. Ключ -f используется для поиска сообщений конкретного отправителя
exiqgrep -f @domain
| 1 | exiqgrep-fluser@domain |
Ключ -r используется для поиска сообщений для определенного адресата
exiqgrep -r @domain
| 1 | exiqgrep-rluser@domain |
Ключ -o указывает искать сообщения, старее, указанного количества секунд. В примере, сообщения старее 1 дня:
exiqgrep -o 86400
| 1 | exiqgrep-o86400… |
Ключ -y ищет сообщения свежее указанного количества секунд. В примере, найти сообщения, пришедшие в течении последнего часа:
exiqgrep -y 3600
| 1 | exiqgrep-y3600… |
Ключ -s позволяет искать по размеру сообщения, совпадающего с заданным регулярным выражением:
exiqgrep -s ‘^7..$’
| 1 | exiqgrep-s’^7..$’… |
Для поиска только среди заблокированных( замороженных ) сообщений, используйте ключ -z, или -x для поиска только среди не заблокированных. Еще несколько ключей отвечающих за вывод результатов поиска Вывести только ID сообщения, в одном из вышеупомянутых вариантов поиска
exiqgrep -i …
| 1 | exiqgrep-i-r|-f… |
Печатать счетчик сообщений при одном из вышеприведенных вариантов поиска:
exiqgrep -c …
| 1 | exiqgrep-c… |
Вывести только идентификатор всей очереди:
exiqgrep -i
| 1 | exiqgrep-i |
Основной бинарник Exim ( /usr/sbin/exim ), используется с различными ключами для управления сообщениями в очереди. Многие ключи, подразумевают указание одного или более ID сообщения в командной строке, как раз тут вам и пригодится команда exiqgrep -i, которая была упомянута выше. Запуск очереди:
exim -q -v
| 1 | exim-q-v |
Сообщение
Разблокировать сообщение:
exim -Mt
| 1 | exim-Mt… |
Доставить сообщение, вне зависимости от состояния блокировки или времени повторной доставки:
exim -M
| 1 | exim-M… |
Доставить сообщение, только если достигнуто время для повторной доставки:
exim -Mc
| 1 | exim-Mc… |
Принудительно остановить сообщение с формулировкой «отменено администратором»:
exim -Mg
| 1 | exim-Mg… |
Удалить все заблокированные сообщения:
exiqgrep -z -i | xargs exim -Mrm
| 1 | exiqgrep-z-i|xargs exim-Mrm |
Удалить все сообщения, старше 5 дней (86400 * 5 = 432000 секунд):
exiqgrep -o 432000 -i | xargs exim -Mrm
| 1 | exiqgrep-o432000-i|xargs exim-Mrm |
Заблокировать все письма от указанного отправителя:
exiqgrep -i -f luser@example.tld | xargs exim -Mf
| 1 | exiqgrep-i-fluser@example.tld|xargs exim-Mf |
Просмотреть заголовки сообщений:
exim -Mvh
| 1 | exim-Mvh |
Просмотреть тело сообщений:
exim -Mvb
| 1 | exim-Mvb |
Просмотр логов сообщения:
exim -Mvl
| 1 | exim-Mvl |
Добавить получателя в сообщение:
exim -Mar
| 1 | exim-Mar |
Редактировать отправителя сообщения:
root@localhost# exim -Mes
| 1 | root@localhost# exim -Mes |
Email sub-addressing (plus-signs as in Gmail)
These can easily be achieved by adding something similar to the following in one of more of your router definitions
local_part_suffix = +* : -* : _*
local_part_suffix_optional
The above example would deliver user+example@domain.com, user-example@domain.com and user_example@domain.com to user@domain.com.
Similarly, you could use a prefix instead with these similarly named options
local_part_prefix = *+ : *- : *_
local_part_prefix_optional
The above example would deliver example+user@domain.com, example-user@domain.com and example_user@domain.com to user@domain.com.
Split file
In this scenarios the configuration is split across lots of smaller files stored in /etc/exim4/conf.d/ which are then assembled in to one file for you by the update-exim4.conf command. Each section of the configuration file has its own subdirectory and the files therein are concatenated in alphabetical order. As such its probably a good idea that your custom files be named something like 00_exim4-my-config so they are included first.
This mode of operation allows for your own sections of configuration to be inserted at any location in the final config file, without touching any of the package provided files. The idea being that upgrades become very reliable.
DMARC Support
Note Trisquel 8 backports repository, exim4-daemon-heavy has DMARC support builtin, and is based on the version from ubuntu 18.04.
You will need to compile a modified version of exim, editing any of the EDITME configuration files in a patch like the one below. In your configuration, you will need to use the spf builtin to exim instead of the external one that Debian’s default config ships with. Documentation of these features is in https://github.com/Exim/exim/blob/master/doc/doc-txt/experimental-spec.txt
@@ -459,9 +462,9 @@
 # installed on your system (www.libspf2.org). Depending on where it is installed
 # you may have to edit the CFLAGS and LDFLAGS lines.

-# EXPERIMENTAL_SPF=yes
-# CFLAGS  += -I/usr/local/include
-# LDFLAGS += -lspf2
+EXPERIMENTAL_SPF=yes
+CFLAGS  += -I/usr/local/include
+LDFLAGS += -lspf2

 # Uncomment the following lines to add SRS (Sender rewriting scheme) support.
 # You need to have libsrs_alt installed on your system (srs.mirtol.com).
@@ -474,10 +477,10 @@

 # Uncomment the following line to add DMARC checking capability, implemented
 # using libopendmarc libraries.  You must have SPF support enabled also.
-# EXPERIMENTAL_DMARC=yes
-# DMARC_TLD_FILE= /etc/exim/opendmarc.tlds
-# CFLAGS += -I/usr/local/include
-# LDFLAGS += -lopendmarc
+EXPERIMENTAL_DMARC=yes
+DMARC_TLD_FILE= /etc/exim4/opendmarc.tlds
+CFLAGS += -I/usr/local/include
+LDFLAGS += -lopendmarc

 # Uncomment the following lines to add Brightmail AntiSpam support. You need
 # to have the Brightmail client SDK installed. Please check the experimental
Exim will also have new dependencies, libopendmarc2 and libspf2-2. And their dev version for building.
DNS Blacklists
You can configure exim to use DNS Blacklists with the macro CHECK_RCPT_IP_DNSBLS :
CHECK_RCPT_IP_DNSBLS = zen.spamhaus.org
The default behaviour is not to block the hosts found in the lists, but just add a warning header. In order to truly blacklist the spammers, just change ‘warn’ by ‘deny’ in the following block:
  .ifdef CHECK_RCPT_IP_DNSBLS
  warn # <--- deny
    dnslists = CHECK_RCPT_IP_DNSBLS
    add_header = X-Warning: $sender_host_address is listed at $dnslist_domain ($dnslist_value: $dnslist_text)
    log_message = $sender_host_address is listed at $dnslist_domain ($dnslist_value: $dnslist_text)
  .endif
Then restart exim.
CentOS: установка и настройка Dovecot 2 + Exim + ClamAV + Postfixadmin
Установка выполняется на:
Предполагается, что MySQL и Apache HTTP уже установлены.
Создаём базу для доменов и почтовых ящиков:
Создаём пользователя и даём доступ к этой базе:
Устанавливаем всё необходимое для Postfixadmin:
Наcтройка Dovecot
Получаем UID пользователя exim (от него у нас будут работать и ClamAV, и Dovecot и сам Exim):
Редактируем файл /etc/dovecot/dovecot.conf , и приводим его к такому виду (было желание описать все подробно — но их слишком много, см. ссылки в конце статьи):
Создаём файл с описанием подключения к MySQL — /etc/dovecot/dovecot-mysql.conf :
Проверим базу (вообще мы пользователя создадим позже, тут просто для примера) — найдём пользователя:
Запустился, пока без ошибок.
Настройка Exim
Создаём новый /etc/exim/exim.conf :
Проверяем синтаксис конфига:
Ошибка будет выглядеть так (оставим незакрытую скобку
Устанавливаем права доступа:
Отключаем и удаляем Postfix:
Устанавливаем 2 ( sendmail.exim ) вместо 1 ( sendmail.postfix ) — таким образом MTA по-умолчанию у нас будет Exim.
Добавляем в автозагрузку Exim:
Настройка Postfixadmin
Настраиваем виртуалхост для Postfixadmin (Apache HTTP установлен по этой>>> статье).
Создаём директорию для php -обработчика:
Обязательно проверяем права:
Создаём конфиг /etc/httpd/conf.d/postfixadmin.domain.org.ua.conf :
Проверяем конфиг Apache HTTP:
Создаём конфиг для NGINX:
Открываем страницу http://postfixadmin.domain.org.ua/setup.php и внизу задаём пароль установки (обязательное условие — минимум 2 цифры в пароле):
Редактируем файл /var/www/vhosts/postfixadmin.domain.org.ua/config.inc.php , добавляем:
Где строка символов (хеш пароля) — та же, что и на странице.
Теперь переходим в саму панель управления http://postfixadmin.domain.org.ua/login.php:
Т.к. мы не снимали галочку «Отправить приветственное письмо» — Exim должен был отправить его на созданный ящик.
Проверяем лог /var/log/exim/main.log :
Настраиваем IPTABLES:
Подключаемся внешним почтовым клиентом, проверяем лог /var/log/maillog :
Заодно, можно увидеть работу dnsblacklist :
Проверим с помощью telnet , для большей наглядности:
Позже надо будет добавить Greylisting, Spamassassin и поддержку шифрования по TLS.
Exim debugging
Несколько команд для проверки работы Exim.
Проверить отправку можно так:
Проверить работу антивируса:
Посмотреть количество писем в очереди на отправку:
Узнать, чем занят Exim в настоящий момент:
Проверить маршрут отправки письма:
Сымитировать SMTP-активность с заданного адреса, с отображением задействованных фильтров и т.п.:
Вывести все опции Exim из файлов конфигурации (активные/неактивные):
источник
User authentication
Adding user authentication is possible using tools like Dovecot or sasl2-bin. For shell users who would like to use SASL and PAM for password authentication, that can setup this way:
#apt-get install sasl2-bin
Edit /etc/default/saslauthd to enable saslauth:
START=yes
Start the deamon:
#/etc/init.d/saslauthd start
In /etc/exim4/exim4.conf.template, uncomment the following lines to enable authentication via saslauthd:
 plain_saslauthd_server:
    driver = plaintext
    public_name = PLAIN
    server_condition = ${if saslauthd{{$auth2}{$auth3}}{1}{0}}
    server_set_id = $auth2
    server_prompts = :
    .ifndef AUTH_SERVER_ALLOW_NOTLS_PASSWORDS
    server_advertise_condition = ${if eq{$tls_cipher}{}{}{*}}
    .endif
Add exim to the sasl group:
#adduser Debian-exim sasl
Restart exim:
#/etc/init.d/exim4 restart
Test the connection using your username:
#swaks -a -tls -q AUTH -s localhost -au your_user
Password:
Enable IMAP access by installing Courier-Imap or a similar MTA.
Roudcube
# nano /etc/httpd/conf.d/roundcube.conf
#
# Round Cube Webmail is a browser-based multilingual IMAP client
#
Options none
AllowOverride Limit
Require all granted
Options none
AllowOverride Limit
Require all granted
# Those directories should not be viewed by Web clients.
Order Allow,Deny
Deny from all
Order Allow,Deny
Deny from all
# service httpd restart
# mysql -u root -p
mysql> CREATE DATABASE dbroundcube;
mysql> CREATE USER userroundcube@localhost IDENTIFIED BY ‘password’;
mysql> GRANT ALL PRIVILEGES on dbroundcube.* to userroundcube@localhost ;
mysql> FLUSH PRIVILEGES;
mysql> quit
http://mail.mypostdomain.com/roundcube/installer
POP3: 110
IMAP: 143
SMTP: 25
For running a mailing list and ensuring all sent mail is DMARC compliant
Requires DMARC support (see above section of this wiki).
Edit exim-conf.d/acl/30_exim4-config_check_rcpt, comment out a line
  accept
    hosts = +relay_from_hosts
    control = submission/sender_retain
    # commented out, we need dkim from localhost for dmarc
#    control = dkim_disable_verify
Add to your rcpt_local_acl
# for dmarc, we need to run spf beforehand
warn
  spf = !pass
  log_message = spf not pass
Add to your data_local_acl.
# Here we do dmarc from: munging basically just like mailman does, as far as I can tell.
warn
  log_message = fsf-exim-dmarc-munging
  # for dmarc, we only care about messages that mailman sends out,
  # and in our case, that runs on the same machine.
  hosts = <; 127.0.0.1 ; ::1
  dmarc_status = reject:quarantine
  remove_header = Reply-to:
  # Add from: to reply-to:.
  add_header = Reply-to: ${if def:h_reply-to: {$h_reply-to:, }{}}$h_from:
  remove_header = From:
  # The main from munge is done in the next line
  # example input and outputs of it:
  # input:
  # List-Id: <libreplanet-discuss.libreplanet.org>
  # From: joe@wackydomain.com
  # output:
  # From: joe--- via <libreplanet-discuss@libreplanet.org>
  #
  # input:
  # List-Id: GNU emacs discussion
  #  <gnu-emacs.gnu.org>
  # From: "P xxx person" <aperson@wackydomain.com>
  # output:
  # From: "P xxx person" via GNU emacs discussion
  #   <gnu-emacs@gnu.org>
  #
  # how this works:
  # sg = subsitute globally, works like perl
  # first 2 sgs operate on original from header.
  # inner sg removes <.*, outer sg does s/@.*/---/.
  #
  # The final sg operates on list-id header, replaces the second to last . with an @
  # Note, this means if we ever use any list that uses 3+ part domain, this
  # will need adjusting, for example if we made somelist@savannah.gnu.org
  #
  # I imagine its possible for someone to have a crazy from: header and
  # screw this up somehow.
  #
  # Note, at least for emacs mail client, when doing reply-all for these
  # messages, it uses reply-to: and to:, not the from:
  add_header = From: ${sg{${sg{$h_from:}{\N *<.*\N}{}}}{@.*}{---}} via ${sg{$h_list-id:}{\N\.(+\.+)$\N}{@\$1}}
Exim установка и настройка
Теперь мы откроем файл /etc/exim/exim.conf, используя ваш любимый редактор,предварительно создав его резервную копию и приведем его к следующему виду:
primary_hostname = mail.mypostdomain.com
domainlist local_domains = @ : mypostdomain.com
tls_advertise_hosts = *
tls_certificate = /etc/ssl/mail.mypostdomain.com.crt
tls_privatekey = /etc/ssl/mail.mypostdomain.com.key
auth_advertise_hosts = *
Обратим внимание на строки tls_certificate и tls_privatekey, мы будем использовать сертификат SSL, Вы можете заказать его на нашем сайте и найти необходимые файлы в Личном кабинете. Далее перейдем к разделу транспорт и приведем к виду:
Далее перейдем к разделу транспорт и приведем к виду:
local_delivery:
driver = appendfile
directory = $home/Maildir
maildir_format
maildir_use_size_file
delivery_date_add
envelope_to_add
return_path_add
Далее в разделе аутентификации добавим несколько строк:
dovecot_login:
driver = dovecot
public_name = LOGIN
server_socket = /var/run/dovecot/auth-client
server_set_id = $auth1
dovecot_plain:
driver = dovecot
public_name = PLAIN
server_socket = /var/run/dovecot/auth-client
server_set_id = $auth1
Запустим exim, и добавим его в автозагрузку системы используя systemctl:
Настройка Exim
Для настройки (конфигурирования) выполните команду:
# dpkg-reconfigure exim4-config
Нажимаем на начальном окне «OK», и в появившемся окне выбираем опцию «интернет-сайт;отправка писем с использованием SNTP» — 1 строчка в выборе:
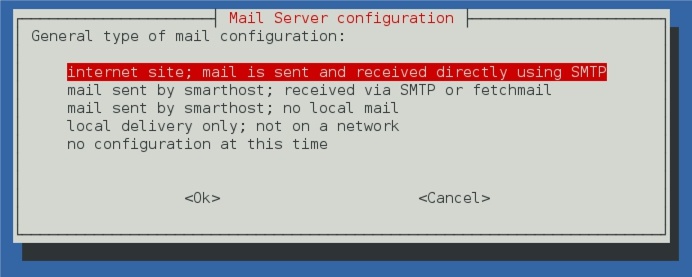
конфигурирование почтового сервера exim на Debian
После чего нажимаем ОК. В следующем шаге, вводим доменное имя. У меня это my_home_domain:
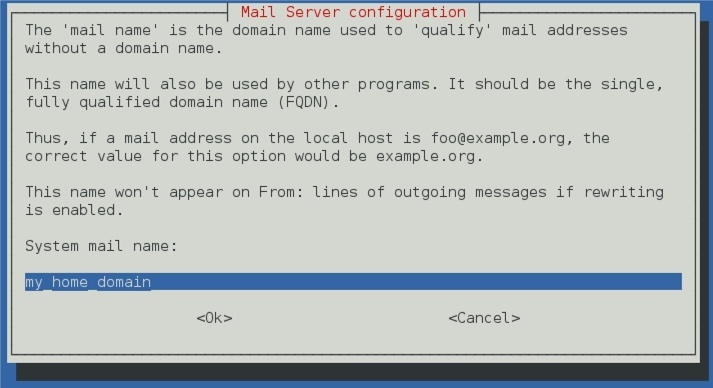
настройка домена для exim
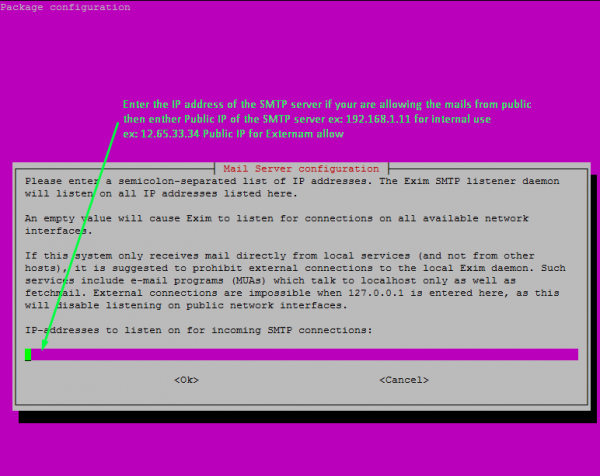
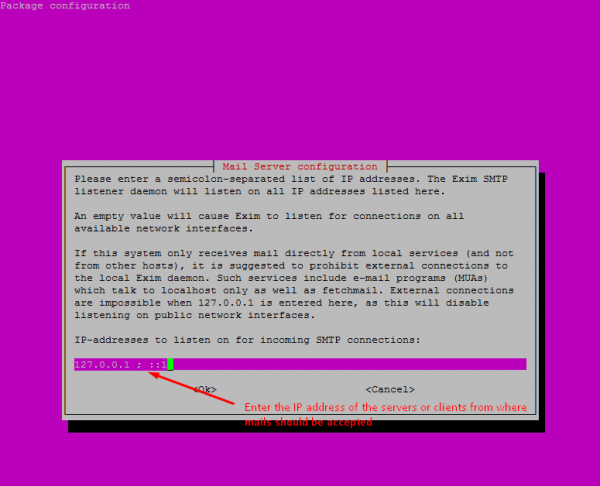
В следующей вкладке указываем список ИП-адресов (между ними нужно ставить точку с запятой — «;»)для SMTP соединения (стоит указать толко IP-адрес localhost-а):
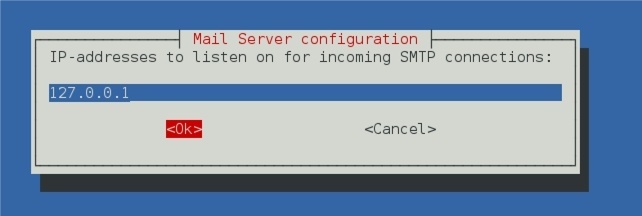
вводим IP адрес который будет слушать и использовать SMTP
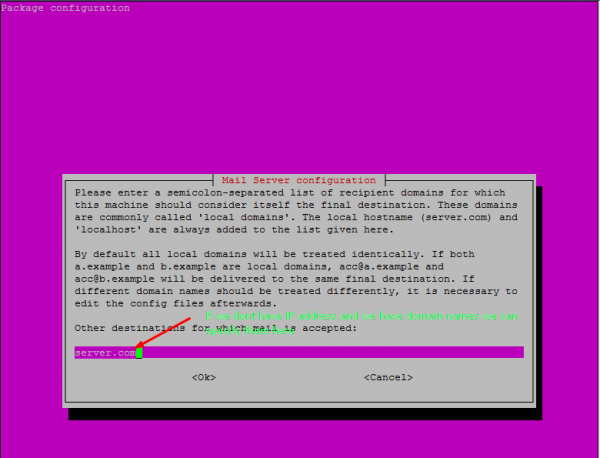
В следующем окне указываем все домены, которые указывают на ваш сервер (через точку с запятой):
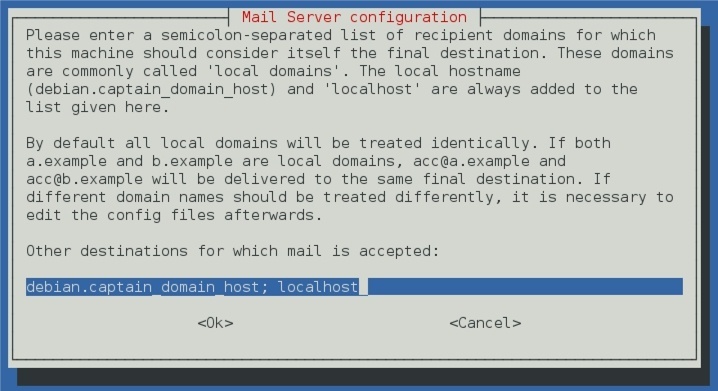
прописываем дополнительные домены
На следующих пунктах мы не заполняем поля, оставляем пустыми ( но только для 2 следующих):

домены для которых доступна релейная передача почты
И, еще один:
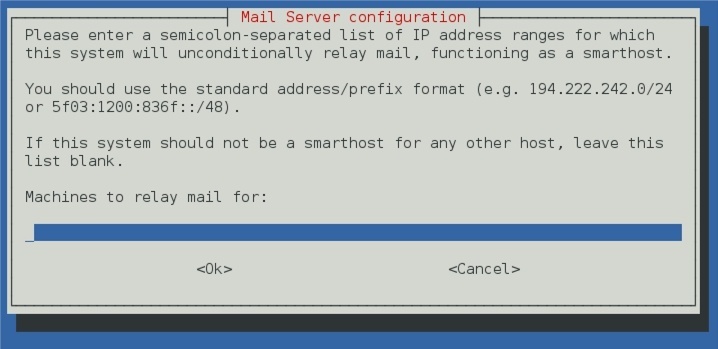
машины для которых доступна релейная передача почты
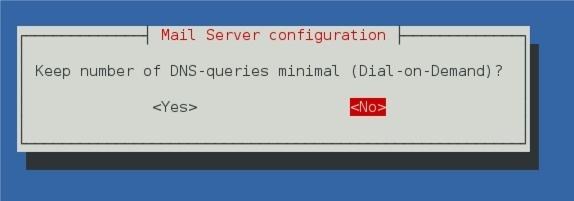
На следующем окне нас спросят «нужно ли включить сокращения DNS-запросов» — выбираем «НЕТ ( NO)»:
Далее, выбираем «Maildir — хранение в домашней директории всей почты», есть так же «mbox», но первый вариант имеет большую популярность и обладает некоторыми преимуществами:

выбор директории для хранения почты
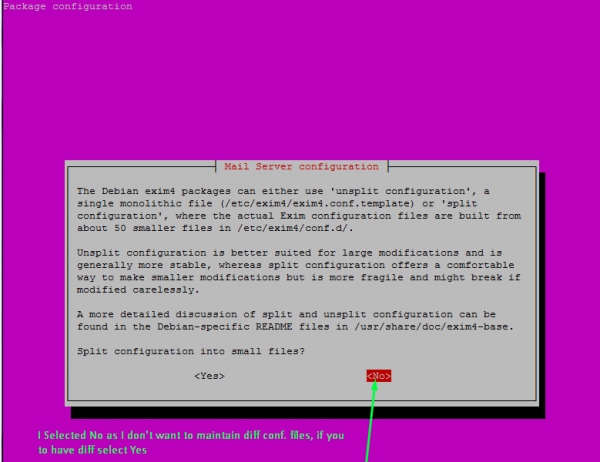
На следующем окне, спрашивают «Желаете разделить конфигурацию» — выбираем «No (нет)»:
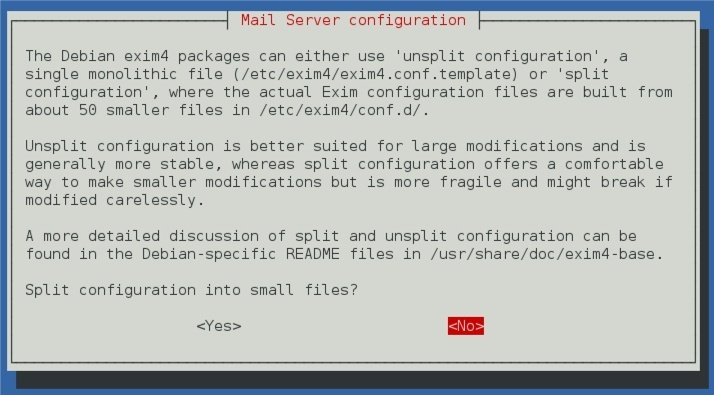
розделение конфигурации в exim
После чего, окно мастера установки закроется само, и выполнит перезагрузку Exim.
Протестировать можно следующим образом, выполните команду:
# echo “My test Msg” | mail -s Topic your_email_address
Вот и вся установка, надеюсь моя статья «Установка exim на Debian/Ubuntu/Mint» была полезной.
Installation
To install exim4, use the following command –
# hostname testserver.com
# sudo –i (to Enter with root permissions)
# apt-get update
# apt-get install exim4
The sample output should be like this –
Reading package lists... Done
Building dependency tree
Reading state information... Done
The following extra packages will be installed:
exim4-base exim4-config exim4-daemon-light heirloom-mailx
Suggested packages:
mail-reader eximon4 exim4-doc-html exim4-doc-info spf-tools-perl swaks
Recommended packages:
mailx
The following NEW packages will be installed:
exim4 exim4-base exim4-config exim4-daemon-light heirloom-mailx
0 upgraded, 5 newly installed, 0 to remove and 66 not upgraded.
Need to get 1,862 kB of archives.
After this operation, 4,258 kB of additional disk space will be used.
Do you want to continue? [Y/n] y
Get:1 http://us.archive.ubuntu.com/ubuntu/ wily/main exim4-config all 4.86-3 ubuntu1
Get:2 http://us.archive.ubuntu.com/ubuntu/ wily/main exim4-base amd64 4.86-3ubuntu1
Get:3 http://us.archive.ubuntu.com/ubuntu/ wily/main exim4-daemon-light amd64 4.86-3ubuntu1
Get:4 http://us.archive.ubuntu.com/ubuntu/ wily/main exim4 all 4.86-3ubuntu1
Get:5 http://us.archive.ubuntu.com/ubuntu/ wily/universe heirloom-mailx amd64 12.5-5
Fetched 1,862 kB in 49s (37.7 kB/s)
Preconfiguring packages ...
Selecting previously unselected package exim4-config.
(Reading database ... 91615 files and directories currently installed.)
Preparing to unpack .../exim4-config_4.86-3ubuntu1_all.deb ...
Unpacking exim4-config (4.86-3ubuntu1) ...
................................................
# dpkg-reconfigure exim4-config
The output should be like this –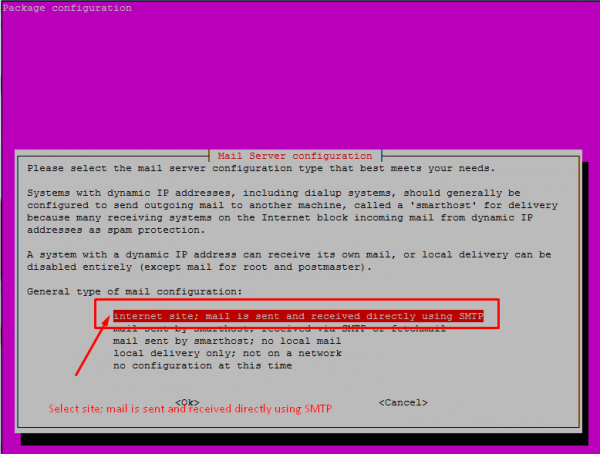
Select “internet site; mail is sent and received directly using SMTP” option
Provide the server name for the Exim4 SMTP server. By default, it will take the hostname of the machine.

Here, you can give a semicolon-separated list of IP address for multiple IP’s.
Please note that, you can give a semicolon-separated list of domain address for multiple domains.
Enter a semicolon-separated list of IP address ranges for which this system will unconditionally relay mails. (Functioning as a smart host). This is generally the localhost which will be taken.

Select Keep number of DNS-queries minimal (Dial-on-Demand) to No ( previously, we used to have Dial-up connection, but currently most of the internet users are having broadband connections)

Select the delivery method for the local mail’s. Here, I have selected Maildir format in the home directory
Select Split configuration into small files? to No . If you are interested to store the configuration into small files, then you can choose YES
After the configuration we can add the client using the same configuration command or we can directly edit the configuration file and add the additional client to use with this SMTP server.
Open the configuration file and edit or add the clients IP or domain names
# vi /etc/exim4/update-exim4.conf.conf
update-exim4.conf.conf file should be like this –
## Edit this file and /etc/mailname by hand and execute update-exim4.conf
# yourself or use 'dpkg-reconfigure exim4-config'#
# Please note that this is _not_ a dpkg-conffile and that automatically changes
# to this file might happen. The code handling this will honor your local
# changes, so this is usually fine, but will break local schemes that mess
# around with multiple versions of the file.
## update-exim4.conf uses this file to determine variable values to generate
# exim configuration macros for the configuration file.
## Most settings found in here do have corresponding questions in the
# Debconf configuration, but not all of them.
## This is a Debian specific file
dc_eximconfig_configtype='internet'
dc_other_hostnames='server.com'
dc_local_interfaces='127.0.0.1'
dc_readhost=''
dc_relay_domains='192.168.1.1'
dc_minimaldns='false'
dc_relay_nets='cgi.com'
dc_smarthost=''
CFILEMODE='644'
dc_use_split_config='false'
dc_hide_mailname=''
dc_mailname_in_oh='true'
dc_localdelivery='maildir_home'
Now, edit the following lines in the configuration with semicolon separated
dc_relay_nets are used to add the IP address of the client/servers
dc_relay_domains are used to add the domain names of the client/servers
Lakshmi Srinivas
Published on 18-Oct-2019 17:02:42
Previous Page
Print Page
Next Page
Работа с кучей
Для начала взглянем на саму провинившуюся функцию.
/src/base64.c
За выделение требуемого количества памяти отвечает — кастомная функция из набора для менеджмента памяти, который используется в составе Exim.
/src/store.h
Во время работы функции выделяется буфер размером байт для хранения декодированных данных, где — длина передаваемых данных. Такая формула не случайна, так как в стандарте Base64 каждые три исходных байта кодируются четырьмя символами. В идеальных условиях размер переданных данных всегда кратен четырем, но, к счастью, мы живем не в них, и если передать невалидную кодированную строку, то функция получит неверное значение размера выделяемой памяти.
Размеры выделяемой памяти для валидной и невалидной строки Base64
В общем случае, когда передаем строку размером 4n – 1, Exim зарезервирует 3n + 1 байт, но после декодирования получится строка, итоговый размер которой будет равен 3n + 2 байта, и это вызовет переполнение при попытке записи в выделенный буфер.
Где используется кодировка Base64? Да практически везде. Начиная от разных типов авторизаций и заканчивая файлами, которые прикрепляются к письмам. Все эти вещи потенциально уязвимы. Авторизация нам подходит, так как для отправки сообщений чаще всего потребуется валидный логин и пароль. На тестовом стенде уже включен механизм аутентификации CRAM-MD5, но подойдет и любой другой, который работает с Base64.
Теперь немножко поговорим о работе с памятью. Как я уже писал, в Exim существует самописный набор функций для этих целей. Функция — вызов прямиком из библиотеки glibc. Она занимается выделением блока памяти нужного размера.
Вариант 1. Присоединись к сообществу «Xakep.ru», чтобы читать все материалы на сайте
Членство в сообществе в течение указанного срока откроет тебе доступ ко ВСЕМ материалам «Хакера», увеличит личную накопительную скидку и позволит накапливать профессиональный рейтинг Xakep Score!
Подробнее
Вариант 2. Открой один материал
Заинтересовала статья, но нет возможности стать членом клуба «Xakep.ru»? Тогда этот вариант для тебя!
Обрати внимание: этот способ подходит только для статей, опубликованных более двух месяцев назад.
Я уже участник «Xakep.ru»


