5 мин для чтениякак обрабатывать пароли учетных записей в linux с помощью команды passwd
Содержание:
Внешняя аутентификация
Еще один метод аутентификации пользователей базы данных — метод внешней аутентификации, при котором учетные записи пользователей на уровне операционной системы сопоставляются с именами пользователей в базе данных. Oracle осуществляет управление полномочиями пользователей в самой базе данных, но аутентификация пользователей производится операционной системой, которая является внешней по отношению к БД. Преимущество этого метода состоит в том, что будет требоваться единственное имя пользователя для операционной системы и для подключений к базе данных. Это может также облегчить аудит действий пользователей, поскольку имена в базе данных и учетные записи операционной системы совпадают.
Для применения аутентификации операционной системой вначале потребуется установить параметр конфигурации OS_AUTHENT_PREFIX в файле init.ora:
OS_AUTHENT_PREFIX = ""
Пара кавычек не должна содержать пробел.
На заметку! По умолчанию параметру OS_AUTHENT_PREFIX присваивается значение «OPS$», но это делается только для поддержания обратной совместимости.
При повторном запуске базы данных можно начать использовать внешнюю аутентификацию средствами операционной системы. Чтобы активизировать аутентификацию операционной системой, пользователей необходимо создавать следующим образом:
SQL> CREATE USER salapati IDENTIFIED EXTERNALLY;
User created.
SQL>
Обратите внимание, что новому пользователю не присваивается пароль — он в нем не нуждается. До тех пор, пока пользователь может войти в операционную систему, все, что ему нужно сделать для входа в базу данных — это ввести следующую команду:
$ sqlplus /
На заметку! Хорошо известная учетная запись Oracle OPS$ORACLE — это простая разновидность приведенного примера внешней аутентификации. OPS$ — префикс, используемый Oracle, начиная с версии Oracle 5. Для внешней аутентификации операционной системой можно использовать любой префикс или вообще его не указывать.
Внешняя аутентификация операционной системой, описанная в этом разделе, не позволяет пользователям подключаться через службу Oracle Net, поскольку этот метод аутентификации считается не слишком безопасным. Поэтому конфигурации с разделяемым сервером, использующие Oracle Net, по умолчанию не могут применять внешнюю аутентификацию операционной системой. Для изменения этого определенного по умолчанию поведения потребуется установить следующий параметр в файле init.ora:
REMOTE_OS_AUTHENT=TRUE
Прокси-аутентификация
Прокси-аутентификация позволяет одному постоянному сеансу базы данных выполнять переключение на других пользователей без необходимости осуществлять вход/выход из БД. Для поддержки взаимодействия пользователя с базой данных Oracle можно использовать несколько продуктов промежуточного слоя. Часто веб-сервер служит промежуточным слоем или слоем приложения, связывающего клиентов с базой данных. Промежуточный слой может выполнять аутентификацию пользователей или же передавать имя пользователя и пароль в базу данных для выполнения аутентификации. Ниже приведен пример санкционирования подключений посредством регистрации пользователя базы данных из узла промежуточного слоя с применением аутентификации с применением пароля.
SQL> ALTER USER salapati
2 GRANT CONNECT THROUGH appserv
3* AUTHENTICATED USING PASSWORD;
User altered.
SQL>
В следующем примере показано, как разрешить постоянному сеансу, запущенному на сервере appserv, временно принимать идентичность salapati, если постоянный сеанс предоставляет пароль этого пользователя:
SQL> ALTER USER salapati
2* GRANT CONNECT THROUGH appserv;
User altered.
SQL>
The newgrp command
The newgrp command executes a new shell and changes a user’s real group identification. The following example illustrates the group ID before and after running the command. It also illustrates that a new shell is executed.
$ id
uid=1000(oracle) gid=1000(oracle)

groups=1000(oracle),1066(students)...
Note that the gid equals 1000(oracle).
$ ps
PID TTY TIME CMD
20279 pts/0 00:00:00 bash 20411 pts/0 00:00:00 ps
$ newgrp students
$ id
uid=1000(oracle) gid=1066(students)
groups=1000(oracle),1066(students)...
Note that the gid now equals 1066(students). Also note that a new shell was executed:
$ ps
PID TTY TIME CMD
20279 pts/0 00:00:00 bash
20464 pts/0 00:00:00 bash
20486 pts/0 00:00:00 ps
Note : The newgrp command does not recognize group ID numbers and you can only change your real group name to a group that you are a member of. Running the command without an argument sets the real group identification to the user’s primary group.
Description
The passwd command changes passwords for user accounts. A normal user can only change the password for their own account, but the superuser can change the password for any account. passwd can also change or reset the account’s validity period — how much time can pass before the password expires and must be changed.
Before a normal user can change their own password, they must first enter their current password for verification. (The superuser can bypass this step when changing another user’s password.)
After the current password has been verified, passwd checks to see if the user is allowed to change their password at this time. If not, passwd refuses to continue, and exits.
Otherwise, the user is then prompted twice for a replacement password. Both entries must match for passwd to continue.
Next, the password is tested for complexity. As a general guideline, passwords should consist of at least 6 characters, including one or more of each of the following:
- lower case letters
- digits 0 through 9
- punctuation marks
Централизованная авторизация пользователей
Если используется опция Oracle Advanced Security (Расширенная безопасность Oracle), для выполнения аутентификации пользователей можно использовать службу каталогов, работающую на основе LDAP (Lightweight Directory Access Protocol — облегченный протокол службы каталогов), такую как . Служба на основе каталога позволяет создавать пользователей предприятия, которым можно назначать глобальные роли. Централизованное управление пользователями позволяет применять однократную регистрацию — т.е. чтобы получить доступ ко всем необходимым им базам данных, пользователи должны зарегистрироваться только один раз.
Поскольку опция Oracle Advanced Security используется не всеми базами данных, подробное описание реализации централизованной авторизации пользователей не приводится. Для ознакомления с подробным описанием этой функциональной возможности обращайтесь к руководству Oracle Advanced Security Administrator’s Guide (Руководство администратора расширенной системы безопасности Oracle), доступном на веб-сайте:
http://tahiti.oracle.com
Вас заинтересует / Intresting for you:
Oracle и непроцедурный доступ … 6818 просмотров Antoni Tue, 21 Nov 2017, 13:32:50
Видеокурс по администрированию… 7269 просмотров Илья Дергунов Mon, 14 May 2018, 05:08:47
Пользователи Oracle: управлени… 6421 просмотров Дэн Tue, 21 Nov 2017, 13:18:05
СУБД Oracle: обзор характерист… 4229 просмотров Antoni Fri, 24 Nov 2017, 07:35:05
Author: Дэн
Другие статьи автора:
Your password is stored in /etc/shadow file
Your encrpted password is not stored in /etc/passwd file. It is stored in /etc/shadow file. In the good old days there was no great problem with this general read permission. Everybody could read the encrypted passwords, but the hardware was too slow to crack a well-chosen password, and moreover, the basic assumption used to be that of a friendly user-community.
Almost, all modern Linux / UNIX line operating systems use some sort of the shadow password suite, where /etc/passwd has asterisks (*) instead of encrypted passwords, and the encrypted passwords are in /etc/shadow which is readable by the superuser only.
How to list users in Linux using pagers
Of course we can use pagers such as more/less commands as follows to view the /etc/passwd file: Sample outputs: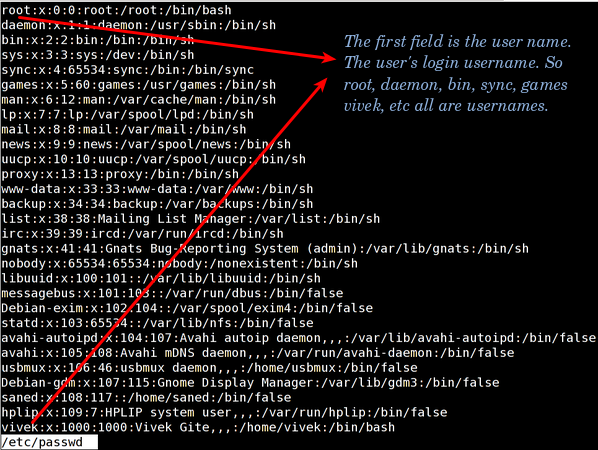
Fig.01: List users using /etc/passwd All fields are separated by a colon (:) symbol. Total seven fields exists. The first field is username. It is used when user logs in. It should be between 1 and 32 characters in length. Of course we can limit outputs using the head command and tail command as follows:
Linux list user names only
To list only usernames type the following awk command: Sample outputs:
root
daemon
bin
sys
sync
games
man
lp
mail
news
....
..
..hplip
vivek
bind
haldaemon
sshd
mysql
radvd
Another option is to use the cut command:
Как установить immutable bit в Linux?
Установка атрибута immutable осуществляется следующим образом . Например мы можем защитить от записи файл /etc/shadow:
$ chattr +i etcshadow
После этого войдём с учетной записи обычного пользователя (скажем, пользователя test) и попробуем сменить пароль:
$ passwd
Changing password for user test.
Changing password for test
(current) UNIX password: OLDPASSWD
New password: NEWPASSWD
Retype new password: NEWPASSWD
passwd: all authentication tokens updated successfully.
Как видим в итоге мы получили сообщение о якобы успешной смене пароля, однако если мы выйдем и снова попробуем войти с помощью уч. записи нашего пользователя test, то обнаружим, что NEWPASSWD не принимается и для входа нам нужно будет использовать OLDPASSWD. Проверить, защищен ли файл от изменений с помощью атрибута immutable можно с помощью программы lsattr:
$ lsattr etcshadow
----i--------e-- etcshadow
Нужно знать, что если файл /etc/shadow имеет атрибут immutable, то даже пользователь root не сможет изменять пароль! Удалить атрибут immutable можно всё той же программы chattr:
$ chattr -i etcshadow
$ lsattr etcshadow
-------------e-- etcshadow
Interpreting an /etc/group File Entry
This picture below provides an example of a default /etc/group file entry. Each entry in the /etc/group file contains four fields. A colon separates each field. The following is the format for an entry:
groupname:group-password:GID:username-list
Each entry in the /etc/group file contains four fields: The description and requirement for each field are as follows:
| Field | Purpose |
|---|---|
| groupname | Contains the name assigned to the group. |
| group-password (x) | x in this field indicates that shadow passwords are used. |
| GID | Contains the group’s GID number. |
| username-list | List of users that are members of the group |
Each group can have multiple users. Users can also belong to more than one group. The GID stored in the user’s entry in /etc/passwd is the user’s primary group.
How do I verify integrity of password files?
Use the pwck command verifies the integrity of the users and authentication information. It checks that all entries in /etc/passwd and /etc/shadow have the proper format and contain valid data. The user is prompted to delete entries that are improperly formatted or which have other uncorrectable errors. The syntax is:
pwck -r etcpasswd pwck -r etcshadow pwck options etcshadow |
The options are as follows:
  -h, --help                    display this help message and exit
  -q, --quiet                   report errors only
  -r, --read-only               display errors and warnings
                                but do not change files
  -R, --root CHROOT_DIR         directory to chroot into
  -s, --sort                    sort entries by UID
This entry is 2 of 3 in the Linux / UNIX System’s Accounts Files Tutorial series. Keep reading the rest of the series:
- Understanding /etc/passwd File Format
- /etc/shadow file format
- Linux and Unix /etc/group file
How do I change or set password ageing information?
To change user password expiry information use the chage command on Linux. The syntax is (again you must be root to set the password again) as follows:
chage username chage options username chage vivek chage -l tom |
The options are as follows:
  -d, --lastday LAST_DAY        set date of last password change to LAST_DAY
  -E, --expiredate EXPIRE_DATE  set account expiration date to EXPIRE_DATE
  -h, --help                    display this help message and exit
  -I, --inactive INACTIVE       set password inactive after expiration
                                to INACTIVE
  -l, --list                    show account aging information
  -m, --mindays MIN_DAYS        set minimum number of days before password
                                change to MIN_DAYS
  -M, --maxdays MAX_DAYS        set maximim number of days before password
                                change to MAX_DAYS
  -R, --root CHROOT_DIR         directory to chroot into
  -W, --warndays WARN_DAYS      set expiration warning days to WARN_DAYS
Options
(Except for the -A and -M options, the following options cannot be combined.)
|
-a, —add user |
Add user to the named group. |
|
-d, —delete user |
Remove user from the named group. |
|
-h, —help |
Display help message and exit. |
|
-Q, —root CHROOT_DIR |
Apply changes in the CHROOT_DIR directory and use the configuration files from the CHROOT_DIR directory. |
|
-r, —remove-password group |
Remove the password from the named group. The group password will be empty. Only group members will be allowed to use newgrp to join the named group. |
|
-R, —restrict group |
Restrict the access to the named group. The group password is set to «!«. Only group members with a password will be allowed to use newgrp to join the named group. |
|
-A, —administrators user,… |
Set the list of administrative users. |
|
-M, —members user,… |
Set the list of group members. |
Group Account Administration
1. Use the groupadd command to add a group account:
# groupadd group_name
Example: To add a user (tom) to a group (students):
# gpasswd –a tom students
2. Use the groupmod command to modify a group account:
# groupmod group_name
3. Use the gpasswd command to administer group accounts:
# gpasswd group_name
4. Use the groupdel command to delete a group account. The syntax is:
# groupdel group_name
You can remove groups even if there are members in the group. You cannot remove the primary group of any existing user. You must remove the user before removing the group.
5. Use the gpasswd command to administer /etc/group and /etc/gshadow. Every group can have administrators, members, and a password. The syntax is:
# gpasswd group_name
Заключение
Вы познакомились с тремя способами улучшения защиты доступа к вашему компьютеру через SSH: изменение параметров конфигурации sshd; выбор пользователей, имеющих право входа в систему, с помощью PAM; применение последовательностей стуков в порты для сокрытия самого существования доступа через SSH. И хотя, как я говорил, идеальных способов защиты не существует, добавление этих трех уровней сделает ваш сервер существенно безопасней.
Похожие темы
- Оригинал статьи:
Three locks for your SSH door. - Статья
Secure Shell в Википедии содержит полезную вводную информацию и обсуждение SSH. - Определение в Википедии термина «0wn3d»: если вы не знакомы с Интернет-сленгом, познакомьтесь с хакерской терминологией.
- Опции конфигурации: перечень всех конфигурационных опций для sshd.
- Стандартные номера портов: номера портов присваиваются Полномочным органом по цифровым адресам в интернете (IANA); здесь приведен их полный список.
- PAM: получите дополнительную информацию на главном сайте PAM.
- Протоколы SSH: получите протоколы SSH и, в частности, протокол IETF RFC 4252.


