WordPress 5 in docker with nginx and letsencrypt
Содержание:
Step 10 — Migrating Data and Working with the Tinker Console
With your application running, you can migrate your data and experiment with the command, which will initiate a PsySH console with Laravel preloaded. PsySH is a runtime developer console and interactive debugger for PHP, and Tinker is a REPL specifically for Laravel. Using the command will allow you to interact with your Laravel application from the command line in an interactive shell.
First, test the connection to MySQL by running the Laravel command, which creates a table in the database from inside the container:
This command will migrate the default Laravel tables. The output confirming the migration will look like this:
Once the migration is complete, you can run a query to check if you are properly connected to the database using the command:
Test the MySQL connection by getting the data you just migrated:
You will see output that looks like this:
You can use to interact with your databases and to experiment with services and models.
With your Laravel application in place, you are ready for further development and experimentation.
Whitelist certain domains
This repository contains two nginx configuration files.
The file is built for the use case that you want to deny all outgoing traffic by default and only allow some whitelisted domains.
In the first server section domains can be whitelisted by simply adding a
line for each whitelisted domain. Here an example:
- google.com
- mail.google.com
- api.google.com
- google.de
This domains are blocked with the above configuration:
- mail.google.de
- api.google.de
By starting the Docker container the file can be mounted into the running container.
Now the Docker container is running with the mounted configuration.
Configuring Docker and Kubernetes with a Proxy
Assuming you have a cluster of Docker machines (Kubernetes cluster)
and you would like to route all outgoing traffic to your proxy.
That can be achieved by setting some global ENV variables on each Docker machine.
For RedHat/CentOS version 6:
cat <<EOF | sudo tee -a /etc/sysconfig/docker
export http_proxy="http://myproxy.example.com:8888"
export https_proxy="https://myproxy.example.com:8888"
export no_proxy=<REGISTRY_IP>
EOF

sudo service docker restart
For RedHat/CentOS version 7, remove export:
cat <<EOF | sudo tee -a /etc/sysconfig/docker
http_proxy="http://myproxy.example.com:8888"
https_proxy="https://myproxy.example.com:8888"
no_proxy=<REGISTRY_IP>
EOF

sudo sed -i '/\/a EnvironmentFile=/etc/sysconfig/docker' /usr/lib/systemd/system/docker.service
sudo systemctl daemon-reload
sudo service docker restart
For Ubuntu 14.04:
cat <<EOF | sudo tee -a /etc/default/docker
export http_proxy="http://myproxy.example.com:8888"
export https_proxy="https://myproxy.example.com:8888"
export no_proxy=<REGISTRY_IP>
EOF

sudo restart docker
For Kubernetes it works the same way.
The ENV has to be set before the K8S processes are starting.
Minikube can be started with proxy params directly.
Here an example:
https_proxy=http://<PROXY_SERVER>:80 minikube start --docker-env HTTP_PROXY=http://<PROXY_SERVER>:80 --docker-env HTTPS_PROXY=http://<PROXY_SERVER>:80 --docker-env NO_PROXY=192.168.99.0/24
Alternatively the Proxy can be set by Container start as well:
docker run -e "http_proxy=http://myproxy.example.com:8888" \
           -e "https_proxy=https://myproxy.example.com:8888" \
           -d liveperson\app run.sh
Шаг 1 — Загрузка Laravel и установка зависимостей
На первом шаге мы загрузим последнюю версию Laravel и установим зависимости проекта, включая Composer, диспетчер пакетов PHP на уровне приложения. Мы установим эти зависимости с помощью Docker, чтобы не выполнять глобальную установку Composer.
Перейдите в домашний каталог и клонируйте последнюю версию Laravel в каталог с именем :
Перейдите в каталог :
Затем смонтируйте образ из Docker в каталоги, которые нужны для вашего проекта Laravel, чтобы избежать издержек глобальной установки Composer:
Флаги и команды создают виртуальный контейнер, который привязывается к текущему каталогу вплоть до его удаления. Содержимое вашего каталога будет скопировано в контейнер, а содержимое создаваемой Composer внутри контейнера папки будет скопировано в текущий каталог.
В заключение установите в каталоге проекта такой уровень разрешений, чтобы ее владельцем был пользователь без привилегий root:
Это будет важно, когда вы будете записывать Dockerfile для образа вашего приложения на шаге 4, поскольку позволит работать с кодом прложения и запускать процессы в контейнере, не имея привилегий root. Теперь вы разместили код приложения и можете переходить к определению служб с помощью Docker Compose
Теперь вы разместили код приложения и можете переходить к определению служб с помощью Docker Compose.
Предварительные требования
Для данного обучающего модуля вам потребуется следующее:
- Сервер Ubuntu 18.04, пользователь без прав root с привилегиями и активный брандмауэр. Дополнительную информацию о настройке этих параметров см. в руководстве по первоначальной настройке сервера.
- Docker и Docker Compose, установленные на вашем сервере. Инструкции по установке Docker см. в шагах 1 и 2 руководства Установка и использование Docker в Ubuntu 18.04. Дополнительную информацию по установке Compose см. в шаге 1 руководства Установка Docker Compose в Ubuntu 18.04.
- Зарегистрированное доменное имя. В этом обучающем руководстве мы будем использовать example.com. Вы можете получить бесплатный домен на Freenom или зарегистрировать доменное имя по вашему выбору.
-
На вашем сервере должны быть настроены обе приведенные ниже записи DNS. Вы можете воспользоваться введением в работу с DigitalOcean DNS, чтобы получить подробную информацию о добавлении доменов в учетную запись DigitalOcean, если вы используете этот способ:
- Запись A, где указывает на публичный IP-адрес вашего сервера.
- Запись A, где указывает на публичный IP-адрес вашего сервера.
Docker Compose and MySQL
The very first thing we need to is create a file called docker-compose.yml. This allows you to stand up multiple Docker conatiners and have them see each other on the same virtual network. It handles things like DNS lookups (you can refer to containers by name), and makes sharing directories across multiple containers quite easy.
So open up your editor and put this into docker-compose.yml:
There are two things of note in here: the volume, which lets our database persist outside of the container even if the container is stopped or destroyed, and the environment, which sets credentials in MySQL. Environment variables are the normal way of passing settings into Docker containers.
You can now start that container by typing docker-compose up -d:
Congrats, you have your first container running! You can verify that it is running with docker-compose ps and see what it is writing to stdout with docker-compose logs:
Note that while the container will show as “Up”, the underlying MySQL process may not be able to handle requests for 30 or more seconds, as the database will be initialized on the first run. Assuming the data/ directory is left untouched, this will not be an issue when the container is started in the future.
Creating NodeJS Application
Next we’ll enter the container, download the necessary dependencies, and start our NodeJS server.
docker exec -it backend /bin/sh;
We’ll need an editor, and I like so we’ll install it:
apk add nano;
Next we’ll go into the directory and create our project there:
cd /home/node;npm init;npm install express --save;touch index.js;nano index.js;
In our file we’ll add the following:
const express = require('express');const app = express();const port = 5000;const version = '1.0.0';app.get('/', (req, res) => res.send({ version }));app.listen(port, () => console.log(`Listening on port ${port}`));
To save it + , then , and then .
Let’s run it now:
node index.js;
If we open up http://localhost:5000 you’ll notice that nothing is showing:
Nginx
Nginx is a web server with a wide array of features, including reverse proxying, which is what it is used for in this article.It is configured with a . By default it looks for it in , but it is of course possible to specify another file.
As a reverse proxy, it can transparenty handle two very important aspects of a web application, encryption and caching. But before going into detail about that, lets see how the reverse proxy feature itself is configured:
The configuration specifies a virtual server, where each can have its own rules. The directive defined which urls or IP addresses the virtual server responds to.
The configuration defines where to route incoming traffic. Depending on the url, the requests can be passed to one service or another. In the config above, the start of the route specifies the service. sets the new url, and with the url is rewritten so that it fits the service. In this case, the is removed from the url.
This was a general overview, later sections will explain how caching and SSL can be configured.
For more details, check out the docs.
Now that we know the pieces, lets start putting them together.
Установка nginx в контейнере на Docker
Хочу в своей статье «Установка nginx в контейнере на Docker» описать процесс установки nginx внутри Docker. Надеюсь что у Вас уже установлен Docker, если нет, то можно установить его по моему мануалу:
Есть несколько способов как это можно сделать:
1-й способ.
Это использование файла Dockerfile для создания конфигурационного файла, который создаст контейнер. В этом файле можно указать почти все параметры и так же любые команды. Я расскажу как можно это сделать, но поговорим немного о самой структуре данного файла.
Dockerfile
Этот файл похож на Gemfile, Vagrantfile или Berksfile. Это центральный кусок для создания контейнера Докер. Конечно, можно Docker запустить «docker run -i -t foo /bin/bash», а затем настроить контейнер. Но это не сильно удобно и не знаешь как оно все работает + с конфигурационном файлом вы можете воспроизвести тот же контейнер, снова и снова без возможного отклонения.
Я возьму сейчас минимальную конфигурацию для Dockerfile, которая даст возможность установить nginx который будет работает в контейнере. Я объясню основы, пожалуйста, обратитесь к официальной документации Dockerfile для полного обзора (если потребуется).
FROM
Должна быть первая запись в вашем Dockerfile. Эта строчка сообщает Docker на базе которого дистрибутива будит создан новой образ.
FROM centos
MAINTAINER
Если Вы вылаживаете (публикуете) свои образы, то стоит прописать данную строку. Она даст возможность видеть кто автор данного образа или контейнера.
MAINTAINER Vitaly Natarov <solo.metal@bigmir.net>
ADD
Я поддерживаю кастомную сборку Nginx + ModSecurity для своих потребностей. Мне нужно извлечь файл конфигурации хранилища. Я буду все ставить именно с данного репозитория.
ADD http://static.theroux.ca/repository/failshell.repo /etc/yum.repos.d/
В основном, «ADD» позволяет извлекать файлы и скопировать их куда-нибудь в вашем контейнере.
RUN
Используется для настройки вашего контейнера. Вы можете установить столько, сколько вы хотите в вашем Dockerfile.
ПРИМЕЧАНИЕ: На данный момент, я не уверен, но, как я буду интегрировать Chef с Докер. Т.к не сильно много пользовательских конфигураций.
RUN yum -y install nginx
Обратите вниманиена foreground vs background
По пути к докеру, на вашем контейнере должна работать только одна служба. Вот и вся цель использования контейнеров в конце концов. Таким образом вы запускаете ваши услуги на передний план (foreground), но не наbackground. Вы в основном работаете с одной командой, это единственная цель вашего контейнера. Очень простодушный контейнер
Таким образом, мы должны сказать Nginx-у, чтобы он выполнил это!
RUN echo «daemon off;» >> /etc/nginx/nginx.conf
EXPOSE
Пробрасывает порты наружу.
EXPOSE 80
ПРИМЕЧАНИЕ: Это внутренний порт. Это будет отличаться один, который будет использоваться снаружи. Это назначается динамически Докер.
CMD
Сердце и душа вашего контейнера. Что он делает. Это цель жизни!
CMD /usr/sbin/nginx -c /etc/nginx/nginx.conf
Теперь я соберу все до кучи:
# vim Dockerfile
Содержимое моего докерфайла:
FROM centos:centos7
MAINTAINER Vitaly Natarov <solo.metal@bigmir.net>

# Configure my repo to use my custom Nginx with modsec
RUN mkdir -p /usr/local/src
RUN cd /usr/local/src
RUN yum -y install wget vim htop tar

# install repo for centos
# epel repo
RUN rpm -Uvh http://dl.fedoraproject.org/pub/epel/7/x86_64/e/epel-release-7-5.noarch.rpm
# remi repo
RUN rpm -Uvh http://rpms.famillecollet.com/enterprise/remi-release-7.rpm
RUN yum repolist

# install nginx
RUN yum -y install nginx

# tell Nginx to stay foregrounded
ADD nginx.conf /etc/nginx/nginx.conf
RUN echo "daemon off;" >> /etc/nginx/nginx.conf
RUN mkdir -p /var/www
RUN curl https://git.centos.org/sources/httpd/c7/acf5cccf4afaecf3afeb18c50ae59fd5c6504910 \
| tar -xz -C /var/www \
--strip-components=1
RUN sed -i -e 's/Apache/nginx/g' -e '/apache_pb.gif/d' \
/var/www/index.html

# expose HTTP
EXPOSE 80
EXPOSE 8080
EXPOSE 443

# Run
CMD [ "/usr/sbin/nginx" ]
Так же нужен конфиг с nginx. Я советую просто скачать мои конфиги, и, если не нравиться что-то, то просто поменять:https://github.com/SebastianUA/Docker/tree/master/docker_nginx_centos7
PS: ссылки на репозитории могут уже не работать. По этому, их нужно будет поправить!
1: Определение конфигурации веб-сервера
Прежде чем запускать какие-либо контейнеры, нужно определить конфигурации веб-сервера Nginx. Его конфигурационный файл будет включать в себя специальные блоки location для WordPress, а также блок location для направления запросов верификации Let’s Encrypt на клиент Certbot (для автоматического обновления сертификатов).
Сначала создайте каталог проекта для вашей установки WordPress под названием wordpress и перейдите в него:
Затем создайте каталог для конфигурационного файла:
Откройте файл с помощью nano или другого редактора:
В этот файл мы поместим блок server с директивами server name и document root, а также блоки location для направления запроса клиента Certbot, обработки PHP и запросов статических активов.
Вставьте следующий код в файл. Обязательно замените example.com собственным доменным именем:
Давайте подробно разберем, какую информацию содержит блок server.
Директивы:
listen: указывает прослушиваемый порт 80, что позволяет нам использовать для запросов сертификатов
Обратите внимание, порт 443 ещ ене включен – мы обновим конфигурацию, чтобы включить SSL, когда получим сертификаты.
server_name: определяет имя вашего сервера и блок server, который должен использоваться для запросов к нему. Обязательно замените example.com в этой строке своим доменным именем.
index: определяет файлы, которые будут использоваться в качестве индексов при обработке запросов к вашему серверу
Здесь мы изменили приоритет по умолчанию, поставив index.php перед index.html, чтобы Nginx сначала использовал файлы с именем index.php, когда это возможно.
root: указывает корневой каталог для запросов к этому серверу. Этот каталог, /var/www/html, во время сборки согласно инструкциям в WordPress Dockerfile. Также этот Dockerfile гарантирует, что файлы из релиза WordPress подключены к этому тому.
Блоки location:
- location ~ /.well-known/acme-challenge: этот блок будет обрабатывать запросы в каталоге .well-known, где Certbot разместит временный файл для проверки того, разрешается ли DNS вашего домена на ваш сервер. С этой конфигурацией можно использовать плагин webroot для получения сертификатов.
- location /: в этом блоке используется директиву try_files для проверки файлов, которые соответствуют отдельным запросам URI. Однако вместо статуса 404 Not Found по умолчанию сервер передаст управление в файл index.php WordPress с аргументами запроса.
- location ~ \.php$: этот блок настраивает обработку PHP и передает запросы в контейнер WordPress. Поскольку Docker образ WordPress будет основан на образе php: fpm, мы также включим в этот блок специальные параметры конфигурации для протокола FastCGI. Nginx нужен независимый PHP процессор для запросов PHP: в данном случае эти запросы будут обрабатываться процессором php-fpm, включенным в образ php: fpm. Кроме того, этот блок включает в себя специальные директивы, переменные и параметры FastCGI, которые будут проксировать запросы приложению WordPress в контейнере, устанавливать индекс для обработанного URI запроса и парсить запросы URI.
- location ~ /\.ht: этот блок будет обрабатывать файлы .htaccess, так как Nginx их не обслуживает. Директива deny_all гарантирует, что файлы .htaccess никогда не будут предоставляться пользователям.
- location = /favicon.ico, location = /robots.txt: эти блоки гарантируют, что запросы к /favicon.ico и /robots.txt не будут регистрироваться.
- location ~* \.(css|gif|ico|jpeg|jpg|js|png)$: этот блок отключает логирование для запросов статических активов и обеспечивает их высокую кэшируемость, поскольку их обслуживание обычно дорого обходится.
Сохраните и закройте файл, когда закончите редактирование. Если вы использовали nano, нажмите Ctrl+X, Y, а затем Enter.
После конфигурации Nginx вы можете перейти к созданию переменных среды, которые будут передаваться в приложение и контейнеры базы данных во время выполнения.
Blacklist certain domains
This repository contains two nginx configuration files.
The file is built for the use case that you want to allow all outgoing traffic by default and only block traffic to some domains.
In the first server section domains can be blacklisted by simply adding a
line for each blacklisted domain. Here an example:
In the example above all pages would be accessible, but google.com and all subdomains of it would be blocked. Regex can be used here in the same way as in the whitelist example.
By starting the Docker container the file can be mounted into the running container.
Now the Docker container is running with the mounted configuration.
3. Creating Start script
After we create our Dockerfile, we’ll need to create a script named start.sh which will run and configure our WordPress installation. It will create and configure database, passwords for wordpress. To create it, we’ll need to open start.sh with our favorite text editor.
# nano start.sh
After opening start.sh, we’ll need to add the following lines of configuration into it.
#!/bin/bash

__check() {
if [ -f /usr/share/nginx/html/wp-config.php ]; then
exit
fi
}

__create_user() {
# Create a user to SSH into as.
SSH_USERPASS=`pwgen -c -n -1 8`
useradd -G wheel user
echo user:$SSH_USERPASS | chpasswd
echo ssh user password: $SSH_USERPASS
}

__mysql_config() {
# Hack to get MySQL up and running... I need to look into it more.
yum -y erase mariadb mariadb-server
rm -rf /var/lib/mysql/ /etc/my.cnf
yum -y install mariadb mariadb-server
mysql_install_db
chown -R mysql:mysql /var/lib/mysql
/usr/bin/mysqld_safe &
sleep 10
}

__handle_passwords() {
# Here we generate random passwords (thank you pwgen!). The first two are for mysql users, the last batch for random keys in wp-config.php
WORDPRESS_DB="wordpress"
MYSQL_PASSWORD=`pwgen -c -n -1 12`
WORDPRESS_PASSWORD=`pwgen -c -n -1 12`
# This is so the passwords show up in logs.
echo mysql root password: $MYSQL_PASSWORD
echo wordpress password: $WORDPRESS_PASSWORD
echo $MYSQL_PASSWORD > /mysql-root-pw.txt
echo $WORDPRESS_PASSWORD > /wordpress-db-pw.txt
# There used to be a huge ugly line of sed and cat and pipe and stuff below,
# but thanks to @djfiander's thing at https://gist.github.com/djfiander/6141138
# there isn't now.
sed -e "s/database_name_here/$WORDPRESS_DB/
s/username_here/$WORDPRESS_DB/
s/password_here/$WORDPRESS_PASSWORD/
/'AUTH_KEY'/s/put your unique phrase here/`pwgen -c -n -1 65`/
/'SECURE_AUTH_KEY'/s/put your unique phrase here/`pwgen -c -n -1 65`/
/'LOGGED_IN_KEY'/s/put your unique phrase here/`pwgen -c -n -1 65`/
/'NONCE_KEY'/s/put your unique phrase here/`pwgen -c -n -1 65`/
/'AUTH_SALT'/s/put your unique phrase here/`pwgen -c -n -1 65`/
/'SECURE_AUTH_SALT'/s/put your unique phrase here/`pwgen -c -n -1 65`/
/'LOGGED_IN_SALT'/s/put your unique phrase here/`pwgen -c -n -1 65`/
/'NONCE_SALT'/s/put your unique phrase here/`pwgen -c -n -1 65`/" /usr/share/nginx/html/wp-config-sample.php > /usr/share/nginx/html/wp-config.php
}

__httpd_perms() {
chown apache:apache /usr/share/nginx/html/wp-config.php
}

__start_mysql() {
# systemctl start mysqld.service
mysqladmin -u root password $MYSQL_PASSWORD
mysql -uroot -p$MYSQL_PASSWORD -e "CREATE DATABASE wordpress; GRANT ALL PRIVILEGES ON wordpress.* TO 'wordpress'@'localhost' IDENTIFIED BY '$WORDPRESS_PASSWORD'; FLUSH PRIVILEGES;"
killall mysqld
sleep 10
}

__run_supervisor() {
supervisord -n
}

# Call all functions
__check
__create_user
__mysql_config
__handle_passwords
__httpd_perms
__start_mysql
__run_supervisor
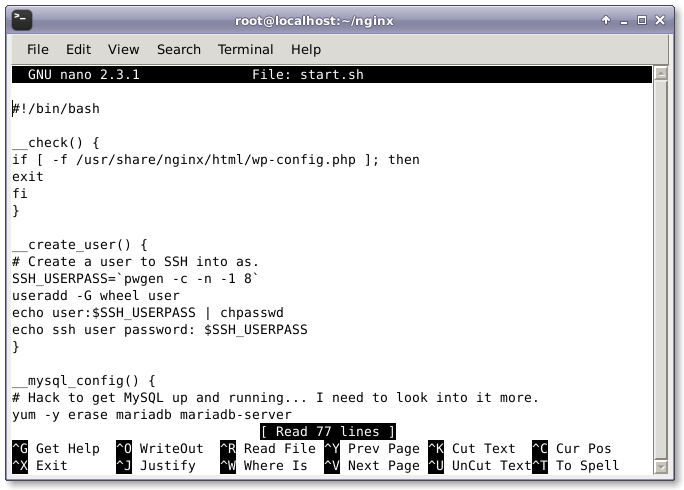
After adding the above configuration, we’ll need to save it and then exit.
Automatic configuration
This image uses docker-gen to dynamically generate Nginx configuration files
for containers exposing HTTP virtual hosts. This works automatically even across container restarts. You configure
virtual host by configuring environment variables on containers for which you want to provide a reverse proxy:
- – a comma separated list of virtual hosts provided by the container
-
– a comma separated list of URL paths provided by the container; they will be mapped to the HTTP
root () of the container -
– a comma separated list of URL paths provided by the container, they will be mapped to the same
HTTP path of the container -
– if container exposes more than one port, or you do not want to use the default port , you can
configure a custom port to which a reverse proxy should connect on the container -
– if container is connected to more than one network, this variable can be used to select which
network should be used (by default, the first network is used, but the order is not guaranteed)
When running a Docker image with your HTTP content, you can specify environment variables.
This will make the reverse proxy resolve into the container:
docker run --name example ... --env VIRTUAL_HOST=example.com --env VIRTUAL_URL=/ ...
This will make the reverse proxy resolve into the container, but
This will make the reverse proxy resolve into the container.
docker run --name example1 ... --env VIRTUAL_HOST=example.com --env VIRTUAL_URL=/foo ...
docker run --name example2 ... --env VIRTUAL_HOST=example.com --env VIRTUAL_URL=/bar ...
Multiple containers can provide content for the same host and URL paths – Nginx will balance load across all of them.
A difference between and is that maps all outside paths to the internal HTTP root
() of the container. This is useful when your container provides static content under the root and you want to
expose it elsewhere to the outside. But the downside is that the internal references between resources, if a container
assumes content is under , might not work correctly. For example, a HTML tag , which
would from the perspective of the container, from the outside might resolve to something completely else, or not resolve
at all. This is why it is often better to serve content in containers under the same path as outside, and use
to map them 1:1. But this means that the container has to be configured accordingly as well.
HTTPS
If you want to use HTTPS for a virtual host, you should mount a volume into the container and provide
SSL key for a virtual host.
For host you should provide and
files. Certificate file should contain the full chain needed to validate the certificate.
If those two files exist, the image will automatically configure the virtual host to use HTTPS and redirect any
non-HTTPS traffic to HTTPS.
If you want any extra configuration for non-HTTPS traffic, you can provide file which
will be included for the non-HTTPS configuration. Similarly, for extra configuration for the HTTPS site, provide
file. Of course, filenames should match the hostname of your virtual host.
1: Клонирование и тестирование приложения
Для начала мы клонируем репозиторий кода приложения Node, в который входит Dockerfile, необходимый для сборки образа приложения с помощью Compose. Сначала можно протестировать приложение, собрав и запустив его с помощью команды docker run без обратного прокси и SSL.
В домашнем каталоге пользователя sudo клонируйте репозиторий nodejs-image-demo.
Клонируйте репозиторий в каталог node_project:
Перейдите в этот каталог:
В этом каталоге есть Dockerfile, который содержит инструкции по созданию приложения Node с помощью образа node:10 и контент текущего каталога проекта. Вы можете посмотреть содержимое Dockerfile с помощью команды:
Эти инструкции создают образ Node, копируя код проекта из текущего каталога в контейнер и устанавливая зависимости с помощью npm install. Они также используют преимущества кэширования и наложения образов в Docker, отделяя копию package.json и package-lock.json, содержащие перечисленные зависимости проекта, от копии остальной части кода приложения. Наконец, в инструкциях указывается, что контейнер будет запускаться как пользователь node без прав root с соответствующими правами доступа к коду приложения и каталогам node_modules.
Чтобы протестировать приложение без SSL, вы можете создать и пометить образ, используя команду docker build и флаг -t. Мы назовем образ node-demo, но вы можете назвать его как-нибудь иначе:
После завершения процесса сборки вы можете просмотреть список образов:
Вы увидите следующий вывод, подтверждающий сборку образа приложения:
Затем создайте контейнер с помощью docker run. Мы включим три флага:
- -p: публикует порт в контейнере и сопоставляет его с портом на хосте. Мы будем использовать порт 80 на хосте, но вы можете смело изменить его по мере необходимости, если на этом порту запущен другой процесс. Дополнительную информацию о портах можно найти в документации Docker.
- -d: запускает контейнер в фоновом режиме.
- —name: позволяет присвоить контейнеру запоминающееся имя.
Запустите следующую команду, чтобы собрать контейнер:
Откройте список запущенных контейнеров:
Вы увидите:
Теперь вы можете посетить свой домен, чтобы проверить установку:
Не забудьте заменить example.com своим собственным доменом. Ваше приложение отобразит домашнюю страницу приложения.
Теперь, когда вы протестировали приложение, вы можете остановить контейнер и удалить образы. Снова используйте docker ps, чтобы получить CONTAINER ID:
Остановите контейнер с помощью docker stop. Обязательно замените CONTAINER ID, указанный здесь, своим значением.
Теперь вы можете удалить остановленный контейнер и все образы, включая неиспользуемые образы, с помощью утилиты docker system prune и флага -a:
Введите y по запросу, чтобы подтвердить, что вы хотите удалить остановленный контейнер и образы. Имейте в виду, что это также удалит ваш кэш сборки.
Creating Vanilla JavaScript Frontend
Let’s create our own application by removing this , adding nano, and creating our own code:
# add nanoapk add nano;# change directoriescd /usr/share/nginx/html;# remove index.htmlrm index.html;# create new index.htmltouch index.html;# edit filenano index.html;
Our file should look something like this:
<!DOCTYPE html><html><head><title>Frontend</title><script>window.onload = function () { fetch('/api', { method: 'get'}).then((response) => { const json = response.json(); if (response.ok) { return json; } return Promise.reject(new Error('Something went wrong.')); }) .then((response) => { document.getElementById('version').innerHTML = JSON.stringify(response); }).catch((error) => { document.getElementById('error').innerHTML = error && error.message || 'Something else went wrong.'; });};</script></head><body><h1>My Application Version</h1><p id="version"></p><p id="error"></p></body></html>
Save it with + , then , and then .
PHP FPM and Nginx
The next piece of the puzzle is PHP FPM and Nginx. We’ll treat these as a single unit since they are both responsible for serving up WordPress.
Start by putting this into your docker-compose.yml file:
We have a few new things for these two services:
- We have a file called php-uploads.ini which is passed in.
- We have a wordpress/ directory which will be populated when the php container is run for the first time.
- We have a nginx.conf file which is passed into the web container
- And finally, we have a logs/ directory which stores logs written by Nginx.
The php container runs PHP in FPM mode, which listens on port 9000 for requests from the webserver. The module is pre-configured except for a few extra directives we’re going to put into php-uploads.ini, as follows:
The above changes will allow files of up to 64 Megabytes to be uploaded to WordPress, which is important if you are dealing with large images or other media.
We also need to tell Nginx to send requests for PHP files to the php container. That’s done by putting this into nginx.conf:
Note that we don’t have a server_name directive, since this instance of Nginx is only serving up one server. That allows us to keep the configuration file simpler, and a simply configuration file is easier to understand and less likely to have configuration issues.
Go ahead and start up those two containers with docker-compose up -d php web and you should see output like this:
The first time you run the above command, you may have more output as Docker images are downloaded for the first time. It’s nothing to worry about, and is a one-time thing that Docker does.
Setting Up Container
For this we’ll borrow a simple nginx docker image and run the following:
docker run -it -d --name frontend nginx:stable-alpine;
Next we’re going to enter the docker container, and add a simple HTML page with some JavaScript which makes a request to our backend.
docker exec -it frontend /bin/sh;
Let’s first check if our nginx container is already running automatically with curl:
apk add curl;curl localhost:# Expected Output# <!DOCTYPE html># <html># <head># <title>Welcome to nginx!</title># <style># body {# width: 35em;# margin: 0 auto;# font-family: Tahoma, Verdana, Arial, sans-serif;# }# </style># </head># <body># <h1>Welcome to nginx!</h1># <p>If you see this page, the nginx web server is successfully installed and# working. Further configuration is required.</p># <p>For online documentation and support please refer to# <a href="http://nginx.org/">nginx.org</a>.<br/># Commercial support is available at# <a href="http://nginx.com/">nginx.com</a>.</p># <p><em>Thank you for using nginx.</em></p># </body># </html>
Step 5 — Configuring PHP
Now that you have defined your infrastructure in the file, you can configure the PHP service to act as a PHP processor for incoming requests from Nginx.
To configure PHP, you will create the file inside the folder. This is the file that you bind-mounted to inside the container in Step 2. Creating this file will allow you to override the default file that PHP reads when it starts.
Create the directory:
Next, open the file:
To demonstrate how to configure PHP, we’ll add the following code to set size limitations for uploaded files:
~/laravel-app/php/local.ini
The and directives set the maximum allowed size for uploaded files, and demonstrate how you can set configurations from your file. You can put any PHP-specific configuration that you want to override in the file.
Save the file and exit your editor.
With your PHP file in place, you can move on to configuring Nginx.


