Как исправить ошибку «dns probe finished nxdomain»? в windows 10, 8, 7
Содержание:
- Что означает ошибка DNS_PROBE_FINISHED_NXDOMAIN?
- Solve DNS_PROBE_FINISHED_NXDOMAIN issue on Android
- #2 Flushing DNS Setting
- Как исправить DNS PROBE FINISHED NXDOMAIN
- Flushing and Updating DNS to Google’s Public DNS Servers
- Change DNS Servers
- Fix DNS PROBE FINISHED NXDOMAIN in Android
- Restart DNS Client Service
- Fixing DNS_PROBE_FINISHED_NXDOMAIN
- Отключение proxy в параметрах системы
- Check Your Local Hosts File
- Стандартные методы устранения ошибки в браузере
- Как исправить ошибку
- Prevent websites, ISP, and other parties from tracking you
Что означает ошибка DNS_PROBE_FINISHED_NXDOMAIN?
Хотя и кажется по описанию сбоя, что проблема связана с DNS-серверами, это не всегда так. Ошибка поиска DNS зачастую выдается платежной системой WebMoney. Применительно к ней зачастую проблемы действительно могут быть связаны с неправильной настройкой серверов, однако первостепенную роль играет блокировка со стороны самой операционной системы (брэндмауэра).
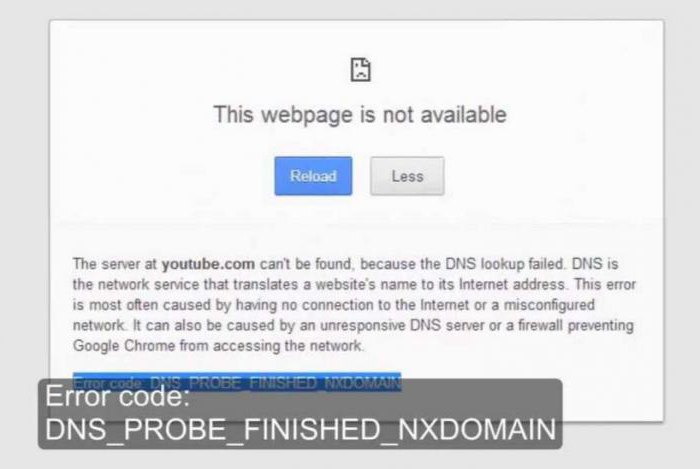
При попытке доступа на определенный интернет-ресурс ошибки поиска DNS тоже могут проявляться. В этом смысле она несколько напоминает небезызвестный сбой, связанный с невозможностью отображения запрашиваемой страницы с указанием типичного кода 404.
О чем говорит такая ситуация? Только о том, что через предпочитаемые настройки компьютерная система не может подключиться к удаленному серверу, на котором располагается нужный контент. В данном случае даже получение автоматических настроек от провайдера не играет никакой роли.
Solve DNS_PROBE_FINISHED_NXDOMAIN issue on Android
Fix it now!
Fix it now!
To repair damaged system, you have to purchase the licensed version of Reimage Reimage.
Technique 1. Change DNS settings
- Open “Settings” and go to “Wi-Fi.”
- Press-hold your selected network and then click “Modify network.”
- Opt for the advanced options by marking the “Show advanced options” box.
- Choose “Static” next to the “IP settings.”
- Type in DNS servers IP addresses to “DNS 1” and “DNS 2” sections.
- Click “Save” and reconnect to the network to activate the settings.
Technique 2. Flush DNS cache
If you use Android with a removable battery, you have to turn off your device, remove the battery and wait for 30 seconds. Then insert the battery back and check if DNS_PROBE_FINISHED_NXDOMAIN error is gone.
If you are using a smartphone with a non-removable battery, follow these steps:
- Open Chrome.
- In the address box enter this address: chrome://net-internals/#DNS
- Click DNS in the left menu.
- Find Clear host cache button and click it.
- Click the black arrow at the right top corner of the screen.
- In the appeared pop-up windows click Clear Cache and Flush Sockets options.
- Restart Chrome.
These methods should help you get rid of DNS_PROBE_FINISHED_NXDOMAIN error. However, if you still experience problems trying to solve this issue, you can try Reimage.
#2 Flushing DNS Setting
Normally your operating systems DNS client will automatically save the cache IP addresses or some other DNS kinds of stuff too, in order to speed up subsequent requests to the same hostname and because of some saved corrupted cached results, this problem can occur and that’s why it will need to be cleared from that saved cache storage in order for your network to communicate with the hostname properly.
It’s possible your computer’s saved DNS cache got corrupted too and to fix it, you’ll need to flush all cached DNS from your computer and the given step below will help you to do it.
#How To Flush DNS On WINDOWS
All these procedures are same for all windows version:
- First, open the Run Commander in your windows by pressing the Windows Key +R key at the same time.
- After that type, the “cmd” in the text box and that will open your windows Command Prompt.
Now type the command “ipconfig /flushdns” and then press enter, it will flush all cached DNS from your PC.
- After that restart your computer and test it, if the problem still stays then open the cmd again and try the 2nd command listed below.
- Second command: “netsh winsock reset catalog” (only try when the above once won’t works).
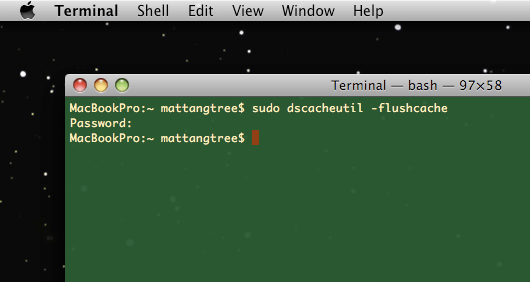
#How To Flush DNS On Mac OS
Flushing the DNS in Mac OS X is an easy process, but the steps taken will depend on which version of OS X you are running. So, first open your Command terminal and type the command on it according to your OS versions which I’m all listed below.
Note: Enter the command and then it will ask you to enter the password so, give it to the commander.
Note: Only this single command will fix the problem.
- For “Mac OS X El Capitan” Type: sudo killall -HUP mDNSResponder
- For “Mac OS X Yosemite” Type: sudo discoveryutil udnsflushcaches
- For “Mac OS X Mavericks” Type: sudo killall -HUP mDNSResponder
- For “Mac OS X Mountain Lion” Type: sudo killall -HUP mDNSResponder
- For “Mac OS X Lion” Type: sudo killall -HUP mDNSResponder
- For “Mac OS X Snow Leopard” Type: sudo dscacheutil -flushcache
- For “Mac OS X El Capitan” Type: sudo killall -HUP mDNSResponder
- For “Mac OS X El Capitan” Type: sudo killall -HUP mDNSResponder
- For “Mac OS X Leopard and below” Type: sudo lookupd -flushcache
#How To Flush DNS On Linux
If you are running the nscd Name Service Cache Daemon and wish to flush your DNS cache, then you will need to do the following steps:
- Open up a command terminal.
- Run the command /etc/init.d/nscd restart
Как исправить DNS PROBE FINISHED NXDOMAIN
Прежде чем приступать к каким-либо методам исправления, прошу внимательно отнестись к следующим 4-м пунктам:
- Правильно ли введен адрес сайта? Очень простой метод получить ошибку DNS_PROBE_FINISHED_NXDOMAIN — ввести произвольный случайный адрес (но для некоторых систем в этом случае вы увидите иную ошибку: ERR_NAME_NOT_RESOLVED).
- Если не удается получить доступ лишь к одному сайту, причем с разных устройств (даже при других кодах ошибок на некоторых из устройств), причина вероятнее всего в самом сайте, и вы здесь вряд ли сможете что-либо изменить: можно лишь предположить, что всё будет исправлено, а сайт не был закрыт.
- Если об ошибке сообщают все сайты на разных устройствах через один роутер, то, возможно, проблема на стороне провайдера и будет решена со временем. Также попробуйте перезагрузить роутер (выключить питание и включить снова).
- Если это ваш собственный сайт, который вы только что зарегистрировали, либо внесли изменения NS-серверов при смене хостинга, учитывайте, что для изменения записей на DNS серверах занимает время и в течение этого времени (обычно не более нескольких часов) вы можете получать NXDOMAIN-ошибку при попытке открыть сайт.
Если все эти пункты не относятся к вашему случаю, а об ошибке DNS PROBE FINISHED NXDOMAIN сообщают многие сайты или только на одном единственном компьютере или ноутбуке, далее первоочередные способы исправить проблему.
Смена параметров DNS-серверов на компьютере, очистка кэша DNS и проверка службы DNS-клиент
Прежде всего попробуйте изменить параметры DNS-серверов вашего Интернет-подключения:
- Нажмите клавиши Win+R на клавиатуре, введите ncpa.cpl и нажмите Enter.
- Откроется список ваших сетевых подключений. Нажмите правой кнопкой мыши по активному Интернет-подключению и выберите пункт «Свойства».
- В списке выберите IP версии 4 (TCP/IPv4) и нажмите кнопку «Свойства».
- Установите отметку «Использовать следующие адреса DNS-серверов» и укажите 8.8.8.8 и 8.8.4.4 (безопасные DNS-серверs Google). И нажмите Ок, применив настройки.
- Запустите командную строку от имени администратора, в ней введите ipconfig /flushdns и нажмите Enter.
- В адресной строке Google Chrome введите chrome://net-internals/#dns и нажмите кнопку «Clear host cache».
Дополнительно, зайдите в список служб Windows (Win+R, ввести services.msc) и проверьте, чтобы служба «DNS-клиент» была запущена, а тип её запуска был установлен в «Автоматически». Если это не так, подробно о включении службы в соответствующем разделе инструкции: Как исправить ошибку DNS_PROBE_FINISHED_NO_INTERNET.
По завершении этих действий проверьте, открывается ли сайт теперь или вновь сообщает об указанной ошибке.
Сброс Winsock и протокола TCP/IP
В ситуации, когда предыдущий метод не помог, попробуйте следующее: запустите командную строку от имени администратора и по порядку введите следующие 3 команды, нажимая Enter после каждой:
ipconfig /release
ipconfig /renew
netsh winsock reset
Если после выполнения этих трех команд и перезапуска Google Chrome ошибка не исчезла, используйте следующую команду:
netsh int ip reset
После неё закройте командную строку и обязательно перезагрузите ваш ПК или ноутбук, а лишь потом проверьте, была ли исправлена ошибка DNS PROBE FINOSHED NXDOMAIN.
Flushing and Updating DNS to Google’s Public DNS Servers
To do this, follow the steps below.
- Click Start and Type cmd, right click cmd and choose Run As Adminsistrator
- When the Black Command Prompt opens, type the following in it and Hit Enter.ipconfig /flushdns
- Once this is done, Hold Windows key and press R again.
- This time, type ncpa.cpl and Click OK. You will be taken to the network connections. From here, the DNS will be updated but you have to identify your network adapter, the one that is set as active.
- Identify your network adapter, which is connected and right click it, then choose Properties.
- Then, from the properties pane, click “Internet Protocol Version 4 (TCP/IPv4)” once so that it becomes highlighted in grey and select Properties again.
- Put check on use the following dns server addresses and enter the following for Preferred DNS Server and Alternate DNS ServerPreferred DNS SERVER: 8.8.8.8 Alternate DNS SERVER 8.8.4.4
- Click OK and close the rest of the windows.
Change DNS Servers
The next thing you can try is changing your DNS servers. By default, DNS servers are automatically assigned by your ISP. But you could try temporarily changing these to a public DNS server, such as Google or Cloudflare.
- Some prefer to use Google’s public DNS (8.8.8.8 and 8.8.4.4) long-term due to them sometimes being more reliable.
- Cloudflare also just launched their new secure and blazing fast free DNS (1.1.1.1 and 1.0.0.1) which we will be using in this example. If you want to use Google’s the steps are the same, you simply replace the DNS server addresses with Googles.
Tip: If you’re already using a free DNS server and having issues, removing it and defaulting back to your ISP’s DNS servers also sometimes fix things. Google and Cloudflare aren’t perfect 100% of the time and there have been a few instances where we’ve noticed switching back has resolved the issue.
Windows
In Windows simply open up Command Prompt by pressing the Windows logo key and R. Then type “control panel” and hit Enter.
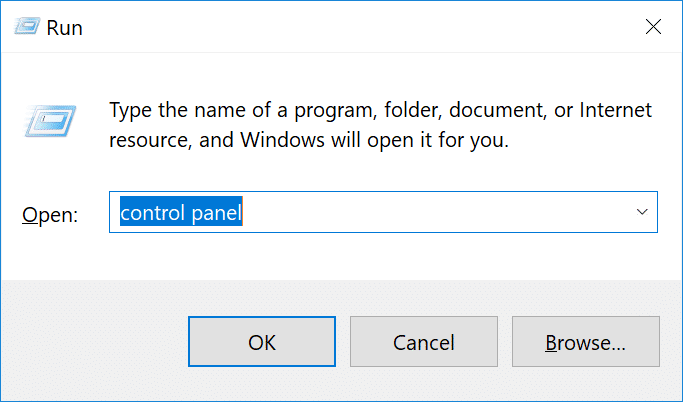
Run Control Panel Windows
Click on “Network and Internet” and then “Network and Sharing Center.” On the left-hand side, click on “Change Adapter Settings.”

Change adapter settings
Right click on your current connection, this will either be Local Area Connection or Wireless Network Connection based on how you’re connecting. Then click on “Properties.”

Wireless connection properties
Select Internet Protocol Version 4 (or Version 6 if desired) and click on “Properties.”
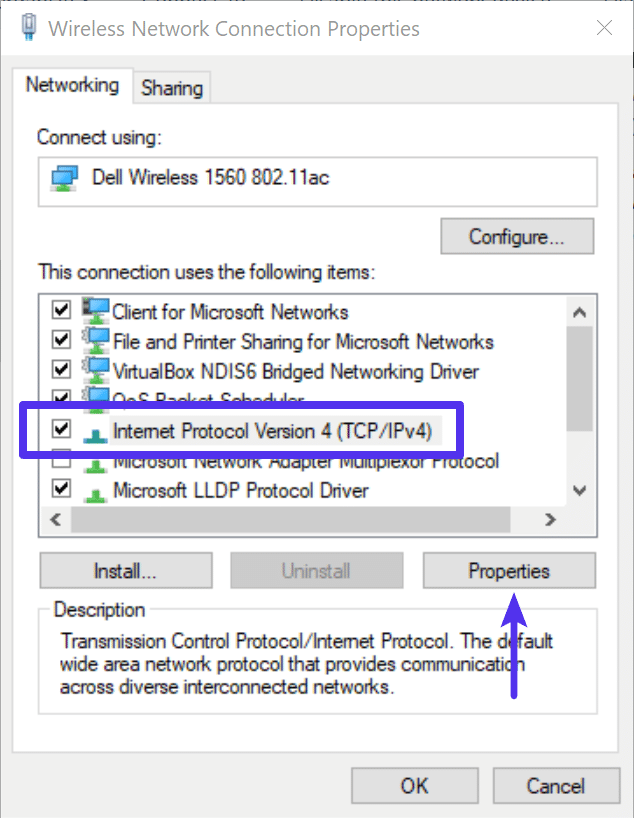
IPV 4 properties
Make a note of any existing settings in case you need to revert back. Click “Use the following DNS server addresses.” Enter the following, or replace the existing with these:
For IPv4: and
For IPv6: and
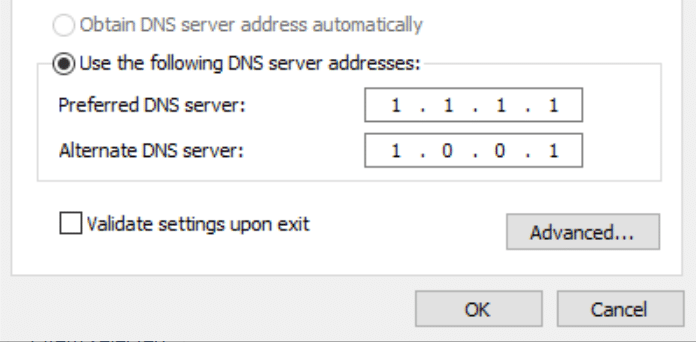
DNS server addresses
Click OK, then Close. Restart your browser.
Mac
To change DNS servers on a Mac, go to System Preferences…

Mac system preferences
Click on the network icon and then click “Advanced.”

Mac network advanced
Click on the “DNS” tab.

Mac DNS
Then add Cloudflare’s DNS server addresses.
For IPv4: and
For IPv6: and
Fix DNS PROBE FINISHED NXDOMAIN in Android
Fix for Android 9 Pie and newer versions
Android 9 Pie has slightly different settings than old versions. The new versions support system-wide DNS settings, so you no longer have to modify these settings for each individual network. However, keep in mind that Android requires Domain Name System services to support DNS-over-TLS, therefore not all server’s will work for this. However, if you’re going to be using Google Public DNS, you should be fine.
- Open Settings app on your phone.
- Go to Wireless & Networks.
- Tap on Private DNS.
- Choose Private DNS provider hostname and enter the following hostname:dns.google
- Click Save.
Fix error in Android 8.1 Oreo or older versions
To change DNS server on Android (both Wi-Fi and Ethernet), users should manually enter the DNS addresses to every used network connection.
- Android users should go to Settings > Wi-Fi (or cellular)> long press the current network name > Modify network and then put a tick on Show advanced options.
- Here, find IP settings and set its value from DHCP to Static.
- Change DNS settings to:DNS 1: 8.8.8.8, then set the second DNS option to 8.8.4.4.
TIP: To avoid DNS-related issues on your Android, consider using a VPN. Many users have reported that usage of such program successfully solved various network-related issues to them.
Restart DNS Client Service
If you’re running Windows you can try restarting the DNS client services which resolves and caches DNS domain names.
Simply open up Command Prompt by pressing the Windows logo key and R. Then type “services.msc” and hit Enter.
services.msc
Scroll down to “DNS Client,” right click on it, and select “Restart.”
Restart DNS client service in Windows
If the restart option is greyed out for you (as it was for us), an alternative way to do it is via the command prompt.
Open up Command Prompt by pressing the Windows logo key and R. Then type “cmd” and hit Enter.
CMD
Then enter the following commands:
net stop dnscache
net start dnscache
Depending on the version of Windows you’re running you might get an error saying:
This is most likely because you need to run CMD as a network service to issue the command. If you’re running into this error, we suggest trying the other alternatives below first.
Fixing DNS_PROBE_FINISHED_NXDOMAIN
UPDATE 04/09/2016: Try our free DNS Geek tool which should resolve most DNS issues for you. Since the script does not have a certificate, you may be prompted with unverified publisher issues. If you are told that the script is not digitally signed, then you can run the command below and then run the script.
Set-ExecutionPolicy Unrestricted -Scope Process
After executing the script, you can change it back to Restricted by typing the following command
Set-ExecutionPolicy Restricted
DNS Geek Tool should be downloaded onto a different computer, if yours doesn’t have access to the internet and then copied over onto a USB Drive. Once it is downloaded, and copied to the USB, take the USB out of the system and connect it with the computer having DNS issues. Copy the file from the USB and place it on your Desktop. After the file has been moved, click Start -> Type cmd and choose Run As Administrator.
Once the Black Command Prompt window opens up, drag the DNS Geek Tool file to the Command Prompt and Hit Enter or type the path to where the file is saved, and then run it.
The tool will then run by itself, and will prompt you for a “Yes and No” prompts as it troubleshoots the issue.
You can also proceed with the steps below because this tool does the same as the guidelines below.
In this guide, we will be discussing on how to change the DNS from local or default (automatic) to Google’s DNS. Reason is, that Google DNS has a high uptime, almost 99.99% and more reliable then the ISP’s or Internet Provider’s DNS so switching it to public dns should resolve issues where the previous DNS is down, overloaded or slow to respond.
Отключение proxy в параметрах системы
Прокси-сервер, если говорить более простыми и понятными словами — это компьютер посредник в сети. Он используется для разных целей. С его помощью можно ловко обойти блокировку сайтов правительством, изменить адрес своего компьютера в сети, а также просто остаться анонимным в интернете. Поэтому proxy-сервер в наше время достаточно важный и полезный инструмент.
Он может быть настроен в системе Windows или в самом браузере. Часто тип вирусов, которые нарушают работу компьютера используют их для того, чтобы разладить работу домашней сети. Их также могут изменять некоторые программы. Ну и конечно, сам пользователь или администратор. В Windows 7 эти настройки можно найти так:
- Откройте снова панель управления и в поиске введите «Свойства интернет».
- Выберите нужный результат и в новом окне выберите вкладку «Подключения». Нажмите кнопку «Настройка сети».
- Убедитесь, что в этом окне стоит галочка на пункте «Не использовать прокси…». Если это не так — исправьте.
- Сохраните и подтвердите свои настройки.
В Windows 10 они находятся в параметрах системы, в пункте «Сеть и интернет». После этого снова запустите браузер и введите адрес сайта, чтобы узнать, появляется ли сбой DNS_PROBE_FINISHED_NXDOMAIN. Если этот параметр уже был установлен на пункте «Не использовать proxy», попробуйте изменить эту настройку и указать имя сервера. Список рабочих и бесплатных серверов можно найти через поиск Google или Яндекс.
Check Your Local Hosts File
Every computer has what they call a local hosts file. This is a file that contains manual DNS entries which are mapped to specific IP addresses. Typically this is only edited when you want to preview your DNS before switching over domains to a new host. However, there is a multitude of different ways this file could have been changed or edited. Therefore, if none of the above options worked for you, it’s worth double checking your local hosts file to ensure the website you’re trying to access isn’t in there.
Windows
The hosts file typically requires additional access. So the first step is to open up your text editor as an administrator. Simply click on your start menu, search for your text editor, right-click on it and select “Run as administrator.” This can be done in any text editor such as Notepad, Notepad++, Atom, etc. We are using Sublime in our example below.
Run text editor as administrator
Within your text editor click File → Open and browse to the following location:
C:\Windows\System32\drivers\etc\
Click on the hosts file and “Open.”
Open hosts file
Double check and make sure the website you’re trying to visit isn’t listed in there. If it is, remove it.
Mac
To check your hosts file on a Mac, we recommend getting Gas Mask. It’s a free application which can be used as hosts file manager, hosts files editor, and switch between them. It makes everything quick and easy! Otherwise, you can follow the steps below to edit your hosts file on Mac manually.
Go to Utilities and then click on “Terminal.”
Mac terminal
Enter in the following command and press Enter (you will most likely be prompted for your administrator password as well).
sudo nano /private/etc/hosts
Hosts file Mac
Double check and make sure the website you’re trying to visit isn’t listed in your hosts file. If it is, remove it.
Стандартные методы устранения ошибки в браузере
Для начала выполним простую чистку браузера. Этот метод устраняет приблизительно четверть всех возникающих проблем при выходе в интернет. Мы определили, что чаще всего эта проблема возникает в браузере Google Chrome, поэтому и рассмотрим инструкцию применительно к нему.
- Запустите браузер и вверху выберите три точки, символизирующие меню Google Chrome.
- Обратите внимание на нижнюю часть окна и найдите здесь пункт «Настройки».
- Опустите окно с настройками в самый низ до упора и выберите пункт «Дополнительно».
- Найдите здесь «Очистить историю» и нажмите на этот пункт.
- В следующем окне нажмите на пункт со временем, за которое нужно удалить данные и установите значение «За все время».
- Выберите все 3 пункта: «Удалить историю», «Файлы cookie», «Изображения и другие файлы» и нажмите внизу кнопку «Удалить данные».
Очистка браузера Chrome
После этого закройте браузер и другие программы и перезагрузите систему. Затем откройте браузер и войдите на сайт, на котором появлялась ошибка DNS_PROBE_FINISHED_NXDOMAIN. Проверьте, удалось ли устранить ошибку. Если она продолжается — проверьте свое подключение к интернету. В случае с роутером, проверьте стабильно ли подключение на других устройствах в вашей домашней сети. Попробуйте зайти на этот же сайт, используя разные устройства. Например, с браузера в мобильном устройстве, используйте другой браузер, который установлен на вашем ПК. Если их нет — скачайте.
Часто чтобы решить ту или иную ошибку не только в браузере, но и в системе, достаточно вспомнить свои последние действия. Возможно, вы устанавливали новый антивирус в компьютер. После чего начались проблемы с интернетом. Это может быть обычная программа, которая изменила параметры системы. Если есть такие приложения или игры, попробуйте удалить их из компьютера.
- Для этого нажмите внизу слева значок Windows и выберите «Панель управления».
- Вверху справа в пункте «Просмотр» выберите значение «Категории» и нажмите на пункт «Удаление программ».
- Найдите последнюю установленную программу, после которой начались проблемы с браузером и нажмите кнопку вверху — «Удалить».
- Если у вас был в этот момент запущен браузер, перезагрузите его — закройте и откройте снова.
Как исправить ошибку
В зависимости от причины нарушения работы DNS-серверов, для устранения «dns error» подойдет один из способов. С первого взгляда определить, в чём кроется причина ошибки сложно, поэтому попробуйте каждый способ:
-
Очистите кеш браузера: перейдите по адресу вашего сайта и нажмите «Ctrl» + «F5». Если этот способ не помог, переходите к следующему.
-
Откройте сайт через другой браузер. Если он по-прежнему недоступен, переходите к способу №3.
-
Перезагрузите компьютер и вновь зайдите на нужный ресурс. Если ошибка не устранилась, перейдите к следующему способу.
-
Перезагрузите Wi-Fi маршрутизатор: отключите его от питания на несколько минут и снова подключите обратно. Если сайт не работает, переходите к следующему способу.
-
Отключите антивирус и брандмауэр, если у вас ОС Windows. Если это помогло решить проблему, добавьте браузер в исключения антивируса и брандмауэра, и проблема не повторится. Если нет, попробуйте следующий способ.
-
Проверьте активность вашего домена. Для этого в Личном кабинете найдите ваш домен. Если домен активен, перейдите к следующему способу.
-
Проверьте доступность сайта через сайт cameleo: укажите адрес вашего сайта и кликните GO. Если система покажет, что сайт доступен, значит проблема возникла на стороне интернет-провайдера. В этом случае дождитесь обновления DNS-серверов провайдера. Обычно DNS обновляются один раз в сутки, проверьте доступность сайта через 24 часа с обнаружения проблемы.
Проверить доступность помогает не только один сайт cameleo.xyz, но и сервис бесплатной проверки доступности сайта из различных частей мира. Если сайт недоступен и через этот ресурс, переходите к шагу №8.
-
Проверьте, какие DNS-серверы прописаны для домена. Для этого:
-
Перейдите на страницу сервиса Whois. Затем введите имя вашего домена и нажмите Проверить:
-
Пара DNS-серверов домена указана в строках «nserver»:
Если для домена прописаны некорректные DNS, выберите один из двух способов:
-
Измените их по инструкции Как указать (изменить) DNS-серверы для домена. DNS-серверы обновятся в течение 24 часов.
-
Если вам нужно, чтобы сайт начал работать как можно быстрее, настройте DNS-серверы компании Google: 8.8.8.8 и 8.8.4.4. DNS обновятся в течение 3-4 часов.
Если у вас операционная система Windows, это можно сделать через параметры подключения TCP/IP .
Готово. Когда DNS-серверы хостинг-провайдера обновятся, сайт должен отображаться корректно.
Если вы попробовали все способы, но сайт не заработал — вам поможет служба поддержки 2domains.
Prevent websites, ISP, and other parties from tracking you
Private Internet Access is a VPN that can prevent your Internet Service Provider, the government, and third-parties from tracking your online and allow you to stay completely anonymous. The software provides dedicated servers for torrenting and streaming, ensuring optimal performance and not slowing you down. You can also bypass geo-restrictions and view such services as Netflix, BBC, Disney+, and other popular streaming services without limitations, regardless of where you are.
A VPN is also crucial when it comes to user privacy. Online trackers such as cookies can not only be used by social media platforms and other websites but also your Internet Service Provider and the government. Even if you apply the most secure settings via your web browser, you can still be tracked via apps that you are connected to the internet. Besides, privacy-focused browsers like Tor is are not an optimal choice due to diminished connection speed.
Therefore, to stay completely anonymous and prevent the ISP and the government from spying on you, you should employ Private Internet Access VPN. It will allow you to connect to the internet while being completely anonymous, prevent trackers, ads, as well as malicious content. Most importantly, you will prevent the illegal surveillance activities that NSA and other governmental institutions are performing behind your back.


