Копирование разделов жёсткого диска средствами gnu/linux: как обойтись загрузочной флешкой там, где раньше нужен был акронис
Содержание:
- Создание текстовых файлов в терминале Linux.
- Tip: Searching for commands without knowing their exact names
- Копирование файлов scp
- Copy Remotely
- Copying Directories with cp Command #
- Steps
- Community Q&A
- Tips
- Почему не получается осуществить копирование объектов через файловый менеджер на ОС Линукс
- КОПИРОВАНИЕ ФАЙЛОВ ПО РЕГУЛЯРНЫМ ВЫРАЖЕНИЯМ В LINUX
- 4) Create hard links to files instead of copying them
- Linux Copy File Examples
- Copying Files and Directories with the rsync Command #
- 12) Create backup date of each copied file
- УТИЛИТА КОПИРОВАНИЯ ФАЙЛОВ CP
Создание текстовых файлов в терминале Linux.
Текстовый файл в терминале Linux можно создать тремя способами.
1. С помощью команды touch:
Вводим команду touch, затем путь и название нового файла.
Например, создадим текстовый файл в текущей директории с именем file.txt:
2. С помощью перенаправления стандартного потока вывода любой команды.
О перенаправлении стандартных потоках вывода в файл более подробно будет рассказано в одной из следующих статей о терминале Linux.
Создать файл можно также перенаправлением вывода любой команды в файл.
В общем виде команда будет следующей:
То есть, команда с выводом, затем галочка вправо >, означающая перенаправление вывода команды в файл и путь к файлу.
Например, перенаправим вывод справки команды ls в файл, который будет создан (а если такой файл есть, то он будет полностью перезаписан):
Но это мы создали не пустой файл, а если хотим создать пустой, то воспользуемся командой echo c переданной ей пустой строкой (две одинарных ковычки) и перенаправим это в файл:
3. С помощью любого текстового редактора, консольного или с графическим интерфейсом.
Передаем команду запуска любого текстового редактора и путь к файлу.
Самый простой консольный текстовый редактор это nano:
Или с помощью текстового редактора с графическим интерфейсом, который установлен в Gnome по умолчанию:
Про манипуляции с текстом более подробно в одной из следующих статей о терминале Linux.
Tip: Searching for commands without knowing their exact names
You can use apropos command to displays a list of all topics in the built-in user manual that are related to the subject. The syntax is:
apropos query apropos query | less apropos keywords | grep 'something' |
In this example, get the list of editing programs/commands that are available on a system:
apropos editor apropos editor | less |
Sample outputs:
ed                   (1)  - text editor
ex                   (1p)  - text editor
mcedit               (1)  - Internal file editor of GNU Midnight Commander
nano                 (1)  - Nano's ANOther editor, an enhanced free Pico clone
psed                 (1)  - a stream editor
sed                  (1p)  - stream editor
sed                  (1)  - stream editor for filtering and transforming text
vi                   (1p)  - screen-oriented (visual) display editor
vim                  (1)  - Vi IMproved, a programmers text editor
Finally, use whatis and man command to obtain information about the mcedit or vi command that apropos provides:
whatis mcedit whatis vi man vi man mcedit |
And there you have it, cp command that copies files and directories on Ubuntu based systems. I strongly suggest that your read cp command man page or see our cp command examples page for more information.
Копирование файлов scp
Эта статья рассчитана в первую очередь на начинающих, поэтому я попытаюсь объяснять все как можно подробнее. Перед тем, как мы перейдем к практике, нужно рассмотреть общий синтаксис команды:
$ scp опции пользователь1@хост1файл пользователь2@хост2:файл
Опции утилиты больше касаются протокола SSH и настраивают общее ее поведение. Дальше следует адрес первого и второго файла. Каждый из них может быть расположен как на локальной, так и на удаленной машине. А теперь рассмотрим основные опции, которые могут нам понадобиться:
- -1 — использовать протокол SSH1;
- -2 — использовать протокол SSH2;
- -B — пакетный режим для передачи нескольких файлов;
- -C — включить сжатие;
- — l — установить ограничение скорости в кбит/сек;
- -o — задать нужную опцию SSH;
- -p — сохранять время модификации;
- -r — рекурсивное копирование директорий;
- -v — более подробный режим.

В качестве пользователя нужно использовать любого пользователя, который есть на сервере. Вместо IP вы можете также домен сервера. Только необходимо, чтобы у выбранного пользователя были права записи в указанную папку.
С помощью опции -r вы можете скопировать на удаленную машину целый каталог. Команда будет выглядеть вот так:

Убедитесь, что у исходного каталога нет косой черты, а у каталога назначения она должна обязательно быть. Немного изменив синтаксис с косой чертой можно передать все файлы из каталога на удаленный сервер:

Если поменять местами локальный путь и сервер, то вы сможете копировать файлы scp c удаленного сервера на локальный компьютер:
Таким же самым образом вы можете копирование файлов scp или папок с сервера:

Обратите внимание, что папка, в которую вы собираетесь копировать должна завершаться косой чертой, иначе папка, которую вы копируете запишется вместо той, в которую нужно скопировать. Чтобы скачать файл scp из одного сервера на другой, просто необходимо указать данные аутентификации на каждом из них
Например, скопируем один файл:
Чтобы скачать файл scp из одного сервера на другой, просто необходимо указать данные аутентификации на каждом из них. Например, скопируем один файл:
Скопируем папку с того же удаленного сервера:
Copy Remotely
So far we have covered how you can copy files and directory contents locally to different areas within the same Linux system, now we’ll demonstrate how you can use secure copy with the ‘scp’ command to copy to a remote system over SSH.
In order for this to work, you must have network connectivity from the source system to the destination system. By default SCP uses port 22, however we can set a specific port number with the -P option.
 ~]# echo "testing scp" > /tmp/scp-test
 ~]# scp /tmp/scp-test :/root
's password:
scp-test               100%   12     0.0KB/s   00:00

 ~]# ssh
's password:
Last login: Sun Jun 12 13:10:32 2016 from 192.168.1.13
 ~]# cat /root/scp-test
testing scp
The example above will copy the /tmp/scp-test file from the local system to the remote host’s /root directory, so long as the user specified has access to this location. We then SSH to the remote server and check the contents of the file have been copied over correctly.
Like ‘cp’, ‘scp’ also supports the -r option for copying recursively.
Copying Directories with cp Command #
To copy a directory, including all its files and subdirectories, use the or option.
In the following example we are copying the directory to :
The command above creates the destination directory, and recursively copy all files and subdirectories from the source to the destination directory.
If the destination directory already exists, the source directory itself and all its content is copied inside the destination directory. To copy only the files and subdirectories but not the target directory, use the option:
Another way to copy only the directory’s content but not the directory itself is to use the wildcard character (). The disadvantage of the following command is that it does not copy the hidden files and directories (the ones starting with a dot ):
All the options we used in the previous section when copying files can also be used when copying directories. The main difference is that when copying directories. you always need to use the option.
Steps
Method 1 of 2:
Using the Command Line
-
1
Open Terminal.
You can also just press Alt+Ctrl+T to open Terminal on most Linux versions.
Click or double-click the Terminal app icon, which usually resembles a black box with a white «>_» on it.
-
2
Go to the proper directory. Type in cd path where «path» is the address of the folder in which the file you want to copy is located, then press ↵ Enter.
- For example, to tell Terminal to look for your file in the Desktop folder, you would type cd Desktop into Terminal.
- Make sure you capitalize the folder’s name if necessary.
- If attempting to switch to a folder results in an error, you’ll need to enter the folder’s entire path (e.g., /home/name/Desktop/folder instead of just folder) here.
-
3
Type in the «copy» tag. This tag is cp with a space after it.
-
4
Enter a file’s name. Type in the name and extension of the file you want to copy after cp and the space, then add a space.
- For example, if you want to copy a file named «hello», you would type cp hello into Terminal.
- If the file name has an extension on the end of it (e.g., «.desktop»), make sure you include the extension in the file’s name when typing it into Terminal.
-
5
Enter the destination folder.
For example, if you want to copy «hello» into a folder named «Hi» that’s stored in the Documents folder, you would have cp hello /home/name/Documents/Hi (where «name» is your username) typed into Terminal.
Type in the path for the folder into which you want to copy the file.
-
6
Press ↵ Enter. Doing so will run your command. Your file will be pasted into the folder you specified.
Advertisement
Method 2 of 2:
Using the Interface
-
1
Consider using keyboard shortcuts. As with virtually all operating systems that have user interfaces, you can use keyboard shortcuts to copy and paste files on Linux:
- Click the file you want to copy to select it, or drag your mouse across multiple files to select them all.
- Press Ctrl+C to copy the files.
- Go to the folder into which you want to copy the files.
- Press Ctrl+V to paste in the files.
-
2
Find the file you want to copy. Go to the location in which the file is located.
-
3
Select the file. Click once the file to do so.
-
4
Right-click the file.
Some Linux versions will also display a menu bar at the top of the screen. If so, you can click Edit instead of right-clicking the selected file.
Doing so will prompt a drop-down menu.
-
5
Click Copy.
You may click Copy… or Copy File on some versions of Linux.
It’s in the drop-down menu. This copies the selected file.
-
6
Go to the destination folder. Find the folder into which you want to paste the file.
-
7
Right-click an empty space. This will create a drop-down menu in the folder.
-
8
Click Paste. It’s in the drop-down menu. Doing so pastes in your copied file.
Advertisement
Community Q&A
Search
Add New Question
Question
What option will allow me to copy the contents of /dir1 to /dir2 while preserving the modification times, ownership, and permissions?
Community Answer
You can try «-a» for an archive to preserve as much as possible. You can also do «—preserve» followed by a comma-separated list of attributes to preserve (or «—preserve all»). Finally, try «cp —help» or «man cp» for more options.
Thanks!
Yes
No
Not Helpful 1
Helpful 0
Advertisement
Tips
-
If you want to move a file to a different folder rather than copying the file, you can type mv instead of cp when specifying the file’s name and its destination (e.g., mv hello Documents).
Thanks!
-
Holding down Ctrl while clicking individual files will select each file you click. Right-clicking one of the selected files and selecting Copy will then copy all of the selected files.
Thanks!
Advertisement
Submit a Tip
All tip submissions are carefully reviewed before being published
Thanks for submitting a tip for review!
Advertisement
Почему не получается осуществить копирование объектов через файловый менеджер на ОС Линукс
У данного обстоятельства есть несколько распространённых причин:
- системный сбой. В такой ситуации после перемещения файлов между двумя директориями пользователю рекомендуется нажать правой клавишей манипулятора по свободному пространству на рабочем столе либо прямо в папке и тапнуть по строке «Обновить». Содержимое каталога должно отобразиться. Также можно попробовать перезапустить стационарный компьютер, ноутбук и выполнить процедуру копирования ещё раз;
- вирусное заражение ПК. Некоторое вредоносное программное обеспечение, которое попало на устройство через Глобальную сеть, может отрицательно повлиять на функционирование операционной системы, заблокировать работу многих стандартных функций. Для решения проблемы необходимо проверить свой ПК, воспользовавшись лицензионным антивирусом либо специализированными утилитами;
- проблемы с копируемыми объектами. Если файл имеет расширение, которое невозможно прочитать, то могут возникнуть проблемы с его копированием на внешний носитель либо в отдельную папку;
- нелицензионная версия операционной системы. Пиратские, собранные копии операционки также могут стать причиной возникновения подобной проблемы, поэтому их не рекомендуется использовать;
- наличие специальных обновлений. Некорректно загруженное обновление может стать причиной нестабильности работы операционной системы. Для исправления ошибки обновление потребуется деинсталлировать;
- устаревшая версия БИОС материнской платы ПК. Данная причина редко вызывает проблемы с копированием файлов и папок на Linux, однако её исключать нельзя. Загрузить последнюю версию BIOS для конкретной модели материнской платы можно с официального сайта её изготовителя в Интернете.
Чистка компьютера от вредоносного ПО с использованием лицензионного антивируса
Важно! Перепрошивать BIOS самостоятельно не рекомендуется во избежание проблем в дальнейшем. Лучше обратиться в сервисный центр, специалисты которого смогут справиться с поставленной задачей без особых проблем
Для устранения проблем с копированием директорий можно попробовать переустановить операционную систему, скачав один из дистрибутивов Linux. Однако данный способ стоит рассматривать в крайнем случае, когда ни одно из вышеперечисленного не привело к положительному результату.
Таким образом, большинство способов копирования файлов и папок на операционке Линукс реализуется с помощью терминала. Однако с работой консоли сможет разобраться не каждый пользователь. В такой ситуации скопировать нужные объекты можно будет в файловом менеджере системы. На основе представленной выше информации каждый сможет понять, как осуществляется в Linux копирование файлов.
КОПИРОВАНИЕ ФАЙЛОВ ПО РЕГУЛЯРНЫМ ВЫРАЖЕНИЯМ В LINUX
В утилите find можно применить различные условия и регулярные выражения для поиска файлов. Я уже немного писал о ней в статье как найти новые файлы в Linux. Мы можем скопировать все найденные с помощью find файлы вызвав для каждого из них команду cp. Например, копируем все файлы в текущей директории содержащие в имени только цифры:
Здесь точка указывает на текущую директорию, а параметр name задает регулярное выражение. Параметром exec мы задаем какую команду нужно выполнить для обнаруженных файлов. Символ {} — подставляет имя каждого файла.
Но не find’ом единым можно такое делать. То же самое можно получить, запросив список файлов директории в ls, отфильтровав его по регулярному выражению egrep и передав имена файлов по очереди в cp с помощью xargs:
Это достаточно неудобный способ копировать файлы linux но все же, он возможен. Будут скопированы все файлы из домашней директории, содержащие в имени только английские буквы.
4) Create hard links to files instead of copying them
Copying file means you must have some space on the storage to store the copied files. Sometimes for any reasons, you may want to create “shortcut” or links to the files instead of copying them. To do this, we can use -l option.
$ cp -l file_4.txt /home/pungki/office
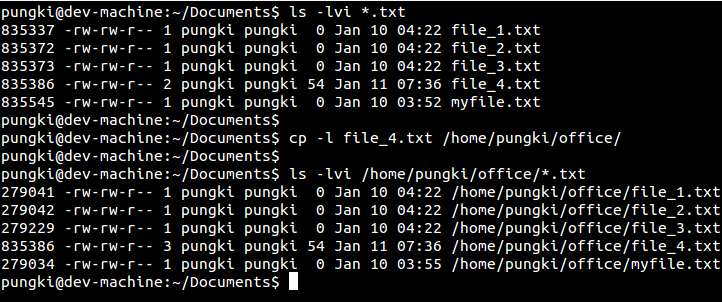
From screenshot above, we see that a hardlink of file_4.txt was copied into /home/pungki/office/file_4.txt. It marked by the same inode, 835386. But please note, hardlinks cannot be created into directories. Let’s take a look an example below.
The original directory_1 has inode number 278230
The original file_5.txt has inode number 279231
Do cp command on directory_1
The copied directory_1 has inode number 274800
The copied file_5.txt had inode number 279231. Same with its original file
Linux Copy File Examples
To make a copy of a file called file.doc in the current directory as newfile.doc, enter: Sample outputs:
-rw-r--r--  1 veryv  wheel  20 Mar 20 17:42 file.doc
-rw-r--r--  1 veryv  wheel  20 Mar 20 17:43 newfile.doc
You can copy multiple files simultaneously into another directory. In this example, copy the files named main.c, demo.h and lib.c into a directory named backup: If backup is located in /home/project, enter:
Verbose option
To see files as they are copied pass the -v option as follows to the cp command:
$ cp -v filename.txt filename.bak $ cp -v foo.txt tmp |
Sample outputs:
foo.txt -> /tmp/foo.txt
Preserve file attributes
To copy a file to a new file and preserve the modification date, time, and access control list associated with the source file, enter: This option (-p) forces cp to preserve the following attributes of each source file in the copy as allowed by permissions:
- Modification time/date
- Access time
- File flags
- File mode
- User ID (UID)
- Group ID (GID)
- Access Control Lists (ACLs)
- Extended Attributes (EAs)
Copying all files
The star wildcard represents anything i.e. all files. To copy all the files in a directory to a new directory, enter:
The star wildcard represents anything whose name ends with the .doc extension. So, to copy all the document files (*.doc) in a directory to a new directory, enter:
Recursive copy
To copy a directory, including all its files and subdirectories, to another directory, enter (copy directories recursively):
Copying Files and Directories with the rsync Command #
is a fast and versatile command line-utility that synchronizes files and directories between two locations. It can be used to copy files to local and remote locations.
includes a number of options that control every aspect of its behavior. The most useful option is which copies directories recursively, transfer special and block devices, preserve symbolic links, modification times, group, ownership, and permissions.
To copy a single file from one to another location, you would run the following command:
If the destination file exists, will overwrite it.
The same command can be used to copy a directory:
threats the source directories that end with a trailing slash differently. If you add a trailing slash on the source directory, the command will copy only the source directory’s contents to the destination directory. When the trailing slash is omitted, will copy the source directory inside the destination directory. The safest option is to always include the trailing slash on both the destination and source.
To learn more about check the following articles:
- How to Use Rsync for Local and Remote Data Transfer and Synchronization
- How to Exclude Files and Directories with Rsync
12) Create backup date of each copied file
When the destination folder already have the file, by default cp command will overwrite the same file in the destination directory. Using —backup option, cp command will make a backup of each existing destination file. ../office will refer to /home/pungki/office. Here’s a sample :
$ cp --backup=simple -v *.txt ../office
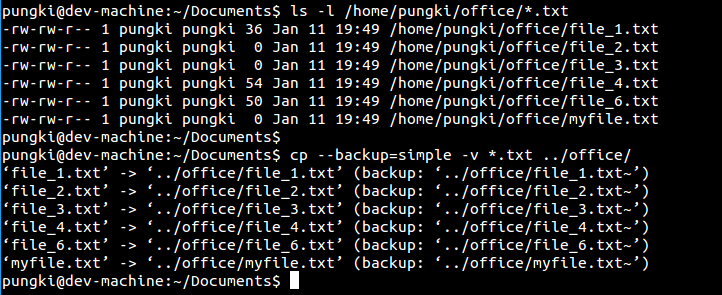
As we can see, —backup=simple option will create a backup file which marked by a tilde sign (~) at the end of the file. —backup option has some Control, which are :
- none, off : never backups (even if —backup is given)
- numbered, t : make numbered backups
- existing, nil : numbered if numbered backup exist, simple otherwise
- simple, never : always make simple backups
УТИЛИТА КОПИРОВАНИЯ ФАЙЛОВ CP
Название утилиты cp — это сокращение от Copy, что означает копировать. Утилита позволяет полностью копировать файлы и директории.
СИНТАКСИС И ОПЦИИ
Общий синтаксис cp выглядит вот так:
$ cp опции файл-источник файл-приемник
Или:
$ cp опции файл-источник директория-приемник/
После выполнения команды файл-источник будет полностью перенесен в файл-приемник. Если в конце указан слэш, файл будет записан в заданную директорию с оригинальным именем.
Утилита имеет несколько интересных опций, которые могут сильно помочь при нестандартных задачах копирования, поэтому давайте их рассмотрим:
- —attributes-only — не копировать содержимое файла, а только флаги доступа и владельца;
- -f, —force — перезаписывать существующие файлы;
- -i, —interactive — спрашивать, нужно ли перезаписывать существующие файлы;
- -L — копировать несимволические ссылки, а то на что они указывают;
- -n — не перезаписывать существующие файлы;
- -P — не следовать символическим ссылкам;
- -r — копировать папку linux рекурсивно;
- -s — не выполнять копирование файлов в linux, а создавать символические ссылки;
- -u — скопировать файл, только если он был изменен;
- -x — не выходить за пределы этой файловой системы;
- -p — сохранять владельца, временные метки и флаги доступа при копировании;
- -t — считать файл-приемник директорией и копировать файл-источник в эту директорию.
ПРИМЕРЫ КОПИРОВАНИЯ ФАЙЛОВ В LINUX
Теперь, когда вы знаете основные опции можно рассмотреть примеры.Например, мы хотим скопировать некую картинку из домашней папки в подкаталог pictures:
Или можем явно указать имя новой картинки:
Копирование папок осуществляется с помощью ключа -r:
После выполнения этой команды копирования ~/папка будет скопирована в папку ~/Документы. Главное, не забывайте поставить слэш в конце выражения или использовать опцию -t. Иначе папка ~/документы будет перезаписана.
По умолчанию команда cp linux перезаписывает существующие файлы или папки, но можно заставить утилиту спрашивать нужно ли перезаписывать каждый файл если вы неуверены в правильности составления команды:
Есть и противоположная опция -n, означающая никогда не перезаписывать существующие файлы.
Опция -u позволяет копировать файл, только если уже существующий более старой версии, чем новый:
cp также поддерживает специальные символы замены * и ?. Например, следующая команда скопирует все файлы, начинающиеся на test:
Если нужно применить более сложные регулярные выражения, придется комбинировать утилиту cp с find или egrep.
В случае если важно сохранить права доступа к файлу и его владельца нужно использовать опцию -p:
Для упрощения использования команды можно использовать синтаксис фигурных скобок. Например, чтобы создать резервную копию файла выполните:
$ cp test.conf{,.bak}
Будет создан файл с таким же именем и расширением .bak
По умолчанию в cp не отображается прогресс копирования файла, что очень неудобно при работе с большими файлами, но его можно легко посмотреть с помощью утилиты cv.


