Микросервисная архитектура, spring cloud и docker
Содержание:
»Installation and Configuration
The service sync is done using an external long-running process in the
consul-k8s project. This process
can run either in or out of a Kubernetes cluster. However, running this within
the Kubernetes cluster is generally easier since it is automated using the
Helm chart.
The Consul server cluster can run either in or out of a Kubernetes cluster.
The Consul server cluster does not need to be running on the same machine
or same platform as the sync process. The sync process needs to be configured
with the address to a Consul agent as well as any additional access
information such as ACL tokens.
To install the sync process, enable the catalog sync feature using
and
upgrade the installation using for existing installs or
for a fresh install.
This will enable services to sync in both directions. You can also choose
to only sync Kubernetes services to Consul or vice versa by disabling a direction.
To only enable syncing Consul services to Kubernetes use the config:
To only enable syncing Kubernetes services to Consul use:
See the
for more information.
Authentication
The sync process must authenticate to both Kubernetes and Consul to read
and write services.
If running using the Helm chart then this authentication is handled for you.
If running outside of Kubernetes, a valid kubeconfig file must be provided with cluster
and authentication information. The sync process will look into the default locations
for both in-cluster and out-of-cluster authentication. If works,
then the sync program should work.
For Consul, if ACLs are configured on the cluster, a Consul
ACL token
will need to be provided. Review the ACL rules
when creating this token so that it only allows the necessary privileges. The catalog
sync process accepts this token by using the
environment variable. This token should be set as a
and referenced in the Helm chart.
Installing Consul on your Docker Host
It’s considered a best practice to install and run the Consul Agent on every host in your network, including your Docker hosts. This has a few important benefits:
First, it makes configuring services a cinch. Services running on the host itself (i.e. that are not containerized) can simply drop service definitions, including health checks, into , and the Consul agent will load them at start or when signaled. The agent will then publish the services into the catalog, and perform any health checks you’ve designated at the frequency you specify.
Second, it provides for reliable failure detection. If your host becomes unreachable due to termination or any other reason, the network of Consul agents running on the other hosts in your network will quickly notice; and any services registered on the host will be marked as unavailable automatically.
Finally, it provides a host-local endpoint for accepting Consul DNS queries and HTTP API requests. Those requests need not go onto the network, which can help simplify security rules and reduce network chatter.
The most controversial question is, should you install the Consul Agent directly on the host, or install it in a container?
The answer is: it doesn’t matter — but the network configuration does. Consul itself is a small, self-contained Linux binary; it has no dependencies. You can certainly run it as a container if you wish, but the benefit of runtime environment isolation that makes containers so appealing is minimal when the application doesn’t need isolation anyway. My personal preference is to run Consul as a first-class service on the host, alongside essential system services as the Docker engine and daemon.
If you choose to run Consul in a container, that’s fine, too. Hashicorp itself publishes an official image in the Docker Hub. The important part is that you must use the option when you run the container:
$ sudo docker run -d --net=host consul:latest
»Helm Chart Installation
The recommended way to run Consul on Kubernetes is via the
Helm chart. This will install and configure
all the necessary components to run Consul. The configuration enables you
to run just a server cluster, just a client cluster, or both. Using the Helm
chart, you can have a full Consul deployment up and running in minutes.
A step-by-step beginner tutorial and accompanying video can be found at the
Minikube with Consul guide.
While the Helm chart exposes dozens of useful configurations and automatically
sets up complex resources, it does not automatically operate Consul.
You are still responsible for learning how to monitor, backup,
upgrade, etc. the Consul cluster.
The Helm chart has no required configuration and will install a Consul
cluster with sane defaults out of the box. Prior to going to production,
it is highly recommended that you
.
Security Warning: By default, the chart will install an insecure configuration
of Consul. This provides a less complicated out-of-box experience for new users,
but is not appropriate for a production setup. It is highly recommended to use
a properly secured Kubernetes cluster or make sure that you understand and enable
the recommended security features. Currently,
some of these features are not supported in the Helm chart and require additional
manual configuration.
Installing Consul
Add the HashiCorp Helm Repository:
Ensure you have access to the consul chart:
Now you’re ready to install Consul! To install Consul with the default
configuration using Helm 3 run:
If using Helm 2, run:
That’s it. The Helm chart does everything to set up a recommended
Consul-on-Kubernetes deployment.
In a couple minutes, a Consul cluster will be formed and a leader
elected and every node will have a running Consul agent.
Customizing Your Installation
If you want to customize your installation,
create a file to override the default settings.
You can learn what settings are available by running
or by reading the Helm Chart Reference.
For example, if you want to enable the Consul Connect feature,
use the following config file:
Once you’ve created your file, run with the flag:
If you’ve already installed Consul and want to make changes, you’ll need to run
. See Upgrading for more details.
»Architecture
We recommend running Consul on Kubernetes with the same
general architecture
as running it anywhere else. There are some benefits Kubernetes can provide
that eases operating a Consul cluster and we document those below. The standard
production deployment guide is still an
important read even if running Consul within Kubernetes.
Each section below will outline the different components of running Consul
on Kubernetes and an overview of the resources that are used within the
Kubernetes cluster.
Server Agents
The server agents are run as a StatefulSet, using persistent volume
claims to store the server state. This also ensures that the
is persisted so that servers
can be rescheduled onto new IP addresses without causing issues. The server agents
are configured with
rules so that they are placed on different nodes. A readiness probe is
configured that marks the pod as ready only when it has established a leader.
A Service is registered to represent the servers and expose the various
ports. The DNS address of this service is used to join the servers to each
other without requiring any other access to the Kubernetes cluster. The
service is configured to publish non-ready endpoints so that it can be used
for joining during bootstrap and upgrades.
Additionally, a PodDisruptionBudget is configured so the Consul server
cluster maintains quorum during voluntary operational events. The maximum
unavailable is where is the number of server agents.
Note: Kubernetes and Helm do not delete Persistent Volumes or Persistent
Volume Claims when a
,
so this must done manually when removing servers.
Client Agents
The client agents are run as a DaemonSet. This places one agent
(within its own pod) on each Kubernetes node.
The clients expose the Consul HTTP API via a static port (default 8500)
bound to the host port. This enables all other pods on the node to connect
to the node-local agent using the host IP that can be retrieved via the
Kubernetes downward API. See
for an example.
There is a major limitation to this: there is no way to bind to a local-only
host port. Therefore, any other node can connect to the agent. This should be
considered for security. For a properly production-secured agent with TLS
and ACLs, this is safe.
Some people prefer to run Consul agent per pod architectures, since this
makes it easy to register the pod as a service. However, this turns
a pod into a «node» in Consul and also causes an explosion of resource usage
since every pod needs a Consul agent. We recommend instead running an
agent (in a dedicated pod) per node, via the DaemonSet. This maintains the
node equivalence in Consul. Service registration should be handled via the
catalog syncing feature with Services rather than pods.
Note: Due to a limitation of anti-affinity rules with DaemonSets,
a client-mode agent runs alongside server-mode agents in Kubernetes. This
duplication wastes some resources, but otherwise functions perfectly fine.
»Viewing the Consul UI
The Consul UI is enabled by default when using the Helm chart.
For security reasons, it isn’t exposed via a Service by default so you must
use to visit the UI.
TLS Disabled
If running with TLS disabled, the Consul UI will be accessible via http on port 8500:
Once the port is forwarded navigate to http://localhost:8500.
TLS Enabled
If running with TLS enabled, the Consul UI will be accessible via https on port 8501:
Once the port is forwarded navigate to https://localhost:8501.
You’ll need to click through an SSL warning from your browser because the
Consul certificate authority is self-signed and not in the browser’s trust store.
ACLs Enabled
If ACLs are enabled, you will need to input an ACL token into the UI in order
to see all resources and make modifications.
To retrieve the bootstrap token that has full permissions, run:
Then paste the token into the UI under the ACLs tab (without the ).
NOTE: If using multi-cluster federation, your kubectl context must be in the primary datacenter
to retrieve the bootstrap token since secondary datacenters use a separate token
with less permissions.
If you want to expose the UI via a Kubernetes Service, configure
the .
This service will allow requests to the Consul servers so it should
not be open to the world.
»Configure and run a Consul server
Next, you will use Docker command-line flags to start the agent as a server, configure networking, and bootstrap the datacenter when one server is up.
Since you started the container in detached mode, , the process will run in the background. You also set port mapping to your local machine as well as binding the client interface of our agent to 0.0.0.0. This allows you to work directly with the Consul datacenter from your local machine and to access Consul’s UI and DNS over localhost. Finally, you are using Docker’s default bridge network.
Note, the Consul Docker image sets up the Consul configuration directory at by default. The agent will load any configuration files placed in that directory.
The configuration directory is not exposed as a volume and will not persist data. Consul uses it only during startup and does not store any state there.
To avoid mounting volumes or copying files to the container, you can also save to that directory via the environment variable , which will be covered later in the tutorial.
»Standard Upgrades
For upgrades we strive to ensure backwards compatibility. To support this,
nodes gossip their protocol version and builds. This enables clients and
servers to intelligently enable new features when available, or to gracefully
fallback to a backward compatible mode of operation otherwise.
For most upgrades, the process is simple. Assuming the current version of
Consul is A, and version B is released.
-
Check the version’s upgrade notes to ensure
there are no compatibility issues that will affect your workload. If there
are plan accordingly before continuing. -
On each server, install version B of Consul.
-
One server at a time, shut down version A via and restart with version B. Wait until
the server is healthy and has rejoined the cluster before moving on to the
next server. -
Once all the servers are upgraded, begin a rollout of clients following
the same process. -
Done! You are now running the latest Consul agent. You can verify this
by running to make sure all members have the latest
build and highest protocol version.
Consul and the Loopback Interface
When you run the Consul agent, it listens on six ports, all of which serve different functions. The three ports essential to our discussion are:
- HTTP API (default: 8500): handles HTTP API requests from clients
- CLI RPC (default: 8400): handles requests from CLI
- DNS (default: 8600): answers DNS queries
By default, Consul allows connections to these ports only from the loopback interface (127.0.0.1). This is a reasonable default choice for security, and poses few problems on legacy hosts that don’t run containers. But it presents a difficulty for containerized applications, since the loopback interface in a container is separate and distinct from the loopback interfaces on the host. This is a consequence of the private network namespace that every container operates in by default under Docker. So if a containerized application tries to connect to Consul by addressing it at , it will fail.
»Lifecycle
Every agent in the Consul cluster goes through a lifecycle. Understanding
this lifecycle is useful for building a mental model of an agent’s interactions
with a cluster and how the cluster treats a node.
When an agent is first started, it does not know about any other node in the
cluster.
To discover its peers, it must join the cluster. This is done with the
command or by providing the proper configuration to auto-join on start. Once a
node joins, this information is gossiped to the entire cluster, meaning all
nodes will eventually be aware of each other. If the agent is a server,
existing servers will begin replicating to the new node.
In the case of a network failure, some nodes may be unreachable by other nodes.
In this case, unreachable nodes are marked as failed. It is impossible to
distinguish between a network failure and an agent crash, so both cases are
handled the same.
Once a node is marked as failed, this information is updated in the service
catalog.
Note: There is some nuance here since this update is only possible if the servers can still form a quorum. Once the network recovers or a crashed agent restarts the cluster will repair itself and unmark a node as failed. The health check in the catalog will also be updated to reflect this.
When a node leaves, it specifies its intent to do so, and the cluster
marks that node as having left. Unlike the failed case, all of the
services provided by a node are immediately deregistered. If the agent was
a server, replication to it will stop.
To prevent an accumulation of dead nodes (nodes in either failed or left
states), Consul will automatically remove dead nodes out of the catalog. This
process is called reaping. This is currently done on a configurable
interval of 72 hours (changing the reap interval is not recommended due to
its consequences during outage situations). Reaping is similar to leaving,
causing all associated services to be deregistered.
»Consul to Kubernetes
This syncs Consul services into first-class Kubernetes services.
The sync service will create an
for each Consul service. The «external name» will be
the Consul DNS name.
For example, given a Consul service , a Kubernetes Service will be created
as follows:
With Consul To Kubernetes syncing enabled, DNS requests of the form
will be serviced by Consul DNS. From a different Kubernetes namespace than where Consul
is deployed, the DNS request would need to be .
Note: Consul to Kubernetes syncing isn’t required if you’ve enabled Consul DNS on Kubernetes
and all you need to do is address services in the form , i.e. you don’t need Kubernetes objects created.
Requires Consul DNS via CoreDNS in Kubernetes: This feature requires that
Consul DNS is configured within Kubernetes.
Additionally,
is required (instead of kube-dns) to resolve an
issue with resolving services pointing to custom domains.
Sync Enable/Disable
All Consul services visible to the sync process based on its given ACL token
will be synced to Kubernetes.
There is no way to change this behavior per service. For the opposite sync
direction (Kubernetes to Consul), you can use Kubernetes annotations to disable
a sync per service. This is not currently possible for Consul to Kubernetes
sync and the ACL token must be used to limit what services are synced.
In the future, we hope to support per-service configuration.
Service Name
When a Consul service is synced to Kubernetes, the name of the Kubernetes
service will exactly match the name of the Consul service.
To change this default exact match behavior, it is possible to specify a
prefix to be added to service names within Kubernetes by using the
flag. This can also be specified in the Helm
configuration.
If a conflicting service is found, the service will not be synced. This
does not match the Kubernetes to Consul behavior, but given the current
implementation we must do this because Kubernetes can’t mix both CNAME and
Endpoint-based services.
Kubernetes Service Labels and Annotations
Any Consul services synced to Kubernetes will be labeled and annotated.
An annotation will be set to «true» to note
that this is a synced service from Consul.
Additionally, a label will be specified so that label selectors
can be used with and other tooling to easily filter all Consul-synced
services.
»Types of Consul Integrations
By leveraging Consul’s RESTful HTTP API system, vendors are able to build extensible integrations at the data plane, platform, and the infrastructure layer to extend Consul’s functionalities. These integrations can be performed with the OSS (open source) version of Consul. Integrations with advanced network segmentation, advanced federation, and advanced read scalability need to be tested against Consul Enterprise, since these features are only supported by Consul Enterprise.
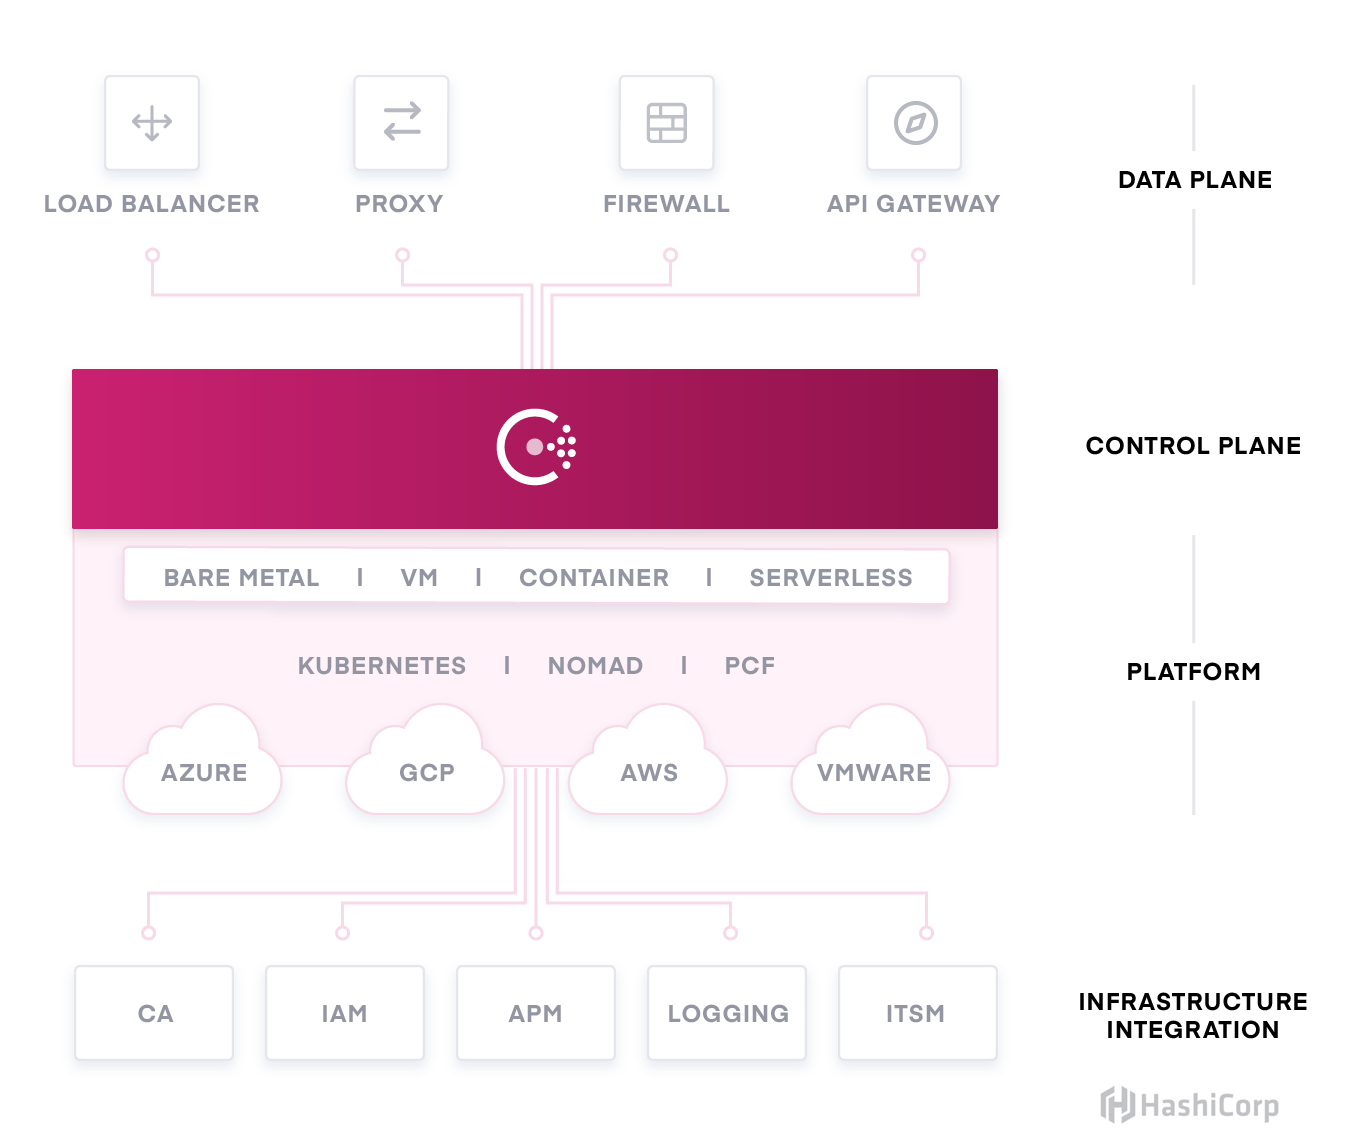
Data Plane: These integrations automate IP updates of load balancers by leveraging Consul service discovery, automate firewall security policy updates by leveraging Consul intentions within a centralized management tool, extend sidecar proxies to support Consul connect, and extend API gateways to allow Consul to route incoming traffic to the proxies for Connect-enabled services.
Control Plane: Consul has a client-server architecture and is the control plane for the service mesh. No integrations at this layer.
Platform: These integrations leverage automation of Consul agent deployment, configuration, and management through cloud and PaaS provisioning and orchestration tools such as Kubernetes and Pivotal Cloud Foundry (PCF). They include the Consul agent running in both client and server mode.
Infrastructure: These integrations extend Consul’s certificate management, secure ACL configuration, observability metrics and logging, and service discovery that allows for dynamic service mapping with ITSM tools.
По данным портала ЗАЧЕСТНЫЙБИЗНЕСОБЩЕСТВО С ОГРАНИЧЕННОЙ ОТВЕТСТВЕННОСТЬЮ «КОНСУС»По данным портала ЗАЧЕСТНЫЙБИЗНЕС1018004858
О компании:
ООО «КОНСУС» ИНН 1018004858, ОГРН 1091031000499 зарегистрировано 19.05.2009 в регионе Республика Карелия по адресу: 186670, респ Карелия, поселок городского типа Чупа, район Лоухский, улица Коргуева, 7а. Статус: Действующее. Размер Уставного Капитала 15 000,00 руб.
Руководителем организации является: Генеральный Директор — Шитиков Александр Васильевич, ИНН . У организации 3 Учредителя. Основным направлением деятельности является «управление недвижимым имуществом за вознаграждение или на договорной основе». На 01.01.2020 в ООО «КОНСУС» числится 4 сотрудника.
Рейтинг организации: Средний подробнее
Должная осмотрительность (отчет) ?
Статус: ?
Действующее
Дата регистрации: По данным портала ЗАЧЕСТНЫЙБИЗНЕС
?
По данным портала ЗАЧЕСТНЫЙБИЗНЕС
19.05.2009
Налоговый режим: ?
По данным портала ЗАЧЕСТНЫЙБИЗНЕС
Упрощенная система налогообложения (УСН) (на 01.01.2020)
Среднесписочная численность работников: ?
01.01.2020 – 4 ↓ -0 (4 на 01.01.2019 г.)
Фонд оплаты труда / Средняя заработная плата Доступно в Премиум Доступе ?
|
ОГРН ? |
1091031000499 присвоен: 19.05.2009 |
|
ИНН ? |
1018004858 |
|
КПП ? |
101801001 |
|
ОКПО ? |
89669428 |
|
ОКТМО ? |
86621170051 |
Реквизиты для договора
?
…Скачать
Проверить блокировку cчетов
?
Контактная информация 8143… Посмотреть
?
Отзывы об организации
?: 0 Написать отзыв
Юридический адрес: ?
По данным портала ЗАЧЕСТНЫЙБИЗНЕС
186670, респ Карелия, поселок городского типа Чупа, район Лоухский, улица Коргуева, 7а
получен 19.05.2009
зарегистрировано по данному адресу:
По данным портала ЗАЧЕСТНЫЙБИЗНЕС
По данным портала ЗАЧЕСТНЫЙБИЗНЕС
Иное Должностное Лицо ?По данным портала ЗАЧЕСТНЫЙБИЗНЕС
Генеральный ДиректорПо данным портала ЗАЧЕСТНЫЙБИЗНЕС
Шитиков Александр Васильевич
| ИНН ? |
По данным портала ЗАЧЕСТНЫЙБИЗНЕС |
| действует с | По данным портала ЗАЧЕСТНЫЙБИЗНЕС 19.05.2009 |
Учредители ? ()
Уставный капитал: По данным портала ЗАЧЕСТНЫЙБИЗНЕС
15 000,00 руб.
| 33.33% |
Шитиков Александр Васильевич 5 000,00руб., 19.05.2009 , ИНН |
| 33.33% |
Шитиков Василий Александрович 5 000,00руб., 19.05.2009 , ИНН |
| 33.33% |
Шитиков Владимир Александрович 5 000,00руб., 19.05.2009 , ИНН |
Основной вид деятельности: ?По данным портала ЗАЧЕСТНЫЙБИЗНЕС
68.32 управление недвижимым имуществом за вознаграждение или на договорной основе
Дополнительные виды деятельности:
Единый Реестр Проверок (Ген. Прокуратуры РФ) ?
Реестр недобросовестных поставщиков: ?
По данным портала ЗАЧЕСТНЫЙБИЗНЕС
не числится.
Данные реестра субъектов МСП: ?
| Критерий организации |
По данным портала ЗАЧЕСТНЫЙБИЗНЕС Микропредприятие |
Реестр операторов, осуществляющих обработку персональных данных (Данные РКН) ?
| Регистрационный номер: |
По данным портала ЗАЧЕСТНЫЙБИЗНЕС 12-0240243 от По данным портала ЗАЧЕСТНЫЙБИЗНЕС 22.03.2012 |
| Дата начала обработки: |
По данным портала ЗАЧЕСТНЫЙБИЗНЕС 26.04.2009 |
Налоговый орган ?
По данным портала ЗАЧЕСТНЫЙБИЗНЕС
Межрайонная Инспекция Федеральной Налоговой Службы № 1 По Республике Карелия
Дата постановки на учет: По данным портала ЗАЧЕСТНЫЙБИЗНЕС
19.05.2009
Регистрация во внебюджетных фондах
| Фонд | Рег. номер | Дата регистрации |
|---|---|---|
|
ПФР ? |
009016040253 |
По данным портала ЗАЧЕСТНЫЙБИЗНЕС 21.05.2009 |
|
ФСС ? |
100100040810001 |
По данным портала ЗАЧЕСТНЫЙБИЗНЕС 21.05.2009 |
Уплаченные страховые взносы за 2018 год (По данным ФНС):
— на обязательное социальное страхование на случай временной нетрудоспособности и в связи с материнством: 0,00 руб. ↓ -0 млн.
— на обязательное медицинское страхование работающего населения, зачисляемые в бюджет Федерального фонда обязательного медицинского страхования: 0,00 руб. ↓ -0 млн.
Коды статистики
|
ОКАТО ? |
86221570000 |
|
ОКОГУ ? |
4210014 |
|
ОКОПФ ? |
12300 |
|
ОКФС ? |
16 |
Финансовая отчетность ООО «КОНСУС» ?
?
Финансовый анализ отчетности за 2019 год
Коэффициент текущей ликвидности:
>2
Коэффициент капитализации:
Рентабельность продаж (ROS):
0.2 Подробный анализ…
|
В качестве Поставщика: , на сумму |
|
В качестве Заказчика: , на сумму |
По данным портала ЗАЧЕСТНЫЙБИЗНЕС
Судебные дела ООО «КОНСУС» ?
|
найдено по ИНН: По данным портала ЗАЧЕСТНЫЙБИЗНЕС |
|
Истец: По данным портала ЗАЧЕСТНЫЙБИЗНЕС , на сумму: 169 442,00 руб. |
|
найдено по наименованию (возможны совпадения): По данным портала ЗАЧЕСТНЫЙБИЗНЕС |
По данным портала ЗАЧЕСТНЫЙБИЗНЕС
Исполнительные производства ООО «КОНСУС»
?
|
найдено по наименованию и адресу (возможны совпадения): По данным портала ЗАЧЕСТНЫЙБИЗНЕС |
По данным портала ЗАЧЕСТНЫЙБИЗНЕС
Лента изменений ООО «КОНСУС»
?
Не является участником проекта ЗАЧЕСТНЫЙБИЗНЕС ?
»Stopping an Agent
An agent can be stopped in two ways: gracefully or forcefully. Servers and
Clients both behave differently depending on the leave that is performed. There
are two potential states a process can be in after a system signal is sent:
left and failed.
To gracefully halt an agent, send the process an interrupt signal (usually
from a terminal, or running ). For more
information on different signals sent by the command, see
here
When a Client is gracefully exited, the agent first notifies the cluster it
intends to leave the cluster. This way, other cluster members notify the
cluster that the node has left.
When a Server is gracefully exited, the server will not be marked as left.
This is to minimally impact the consensus quorum. Instead, the Server will be
marked as failed. To remove a server from the cluster, the
command is used. Using
will put the server instance in a left state so long as the
Server agent is not alive.
Alternatively, you can forcibly stop an agent by sending it a
signal. This will stop any agent immediately. The rest
of the cluster will eventually (usually within seconds) detect that the node has
died and notify the cluster that the node has failed.
For client agents, the difference between a node failing and a node leaving
may not be important for your use case. For example, for a web server and load
balancer setup, both result in the same outcome: the web node is removed
from the load balancer pool.
The and
configuration
options allow you to adjust this behavior.
»Next steps
In this tutorial, you learned to deploy a containerized Consul datacenter. You also learned how to deploy a containerized service and how to configure your Consul client to register that service with your Consul datacenter.
You can continue learning how to deploy a Consul datacenter in production by completing the Deployment guide. The collection includes securing the datacenter with Access Control Lists and encryption, DNS configuration, and datacenter federation.
For additional reference documentation on the official Docker image for Consul, refer to the following websites:
- Docker Documentation
- Consul @ Dockerhub
- hashicorp/docker-consul GitHub Repository
»Getting Started With Consul and Kubernetes
There are several ways to try Consul with Kubernetes in different environments.
Guides
-
The Getting Started with Consul Service Mesh track
provides guidance for installing Consul as service mesh for Kubernetes using the Helm
chart, deploying services in the service mesh, and using intentions to secure service
communications. -
The Consul and Minikube guide is a quick step-by-step guide for deploying Consul with the official Helm chart on a local instance of Minikube.
-
Review production best practices and cloud-specific configurations for deploying Consul on managed Kubernetes runtimes.
- The Consul on Azure Kubernetes Service (AKS) guide is a complete step-by-step guide on how to deploy Consul on AKS. The guide also allows you to practice deploying two microservices.
- The Consul on Amazon Elastic Kubernetes (EKS) guide is a complete step-by-step guide on how to deploy Consul on EKS. Additionally, it provides guidance on interacting with your datacenter with the Consul UI, CLI, and API.
- The Consul on Google Kubernetes Engine (GKE) guide is a complete step-by-step guide on how to deploy Consul on GKE. Additionally, it provides guidance on interacting with your datacenter with the Consul UI, CLI, and API.
-
The Consul and Kubernetes Reference Architecture guide provides recommended practices for production.
-
The Consul and Kubernetes Deployment guide covers the necessary steps to install and configure a new Consul cluster on Kubernetes in production.
Documentation
- Installing Consul covers how to install Consul using the Helm chart.
- Helm Chart Reference describes the different options for configuring the Helm chart.
»What is Consul?
Consul is a service mesh solution providing a full featured control plane
with service discovery, configuration, and segmentation functionality. Each
of these features can be used individually as needed, or they can be used
together to build a full service mesh. Consul requires a data plane and
supports both a proxy and native integration model. Consul ships with a
simple built-in proxy so that everything works out of the box, but also
supports 3rd party proxy integrations such as Envoy.
Review the video below to learn more about Consul from HashiCorp’s co-founder Armon.
The key features of Consul are:
-
Service Discovery: Clients of Consul can register a service, such as
or , and other clients can use Consul to discover providers
of a given service. Using either DNS or HTTP, applications can easily find
the services they depend upon. -
Health Checking: Consul clients can provide any number of health checks,
either associated with a given service («is the webserver returning 200 OK»), or
with the local node («is memory utilization below 90%»). This information can be
used by an operator to monitor cluster health, and it is used by the service
discovery components to route traffic away from unhealthy hosts. -
KV Store: Applications can make use of Consul’s hierarchical key/value
store for any number of purposes, including dynamic configuration, feature flagging,
coordination, leader election, and more. The simple HTTP API makes it easy to use. -
Secure Service Communication: Consul can generate and distribute TLS
certificates for services to establish mutual TLS connections.
Intentions
can be used to define which services are allowed to communicate.
Service segmentation can be easily managed with intentions that can
be changed in real time instead of using complex network topologies
and static firewall rules. -
Multi Datacenter: Consul supports multiple datacenters out of the box. This
means users of Consul do not have to worry about building additional layers of
abstraction to grow to multiple regions.
Consul is designed to be friendly to both the DevOps community and
application developers, making it perfect for modern, elastic infrastructures.
Configuring dnsmasq to use the dummy interface
dnsmasq is a fantastic piece of software. Among other things, it can act as a local DNS cache on your host. It’s extremely flexible and can make integration with Consul’s DNS service a snap. We’re going to install it on our server; bind it to both our loopback and dummy interfaces; make it pass queries ending in to the Consul agent; and configure on both the host and our containers to dispatch DNS queries to it.
First, use your operating system’s package manager (, , etc.) to install dnsmasq.
Next, configure dnsmasq to bind to the loopback and dummy interfaces, and forward Consul queries to the agent. Create a file with the following text:
server=/consul/169.254.1.1#8600listen-address=127.0.0.1listen-address=169.254.1.1
Then restart dnsmasq.
Putting it together: Containers, Consul, and DNS
The key to making everything work at this point is to ensure that the container itself, and the code running inside, point to the right address when resolving DNS queries or connecting to Consul’s HTTP API.
When starting your Docker container, configure it so that it uses the dnsmasq server as its resolver:
docker run --dns 169.254.1.1 ...
The containerized application will then be able to query addresses ending in , because dnsmasq will forward those queries to the Consul agent.
How about Consul API access? The key is to set two standard environment variables called and . Nearly all standard Consul client libraries use these values to determine where to send queries. Be certain your code uses these variables too — never hard-code Consul endpoints into your applications!
$ sudo docker run --dns 169.254.1.1 \ -e CONSUL_HTTP_ADDR=169.254.1.1:8500 \ -e CONSUL_RPC_ADDR=169.254.1.1:8400 ...
Now, let’s see it in action!
Suppose we have a service already registered in Consul called . Can we find it in our container? Certainly:
$ sudo docker run --dns 169.254.1.1 \ -e CONSUL_HTTP_ADDR=169.254.1.1:8500 \ -e CONSUL_RPC_ADDR=169.254.1.1:8400 \ -it \ myImage:latest /bin/sh# curl http://$CONSUL_HTTP_ADDR/v1/catalog/service/myapp?pretty, "ServiceAddress": "", "ServicePort": 80, "ServiceEnableTagOverride": false, "CreateIndex": 60, "ModifyIndex": 60 }]# dig +short myapp.service.consul10.0.0.2
It’s also a great idea to set and as default environment variables in all users’ shells. To do that, you can simply edit the file on the host and set them there:
# /etc/environmentCONSUL_HTTP_ADDR=169.254.1.1:8500CONSUL_RPC_ADDR=169.254.1.1:8400
»Use Cases
Running a Consul server cluster: The Consul server cluster can run directly
on Kubernetes. This can be used by both nodes within Kubernetes as well as
nodes external to Kubernetes, as long as they can communicate to the server
nodes via the network.
Running Consul clients: Consul clients can run as pods on every node
and expose the Consul API to running pods. This enables many Consul tools
such as envconsul, consul-template, and more to work on Kubernetes since a
local agent is available. This will also register each Kubernetes node with
the Consul catalog for full visibility into your infrastructure.
Consul Connect Service Mesh:
Consul can automatically inject the Consul Connect
sidecar into pods so that they can accept and establish encrypted
and authorized network connections via mutual TLS. And because Connect
can run anywhere, pods can also communicate with external services (and
vice versa) over a fully encrypted connection.
Service sync to enable Kubernetes and non-Kubernetes services to communicate:
Consul can sync Kubernetes services with its own service registry. This allows
Kubernetes services to use native Kubernetes service discovery to discover
and connect to external services registered in Consul, and for external services
to use Consul service discovery to discover and connect to Kubernetes services.
And more! Consul can run directly on Kubernetes, so in addition to the
native integrations provided by Consul itself, any other tool built for
Kubernetes can choose to leverage Consul.


