Эпизод 0. hack vs mac. xcode build time
Содержание:
- Related Softwares for Xcode for Windows PC
- Строим интерфейс
- Значение запуска XCode в Windows?
- Steps to Install Xcode on Windows 10, 8/8.1 and 7 PC or Laptop
- Features of Xcode
- What is the main usage of Xcode
- What is Xcode?
- Наконец-то кодинг
- Steps to install macOS Sierra on Virtual Machine on Windows
- XCode
- Requirements for installing Xcode IDE on Windows
- The Requirements for Xcode to install on your PC
- 1.Xcode for Windows offline:
- Features of Xcode IDE
- 2.Xcode for Windows online:
- What You Need to Install Xcode on Windows 10?
- Steps to Install Xcode on Windows Computers
- Xcode 10
- How to Install and Run Xcode on Windows?
Related Softwares for Xcode for Windows PC
The Related Softwares for Xcode for Windows PC are listed below.
Unity 3D 5 is the newest Unity Game engine platform that is here below that I have provided in the form of Unity Offline Installer
It has a very smooth interface system, and it also makes the performance of this app is very smooth, and it is also user-friendly.
Mac OS VMware or VirtualBox. Xcode package from Apple site.
IIS Smooth Streaming allows you to deliver high definition video streams that playback smoothly on any device which running Silverlight.
The application lets the user get the source code easily from other sites which also allows the user to modify the source code according to the user’s comfort.
Строим интерфейс
Давай разберемся, как изменить внешний вид главного окна нашей программы. Идем в Tools -> Library (заметь, что теперь главное меню изменилось, так как мы находимся не в XCode, а в Interface Builder’е) и видим всевозможные контролы, которые ты можешь разместить на своей форме простым dran-and-drop’ом. Я кину на окно три текстовых поля, пару статических текстовых полей и одну кнопку. Сделаем простой калькулятор, который при нажатии на кнопку складывает значения из двух текстовых полей и выводит результат в третьем. Надо же с чего-то начинать :).
Для настройки контролов используется «инспектор объектов» (Tools -> Inspector). В его окошке отображаются свойства выделенного контрола, и их можно редактировать. Так, с помощью инспектора я задал тайтл кнопки и окна.
Ну, хорошо. Интерфейс у нас есть, и если мы соберем и запустим проект, то увидим на экране форму такой, какой мы ее создали с помощью Interface Builder’а. Ну а как же логика работы нашего приложения? Как создать обработчики для событий, приходящих от контролов, и изменять внешний вид нашего приложения в коде? А вот тут-то и начинается самое интересное… Нам нужно интегрировать наш интерфейс и приложение.
Для этого создадим класс-контроллер окна. Этот класс будет содержать обработчики сообщений от контролов формы и изменять их вид. Идем опять в XCode (не забыл, что мы все это время работали в Interface Builder’е?) и там создаем класс с именем AppConroller (File -> New File -> Cocoa -> Objective-C class). XCode создаст для нас два файла AppController.h и AppController.m с интерфейсом и реализацией класса-контроллера соответственно. Есть одна проблемка – Interface Builder о нашем классе AppController ничего не знает, а мы ведь должны будем привязать объекты интерфейса к полям и методам AppController’а. Перетаскиваем AppController.h на главное окно InterfaceBuilder. Теперь порядок. Но чего-то все-таки не хватает. Ага! Класс есть, а объекта этого класса нет ни одного. Идем в Interface Builder -> Tools -> Library -> Object и перетаскиваем объект с палитры на главное окно билдера. С помощью инспектора сообщаем билдеру, что это – объект класса AppController.
Теперь вся необходимая информация есть в MainMenu.xib, и при старте нашего приложения среда выполнения, загрузив этот файл, содержащий описание интерфейса, создаст объект нашего класса и настроит его нужным образом.
Значение запуска XCode в Windows?
Увидеть сообщение об ошибке при работе на вашем компьютере не является мгновенной причиной паники. Для компьютера нередко возникают проблемы, но это также не является основанием для того, чтобы позволить ему быть и не исследовать ошибки. Ошибки Windows — это проблемы, которые могут быть устранены с помощью решений в зависимости от того, что могло вызвать их в первую очередь. Некоторым может потребоваться только быстрое исправление переустановки системы, в то время как другим может потребоваться углубленная техническая помощь
Крайне важно реагировать на сигналы на экране и исследовать проблему, прежде чем пытаться ее исправить
Наличие знака, который говорит нам о проблемах, которые нам необходимо решить в жизни, чтобы мы продвигались вперед, — отличная идея. Хотя он не всегда работает в жизни, он работает в компьютерах. Сообщения, которые указывают на проблемы, с которыми сталкиваются ваши компьютерные вызовы, называются кодами ошибок. Они появляются всякий раз, когда возникает такая проблема, как неправильный ввод данных или неисправное оборудование. Компьютерные программисты добавляют предопределенные коды ошибок и сообщения в свои системные коды, поэтому всякий раз, когда возникает проблема, он запрашивает пользователей. Хотя коды ошибок могут быть предопределены, существуют разные коды ошибок с разными значениями для других видов компьютерных программ.
Steps to Install Xcode on Windows 10, 8/8.1 and 7 PC or Laptop
Follow the below steps so as to install Xcode on Windows 10, 8, or 8.1 and Windows 7 desktop or laptop for iOS SDK.
Step 1: Initially, download and install VMware or VirtualBox on your Windows computer from the above link.
Step 2: Now, you need to download and install OSX Mavericks ISO as a virtual machine.
Step 3: You have to create the virtual machine on your oracle virtual box. For that, you need to open Virtual Box and click New.
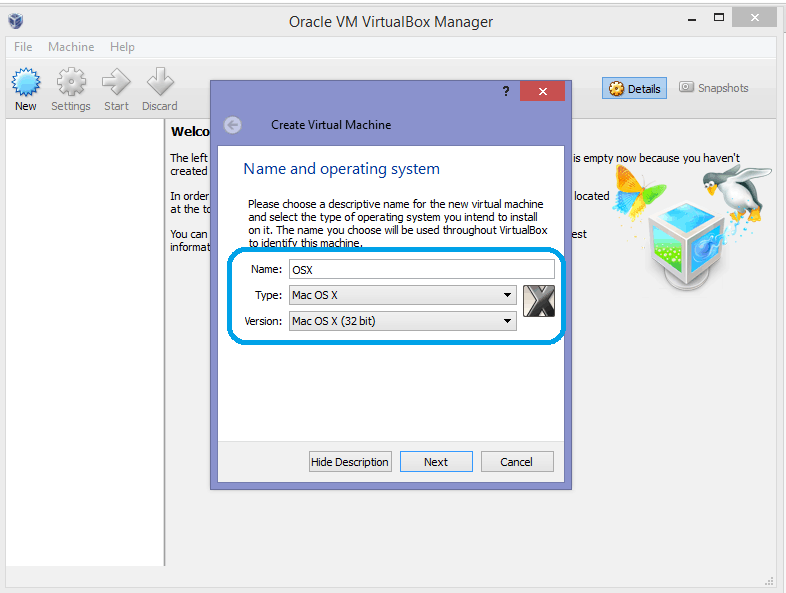
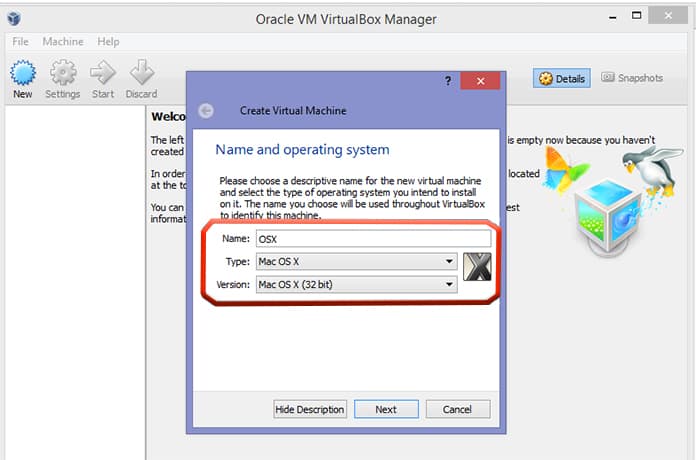
Step 4: Now, you will get a new window asking for the name of the new operating system. Enter Name as OSX, Type of the OS as Mac OS X, and also enter the Version as Mac OS X (32 bit). Click Next.
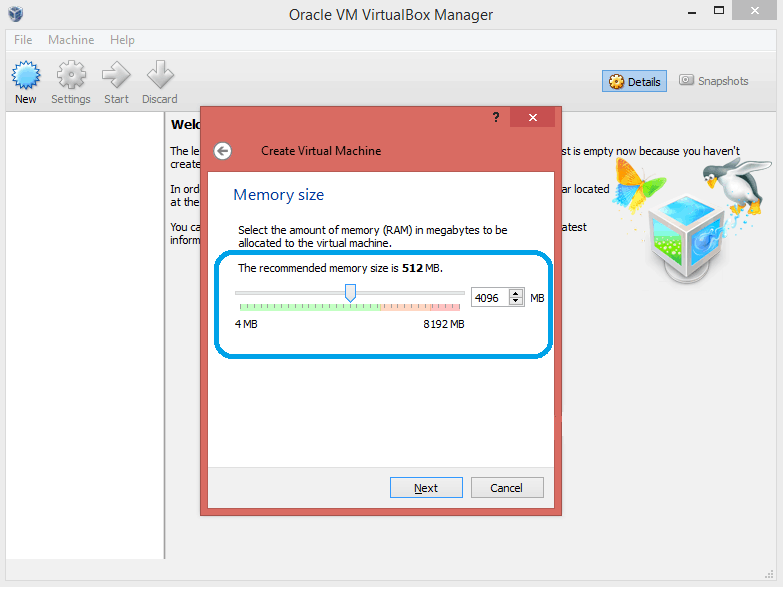
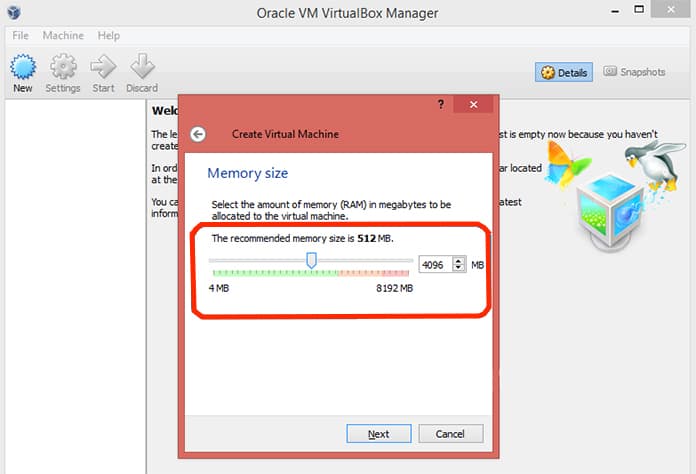
Step 5: You need to select the size of RAM for the virtual machine. The sufficient size of memory for Android to run on your Windows computer requires 1024 MB (1 GB). Select the memory size and then click Next.
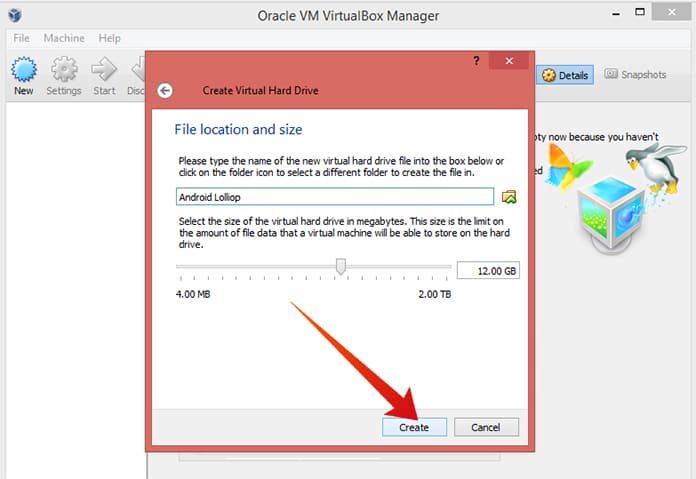
Step 6: Now, select and create the type of virtual hard drive file.
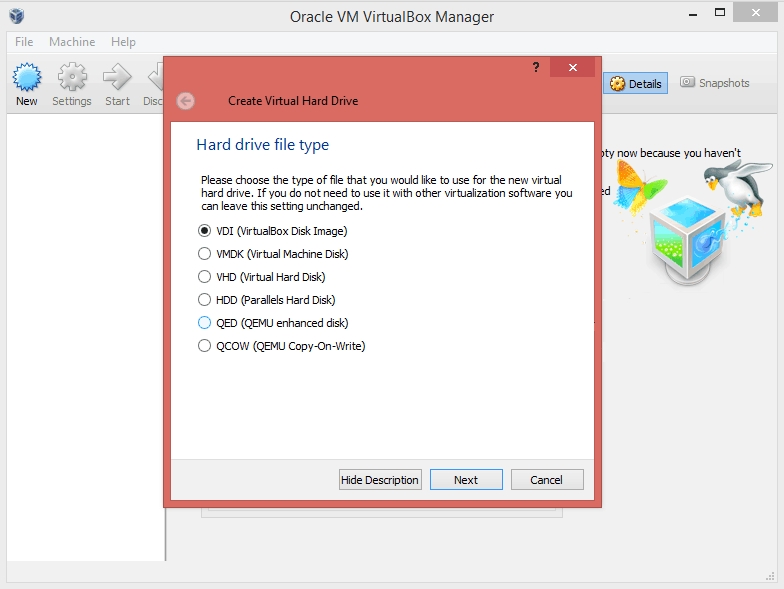
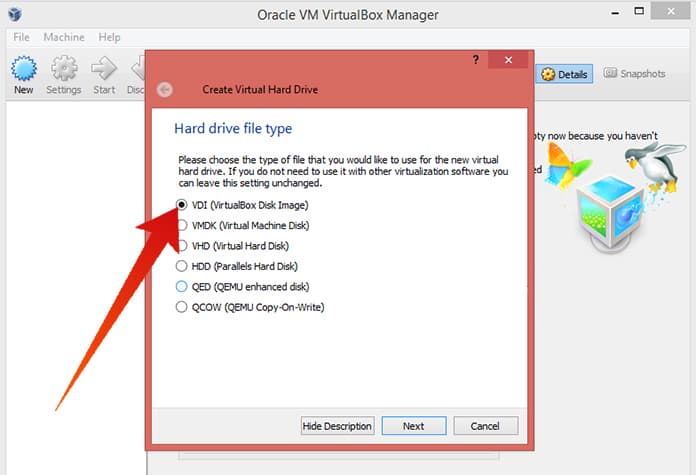
Step 7: Select the type of Hardware file as VDI (VirtualBox Disk Image). It is always recommended to go for VDI in terms of ISO image. Click Next.
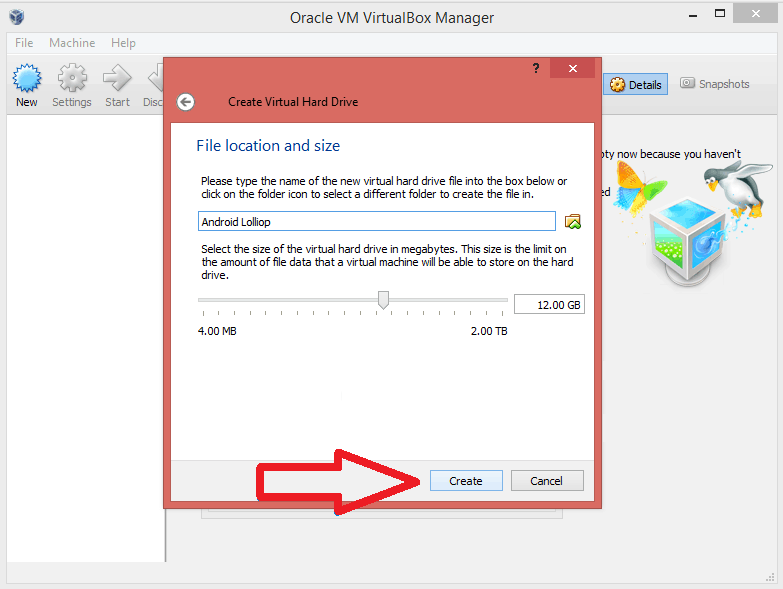
Step 8: Select the physical hard drive as Dynamically allocated. Now, you need to allocate the file location and size of Android from the physical hard drive on your device. Then, Click on Create.
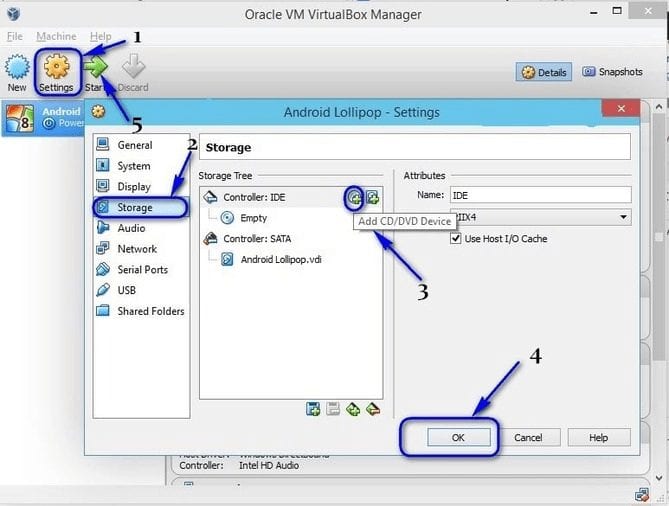
Step 9: Now, you have successfully created virtual machine on your virtual box. You need to mount the iso file which is downloaded before. For that, Go to Settings >> Storage >> Load iso File >> Click Ok >> Start.
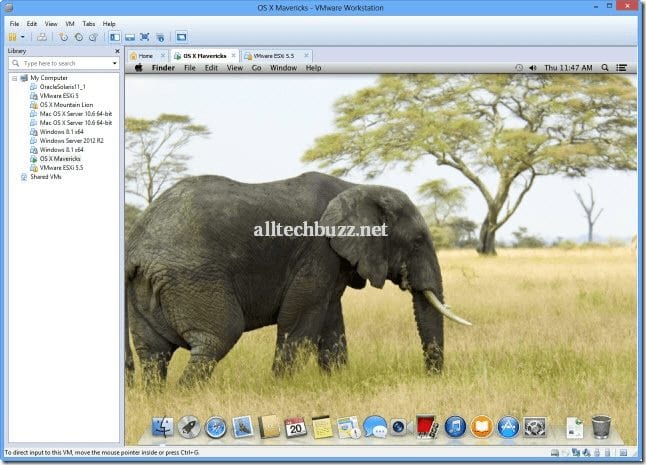
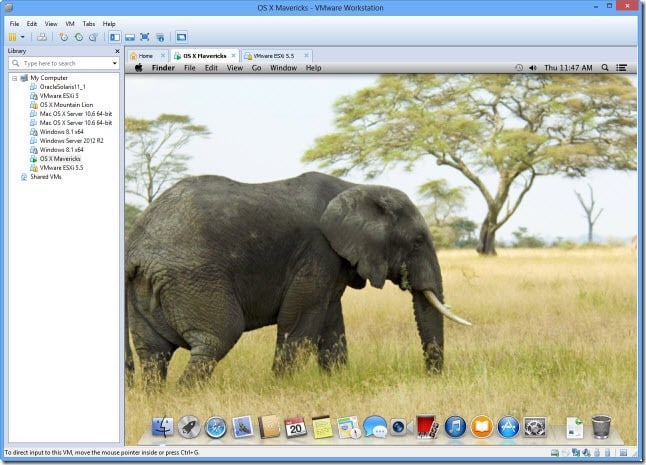
Step 10: Later, you just follow the on-screen steps of OSX boot as Wizard and then OSX will be installed in Oracle Virtual.
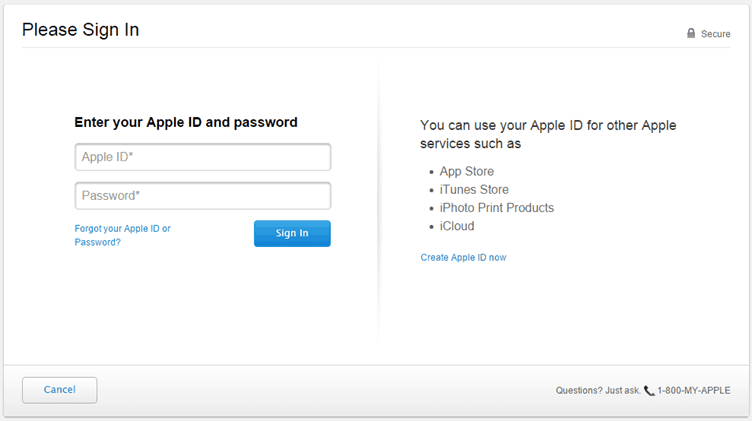
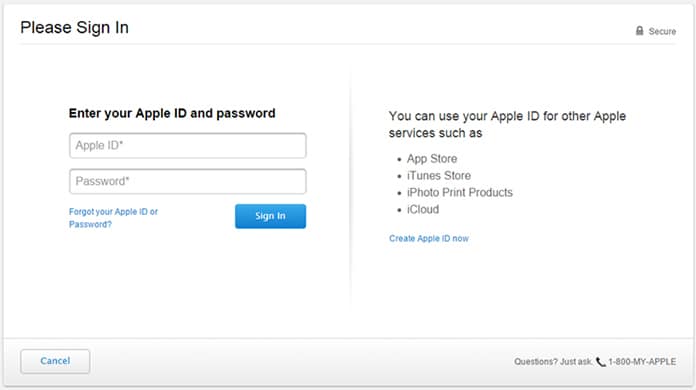
Step 11: Now, go to the safari browser in your Virtualbox and open the official Apple App Store. Sign in using your Apple ID into the App store. You need to enter the Apple ID and password, as shown in the image below:
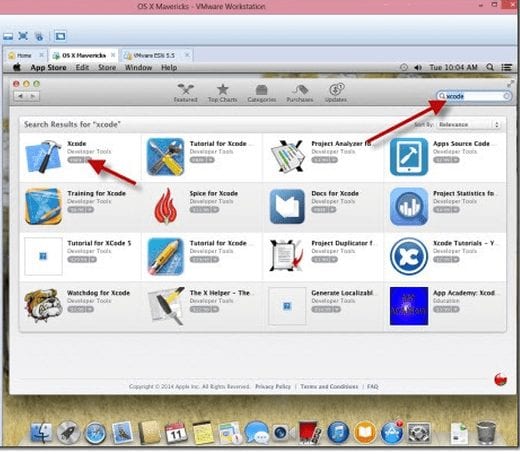
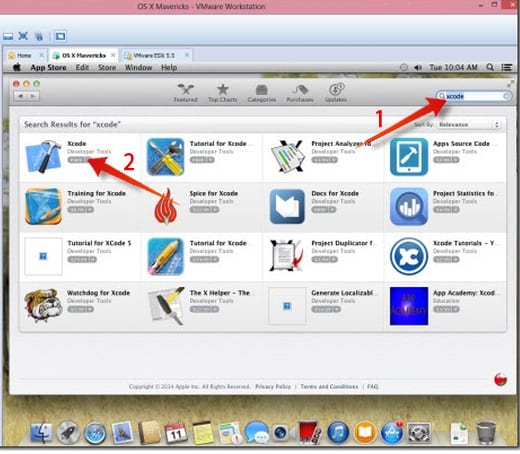
Step 12: After signing, type Xcode in the search box in order to get the complete package. It shows you various related apps. Locate Xcode from different apps and click on Free and Download. Then, click OK to download the kit.
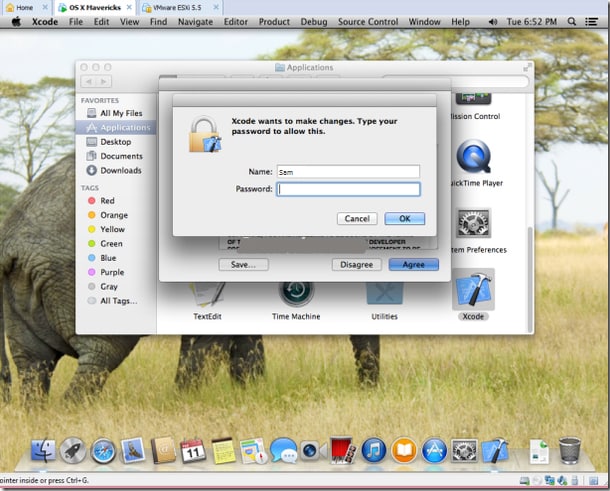
Step 13: After completing the installation process, open it from the applications. Now, you need to provide your root credential in order to get access privilege to install Xcode components and also for modifying your system settings. Enter your name and password and press, OK.
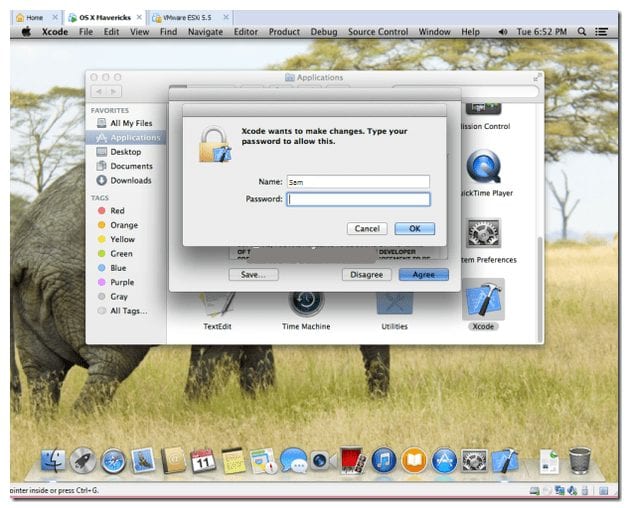
Step 14: That’s it. We have now successfully installed the latest Xcode version on your Windows 10, 8/8.1, and 7 PC using desktop virtualization software VMware workstation.
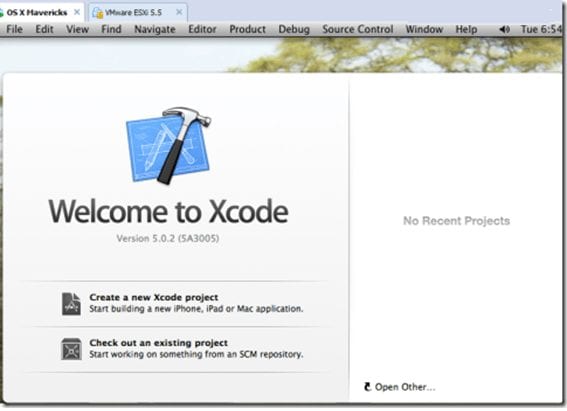
However, it can be used for educational purposes, but not for professional app developers. Now it’s time to use Xcode on our PC. So in this way, you can easily download and install Xcode on your Windows Personal computer or laptop, and you can create better apps as per your need. I hope this tutorial helps you in the best way to install Xcode on Windows 10, 8/8.1, and 7 OS running PC or laptop.
Features of Xcode
The salient features of Xcode For Windows PC
Developing Application: The user can create an application for Mac OS X and iOS devices such as iPad and iPhone.
Game Developing: Users can also develop games for the Mac OS X, iOS, and iPhone with the help of Xcode For Windows PC
Testing: It used for testing the application that is under the processing and here the user can check the safety of the apps and also they can do the UI testing before they are going to declare.
Test Flight: Here if you want to test the reliability and the stability of the application, it has a dedicated Feature called TestFlight that appear with the beta tester. Apple iTunes store needs the approval score of 100% to publish the application in it, and with this feature, the users can test the apps for the music successfully.
Real-Time Verification: Xcode For Windows PC can also verify the device of Mac and iOS it can also test in real-time.
Enable SDK: The SDK enables the users to control images of the app, for organizing them and by this, you can give an excellent touch for your applications that you needed to develop.
Editor: By using the Xcode editor, editing the app’s Interface Graphically is reasonable. If you notice any problems with those apps that you develop using Xcode, you can also get them quickly with this toolkit.
What is the main usage of Xcode
Xcode is an Integrated Development Environment, so it means that it has all the tools required to produce an application. It is, in particular, a text editor, a compiler and a build system into a single software package. These tools work together to help users to write software, compile it and load it onto a device. Users can also use these tools to debug their program and ultimately submit it to the app store. Xcode is Apple’s official IDE for Mac and iOS developers, so if a user is Mac or iOS developer then it is must to use software for them.

However, the software also has a couple of uses for those users who don’t write their own codes. First one is to side-load programs into iOS 9 and later using Xcode IDE 7 or later. The user will need the source code and a cryptographic signature to do so, such that user can’t just upload any arbitrary iOS program. This is a new feature meant to encourage new programmers to design their own programs. The new programmers even do not require to pay for the Apple Developer program. Another reason for users to use Xcode IDE is because of OS X. The OS X is Unix based operating system which means a lot of codes from other Unix-like systems (such as Linux), can be compiled and run with some little modifications.
What is Xcode?
Whenever we’ve to build an application or software of any operating system, we need a kind of software development kit which is called SDK in general.
The software development kit has all the necessary set of software required to develop a fully functional application (or software). Xcode does this job for Mac OS.
Xcode is an Integrated Development Environment which has to be installed on Mac before you start developing an app for Mac OS or iOS operating system.
Xcode according to Wikipedia was first launched in 2003 with a motive to make developing Mac OS based application easy.
Xcode SDK is a complete package for developing Mac OS or iOS applications that includes tools for building interface and coding. The interface builder and an assets management toolkit are the important features of Xcode.
It could be disappointing for the people who want to learn to develop Mac OS or iOS applications but don’t have Mac to download Xcode.
Don’t worry, as I said above, with the workaround that I’ve explained below, anyone can get Xcode for Windows operating system as well.
let’s go ahead and see how.
Наконец-то кодинг
После того, как с формошлепством покончено, настало время написать немного кода, который будет отвечать за поведение нашего приложения.
Код класса AppController
Об идентификаторах IBOutlet и IBAction, которые присутствуют в коде нашего класса, нужно сказать отдельно. Это, собственно, Interface Builder Outlet (ссылка на элемент интерфейса) и Interface Builder Action – обработчик события, которое генерируется каким-то объектом GUI. Привязывать их к реальным объектам пользовательского интерфейса в коде не нужно, сделаем это, используя великий и могучий Interface Builder. Для этого:
- открываем контекстное меню для объекта AppController в InterfaceBuilder’е;
- дропаем созданные нами аутлеты на соответстующие контролы, а IBAction – на кнопку.
Ну вот, наконец-то наше мегаприложение готово к работе. Жмем на «Build and Go» и видим следующее.
Кстати, важный момент: методы и функции Cocoa не бросают исключения, поэтому не жди, что это приложение упадет, если ты вместо целого числа введешь строчку букв. Обработка некорректных значений в этом случае – задача программиста (но об этом в другой раз).
Steps to install macOS Sierra on Virtual Machine on Windows
Step I: Open Virtual Machine (VMware or VirtualBox). Then select Create a New Virtual Machine. After that a new window will open. Then type macOS in the Name section. The Virtual Machine will automatically detect the OS as the user will type. Now, the Type row will set default to Mac OS X. However, user will need to change this. Under Version, select Mac OS X 10.11 El Capitan.

Step II: Next, user have to set the amount of RAM the virtual OS can use. User should set a minimum of 4 GB for efficient working of the OS. After that user will be asked to assign a hard disk.
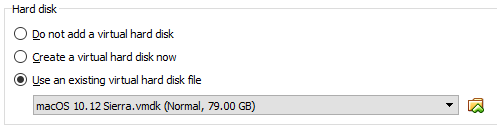
Step III: Then select the type of Hardware file as VDI (VirtualBox Disk Image).
Step IV: Then user have to choose the OS file to install it. Select the folder icon and browse to the location of the Virtual Machine Disk Format file. Then open the file. User should make sure that they have selected the correct virtual disk then click on Create.
XCode
Если ты читал предыдущую статью или уже пробовал кодить под макось, то наверняка познакомился с XCode, стандартной средой разработки под Mac OS X от Apple. Эта среда содержит все, что тебе может потребоваться для кодинга: редактор, компилятор, отладчик и т.д. Для создания графического интерфейса там есть специальная тулза под названием Interface Builder.
Да, именно так – до XCode 4 Interface Builder существовал в виде отдельного приложения, что было довольно-таки неудобно, поэтому в четвертой версии XCode Apple интегрировала Intefrace Builder в свою IDE, и теперь ковать железо можно, не отходя от кассы. К сожалению, XCode 4 на данный момент (на момент сдачи статьи – конец сентября – прим. ред.) находится в фазе тестирования, и в свободном доступе ее нет, поэтому все сказанное ниже относится к XCode и Interface Builder третьей версии. Давай для начала попробуем создать простое GUI-приложение под макось с помощью всего этого хозяйства.
Requirements for installing Xcode IDE on Windows
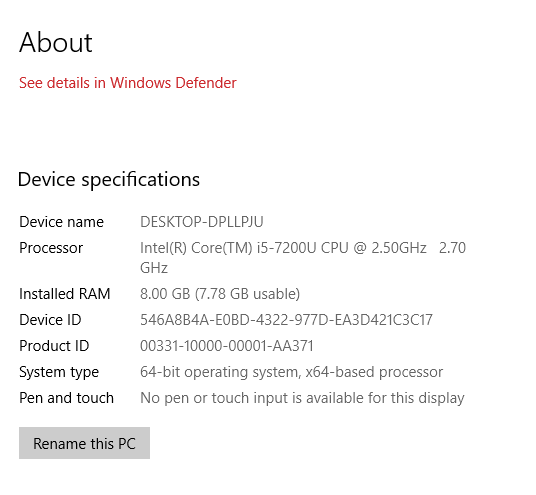
Now lets know about using Xcode IDE on Windows to develop applications for iOS or macOS. So, here is a list of system requirements that a user will need to run Xcode on Windows.
- Download Xcode package from Apple site. User will need to have Apple ID to download it from the Apple Store.
- Dual Core Intel or AMD processor.
- Minimum 2GB of RAM (Recommended: 4 GB+)
- Hardware Virtualization
A professional app developer will have to purchase Apple hardware with OS X and app developer ID. The professional app developers may need to use Xcode on their Apple hardware to test their software before publishing it on the App Store.
The Requirements for Xcode to install on your PC
The requirements of Xcode are listed below
Mac OS VMware or VirtualBox. Xcode package from Apple site.
Xcode For Windows PC package from Apple site.
You must want the Apple ID to download Xcode from the Apple app store.
Your PC must have influenced by Dual-Core Intel processor.
Your system needs to be in a boosted state of 2GB of RAM (Recommended: 4 GB+).
Hardware Virtualization needs to be available on your PC.
If you are a software developer of Apple app and then you need the Apple developer id. Here we gave the report that uses the VirtualBox for installing the Xcode for on windows os. It is a free and open reference software.
1.Xcode for Windows offline:
You need to download some pieces of stuff before start using Xcode on windows. You need to install the Mac Os on your windows computer and then you can easily install the Xcode on that Mac OS. There is no separate Xcode for windows application. You need to install VMWare workstation or Virtual Box to boot Mac OS on your Windows PC. You can also use Xcode on windows without VMWare Workstation but you need USB installer like Rufus.
Xcode for Windows offline – VMWare or Virtual Box:
Download the stuff from the following download link before start reading the instructions.
- Install VMWare on your system and note that if the system fails with the following requirement then it is difficult to use Xcode on windows.
- Open VMWare and press Ctrl+N
- Choose the option “typical” and click next button
- Browse and choose downloaded Mac
- Configure the virtual hardware. Note: If you choose the hardware requirements low then you feel slow booting on virtual Mac and if you choose more than host will become slow.
- Start the virtual Mac
- Open app store
- search and install Xcode
That’s all. Now you can use Xcode for windows easily by opening the virtual machine like on your own machine.
Pros:
- Free of charge
- Both OS at a time
- Easy switching between OS
- Easy Xcode installation
Cons:
- Needs more memory and processor
- Slow down the main OS
Xcode for Windows offline – USB:
If you go with this method you can use only one OS at the time. It is the little bit tricky process because you are going to use Mac from pen drive. You need to download stuff from the following link before start using the Xcode. Please note that Rufus only works on windows. It will format all the data in your USB storage and write the new Mac OS in the USB. So backup your data from the USB to some other location before proceeding with Rufus.
- Install Rufus
- Choose pen drive and copy Mac to pen drive with Rufus
- Restart System and boot it from USB
- Login the Mac OS
- Open app store
- Install Xcode
Pros:
- Free of charge
- Using the whole hardware for one OS
- Speed
Cons:
Only one OS at the time
Features of Xcode IDE
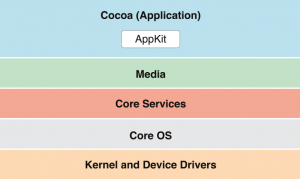
As already described the IDE is tightly integrated with the Cocoa and Cocoa Touch frameworks. So let us know about Cocoa and Cocoa Touch and their features.
Cocoa is Apple’s native object-oriented application programming interface (API) for their operating system macOS. It consists of Cocoa.h header file that includes some kits. The main kits used in Cocoa are the Foundation Kit, Application Kit, and Core Data frameworks. It also consists of some libraries and frameworks that are included in these kits. These libraries mainly include the C standard library and the Objective C runtime. Cocoa Touch is a similar API for iOS, tvOS, and watchOS. It includes gesture recognition, animation and a different set of graphical control elements. Cocoa Touch API is mainly used to design applications for Apple devices such as iPhone, iPad, Apple TV and Apple Watch.
Xcode can also build fat binary files that contain code for multiple architectures. This fat binary files are in the Match-O executable format and are known as universal binary files. These binary files allow software to run on both PowerPC and Intel-base (x86) platforms including both 32-bit and 64-bit code. Xcode IDE also includes the GUI tool instruments. These instruments run with a dynamic tracing framework known as DTrace. DTrace is created by Sun Microsystems and it was released as a part of OpenSolaris.
2.Xcode for Windows online:
It is the easiest way but you need to spend some amount of money and faster internet connection. A lot of providers are available and you can rent Mac OS from them. After renting you can easily install Xcode from the app store. Some of the cloud providers give you the OS with preinstalled Xcode system. So you no need to download Xcode for windows. If you are worried about price then you no need to fear. More options are available according to the provider and you can choose one of them. Plans are available from cents to dollars. If you need only for some hours then you can use “pay as you go” plan. Here you are billed according to your usage. MacInCloud is the cloud provider featured with a lot of plans. Your Mac OS comes with the pre-installed Xcode and you no need to spend time on downloading it.
Pros:
- Easy usage
- No need to install anything
- No worry about system requirements
Cons:
You need to pay an amount
What You Need to Install Xcode on Windows 10?
Now you have clear sense that you cannot install Xcode on Windows without third party software. Therefore, we are going to use third party software and install Xcode on Windows quickly. The software which we need are Virtual Box and VMware. These both software are virtual machine software. With the help of these software, you can easily install Xcode on Windows.
What is Virtual Box and VMware Virtual Machine?
Virtual Machine is a software which give you a platform. Where you can install either macOS on Windows or Windows on macOS. Therefore, virtual machine act like it is different machine. Where you can install any operating system. Like linux, Android operating system, macOS and Windows. Further, There are two popular software for virtual machine. First, which is Virtual Box. Second is the VMware Work Station.
Steps to Install Xcode on Windows Computers
Here you will get to know how you can install the package to your virtual machine in order to get the installation of Xcode completed. You can download the latest Xcode application package from the official site of Apple. All you need is going to the Xcode website, putting your Apple ID and downloading the package. Now if you are ready for the installation process, have a look at this process.
Step 1: You will need to download VirtualBox on your Windows OS running machine. You can easily download this tool from the official website of VirtualBox.
Step 2: After downloading VirtualBox on your system, get OSX Mavericks ISO as a virtual machine.
Step 3: Now open the install VirtualBox on your system. On the top left corner, you will see the New option. Click on it.
Step 4: Here you can create a virtual machine on your system. You will have to enter the Name as OSX, Type as Mac OS X and Version as Mac OS X (32 bit).
Create Virtual Machine to Install Xcode on Windows 10
Step 5: After putting the necessary information in it, click on next to proceed to the next step.
Step 6: Now you will see Memory Size option. This option allows your system to provide enough Ram to the virtual machine.
Step 7: Select the size as a minimum of 1GB and click Next.
Select the amount of RAM to create virtual machine
Step 8: Now you will see the type of virtual hard drive. Choose the first option named as VDI (VirtualBox Disk Image) and click Next.
Select VDI to install Mac OS on Windows PC
Step 9: Now select the hard drive space you want to allocate to the virtual machine and click Create.
Select HD size to install Xcode on Windows
Step 10: The virtual machine has successfully been created on your VirtualBox.
Step 11: In the head left corner, you will see the Settings icon. Click on it. Now click on Storage then Load iOS File and click OK.
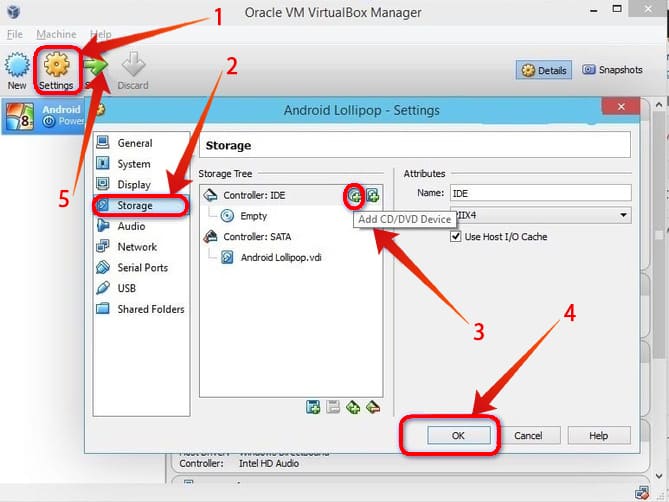
Add storage and Start the MAC OS X Machine
Step 12: After that, you just follow the on-screen steps of OSX boot.
Download and Install Xcode on Windows 10,8 or 7 PC
Step 13: Now open the Safari browser in your VirtualBox and log in with your Apple ID.
Download Xcode for PC running Windows 10/8/7
Step 14: Type Xcode in the search bar and select the Xcode from the search results.
Install Xcode on Windows Computer
Step 15: Provide your name and password there and click OK.
Download and install xcode on PC
Step 16: You are all done! You have successfully installed Xcode on your machine.
Use Xcode on Windows 7, 8 or 10 PC
You have successfully installed Xcode, app development software on your Windows PC or Laptop. The performance and speed of Xcode won’t be extremely high because you are running this software on Windows, but it can be used for educational purpose. Hope that these steps will help you to install Xcode on Windows 10, 8 and 7 PC.
Xcode 10
4 июня 2018 года на WWDC 2018 была представлена бета-версия нового Xcode 10. В новой версии реализована поддержка тёмной темы новой ОС macOS Mojave, поддержка кастомных наборов Instruments, улучшенный Interface Builder — на 40 % быстрее открытие документов и на 30 % быстрее работа, в нём плавающее новое окно Library, которое вместо Inspector начнёт представлять свойства объектов, появился новый NSGridView, который может упорядочивать View в таблицах, как в Numbers, также появился улучшенный редактор кода, поддержка Bitbucket Cloud, Bitbucket Server и GitLab, улучшенный дебаггер, новые возможности автоматического тестирования, новы сборщик, использующий на 20 % меньше памяти, и в два раза уменьшающий время повторных сборок. Кроме того появились API для компьютерного зрения — обнаружение объектов, определение лиц, штрих-кодов; API для обработки языка — смысл предложений, выделение названий и т. п.; Core ML (англ.)русск. 2 — более быстрый и настраиваемый фреймворк для использования машинного обучения и нейронных сетей; Create ML — фреймворк для тренировки нейронных сетей, значительно уменьшающий модели и упрощающий их создание; ARKit (англ.)русск. 2 — новая версия фреймворка дополненной реальности.
История версий
Версия 1.x
- 1.0 (осень 2003)
- 1.5
Версия 2.x
- 2.0
- 2.1
- 2.5
Версия 3.xx
- 3.0
- 3.1
- 3.2
- 3.2.6
Версия 4.xx
- 4.0 (9 марта 2011 года)
- 4.1 (20 июля 2011 года; только для Mac OS X 10.6, 29 августа 2011 года для Mac OS X 10.7)
- 4.2 (12 октября 2011 года)
- 4.3 (7 марта 2012 года)
- 4.3.2 (22 марта 2012 года)
- 4.3.3 (май 2012 года)
- 4.4 (25 июля 2012 года)
- 4.4.1 (7 августа 2012 года)
- 4.5 (19 сентября 2012 года)
- 4.5.1 (3 октября 2012 года)
Версия 5.xx
- 5.0 (12 сентября 2013 года)
- 5.0.1 (4 октября 2013 года)
- 5.0.2 (11 ноября 2013 года)
- 5.1 (10 марта 2014 года)
Версия 6.xx
- 6.0 (9 сентября 2014 года)
- 6.1.1 (2 декабря 2014 года)
- 6.3.1 (19 апреля 2015 года)
- 6.3.2 (18 мая 2015 года)
- 6.4 (30 июня 2015 года)
Версия 7.xx
- 7.0 (16 сентября 2015 года)
- 7.1 (21 октября 2015 года)
- 7.1.1 (9 ноября 2015 года)
- 7.2 (8 декабря 2015 года)
Версия 8.xx
- 8.0 (12 сентября 2016 года)
- 8.1 (27 октября 2016 года)
- 8.2 (12 декабря 2016 года)
- 8.3 (27 марта 2017 года)
- 8.3.1 (6 апреля 2017 года)
- 8.3.2 (18 апреля 2017 года)
- 8.3.3 (5 июня 2017 года)
Версия 9.xx
- 9.0 (19 сентября 2017 года)
- 9.0.1 (17 октября 2017 года)
How to Install and Run Xcode on Windows?
Apple has not launched any software or application using which one can use Xcode on Windows and create applications for iPhone, iPad or MacOS. Meaning you would need MacOS to run the Xcode software and create your own apps. So, you should install MacOS in your system first and then you can install Xcode for your Windows.
1. Virtual Box.
A Virtual Box is a software developed that allows users to use multiple operating systems in one single operating system of a PC. You can use any operating systems like Windows, Linux, Mac, whichever you want to use and the best part of using this app is you don’t need to remove your old operating system.
- Install the software and run it.
- Open the OS that you want to open using the Add button in Virtual Box. But you need to download the Virtual Box image file of that O.S. in your system beforehand.
- After the O.S. is added you can use the Xcode software to create the apps of Apple devices howsoever you wish.

Apart from Virtual Box, there is another similar software for using multiple operating systems i.e. VMWare Player. If you have already installed VMWare then you can use it for the installing Xcode for Windows.
2. VMWare Player
VMware player is also the same as Virtual Box and can be used to install any operating systems on a single PC and run multiple OS at the same time. The steps for the installing VMware would be the same as those of Virtual Box but for your reference, I will guide you using these simple steps:
- Install & run the software now.
- You must have download OS image file (MacOS image file for VMware) already in your PC.
- Add the OS using the add button and after installation is done, you can start using it.

You can now create applications for various Apple devices like iPhone, iPad or Mac or if you are a beginner then you can start learning & creating applications slowly.
3. Boot Windows to Mac OS
In this method, you can download and create a bootable drive(like pen drive) to install the MacOS on your Windows PC. You can use the devices as an external bootable drive to use it for MacOS(but it should have a large space of more than 16GB) or you can boot it into your device keeping or removing your Windows OS during the process and install MacOS.

After the MacOS is installed using any of the above mentioned 3 methods, you can now download and install Xcode software to your MacOS.

Using these methods you can download Xcode for Windows 32 bit or 64 bit and use it for developing the apps. But an important note – Apple has not legalized the use of MacOS in Windows by anyway yet and using the Xcode in Windows is illegal.


