Linux downloads (ubuntu)
Содержание:
- Step 6 — Creating a Table in the pgAdmin Dashboard
- To install PgAdmin4 on Ubuntu 16.04
- Устанавливаем на Ubuntu Desktop 16.04
- Step 3 — Creating a New Role
- Настройка Postgresql в Ubuntu
- Introduction
- Создание и удаление таблиц
- Troubleshooting
- Connect to the PostgreSQL database server via psql
- Daemon installation on Unix
- Шаг 1 — Установка pgAdmin и необходимых зависимостей
- Step 6 — Creating and Deleting Tables
Step 6 — Creating a Table in the pgAdmin Dashboard
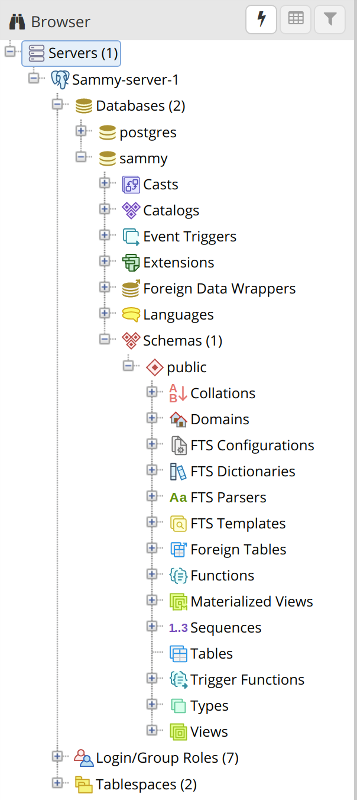
From the pgAdmin dashboard, locate the Browser menu on the left-hand side of the window. Click on the plus sign (+) next to Servers (1) to expand the tree menu within it. Next, click the plus sign to the left of the server you added in the previous step (Sammy-server-1 in our example), then expand Databases, the name of the database you added (sammy, in our example), and then Schemas (1). You should see a tree menu like the following:
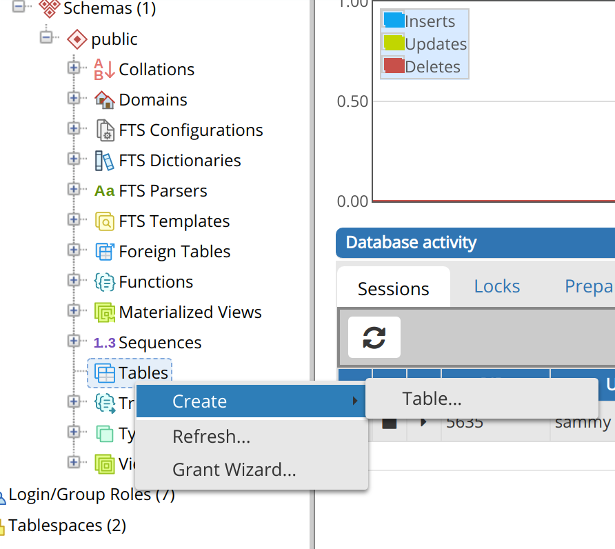
Right-click the Tables list item, then hover your cursor over Create and click Table….
This will open up a Create-Table window. Under the General tab of this window, enter a name for the table. This can be anything you’d like, but to keep things simple we’ll refer to it as table-01.

Then navigate to the Columns tab and click the + sign in the upper right corner of the window to add some columns. When adding a column, you’re required to give it a Name and a Data type, and you may need to choose a Length if it’s required by the data type you’ve selected.
Additionally, the states that adding a primary key to a table is usually best practice. A primary key is a constraint that indicates a specific column or set of columns that can be used as a special identifier for rows in the table. This isn’t a requirement, but if you’d like to set one or more of your columns as the primary key, toggle the switch at the far right from No to Yes.
Click the Save button to create the table.

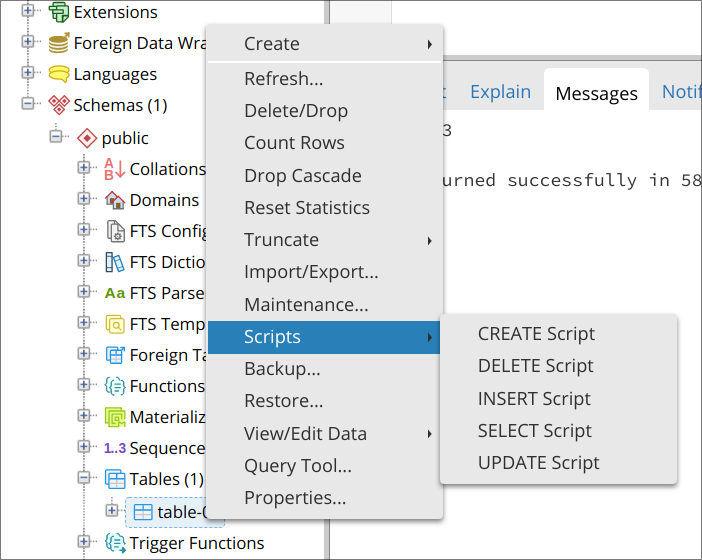
By this point, you’ve created a table and added a couple columns to it. However, the columns don’t yet contain any data. To add data to your new table, right-click the name of the table in the Browser menu, hover your cursor over Scripts and click on INSERT Script.
This will open a new panel on the dashboard. At the top you’ll see a partially-completed statement, with the appropriate table and column names. Go ahead and replace the question marks (?) with some dummy data, being sure that the data you add aligns with the data types you selected for each column. Note that you can also add multiple rows of data by adding each row in a new set of parentheses, with each set of parentheses separated by a comma as shown in the following example.
If you’d like, feel free to replace the partially-completed script with this example statement:

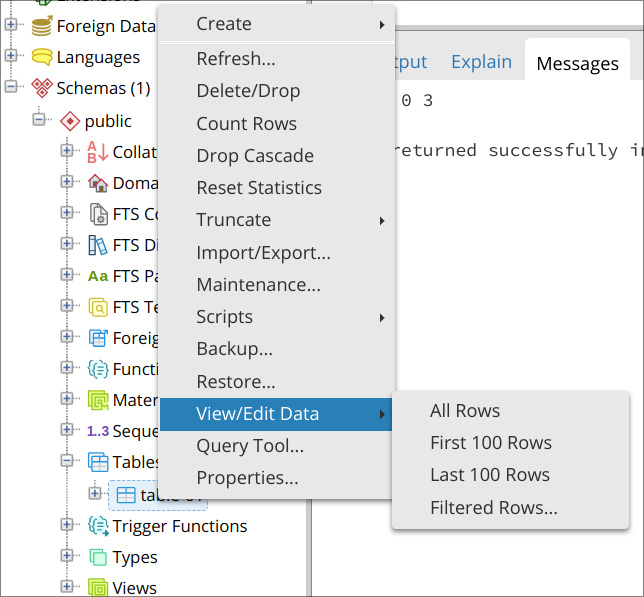
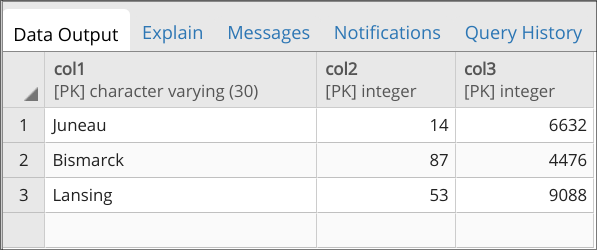
Click on the lightning bolt icon () to execute the statement. To view the table and all the data within it, right-click the name of your table in the Browser menu once again, hover your cursor over View/Edit Data, and select All Rows.
This will open another new panel, below which, in the lower panel’s Data Output tab, you can view all the data held within that table.
With that, you’ve successfully created a table and populated it with some data through the pgAdmin web interface. Of course, this is just one method you can use to create a table through pgAdmin. For example, it’s possible to create and populate a table using SQL instead of the GUI-based method described in this step.
To install PgAdmin4 on Ubuntu 16.04
PgAdmin is a popular open source management and development tool which is released under PostgreSQL/Artistic license. Different types of database operations can be done easily from the browser by using this software. This software can be used on most popular operating systems. Currently, pgAdmin 4 is released and it is developed using Python and JQuery. Many improvements are done in pgAdmin 4 compared to pgAdmin 3. Anyone can download the source or binary file of this software based on a particular operating system for installation. It is so simple to install PgAdmin4 on Ubuntu 16.04, and this article covers the ground on the same process.
Installing PgAdmin4
Before you begin the process, you need to update your system, and for that, make use of the following command.
:~$  sudo apt-get update
Hit:1 http://ppa.launchpad.net/ondrej/php/ubuntu xenial InRelease
Hit:2 http://in.archive.ubuntu.com/ubuntu xenial InRelease
.
.
Fetched 1,565 kB in 5s (300 kB/s)
Reading package lists... Done
And then, you need to Install the required packages — are python, pip and virtualenv. So, run the following command to install them in your system.
:~$ sudo apt-get install build-essential libssl-dev libffi-dev libgmp3-dev virtualenv python-pip libpq-dev python-dev
Reading package lists... Done
Building dependency tree
.
.
Processing triggers for libc-bin (2.23-0ubuntu9) ...
 bingwallpaper
After it is done, you need to create a virtual environment by making use of the following command.
:~$ mkdir pgAdmin4
:~$ cd  pgAdmin4/
:~/pgAdmin4$ virtualenv pgAdmin4
Running virtualenv with interpreter /usr/bin/python2
.
.
Installing setuptools, pkg_resources, pip, wheel...done.
And then, activate the virtual environment by executing the following command.
:~/pgAdmin4$ cd pgAdmin4/
:~/pgAdmin4/pgAdmin4$ source bin/activate
Once all of these is done, you shall download the PgAdmin4 by using the wget command followed by its download link in as follows.
:~/pgAdmin4/pgAdmin4$ wget https://ftp.postgresql.org/pub/pgadmin/pgadmin4/v2.1/pip/pgadmin4-2.1-py2.py3-none-any.whl
.
.
pgadmin4-2.1-py2.py3-none-any.whl 100%  66.22M   958KB/s    in 66s
You shall now install your PgAdmin4 application by running the following command.
:~/pgAdmin4/pgAdmin4$ pip install pgadmin4-2.1-py2.py3-none-any.whl
Processing ./pgadmin4-2.1-py2.py3-none-any.whl
Collecting pytz==2014.10 (from pgadmin4==2.1)
.
.
python-editor-1.0.3 python-mimeparse-1.5.1 pytz-2014.10 simplejson-3.6.5 six-1.11.0 speaklater-1.3 sqlparse-0.1.19 testtools-2.3.0 traceback2-1.4.0 unittest2-1.1.0
And after the download, you need to configure and run PgAdmin4 by making use of the following command.
:~$ nano lib/python2.7/site-packages/pgadmin4/config_local.py
Add the following content in config_local.py.
import os
DATA_DIR = os.path.realpath(os.path.expanduser(u' ~/.pgadmin/' ))
LOG_FILE = os.path.join(DATA_DIR, ' pgadmin4.log' )
SQLITE_PATH = os.path.join(DATA_DIR, ' pgadmin4.db' )
SESSION_DB_PATH = os.path.join(DATA_DIR, ' sessions' )
STORAGE_DIR = os.path.join(DATA_DIR, ' storage' )
SERVER_MODE = False
After the installation, you can run the following commands to run pgAdmin
:~$  python lib/python2.7/site-packages/pgadmin4/pgAdmin4.py
:~/pgAdmin4/pgAdmin4$ pip install flask-htmlmin
Requirement already satisfied: flask-htmlmin in ./lib/python2.7/site-packages
.
.
Requirement already satisfied: itsdangerous> =0.21 in ./lib/python2.7/site-packages (from Flask-> flask-htmlmin)
Requirement already satisfied: markupsafe in ./lib/python2.7/site-packages (from Jinja2> =2.4-> Flask-> flask-htmlmin
And check and see if PgAdmin4 runs successfully by running the following command.
:~/pgAdmin4/pgAdmin4$ python lib/python2.7/site-packages/pgadmin4/pgAdmin4.py
pgAdmin 4 - Application Initialisation
======================================
Starting pgAdmin 4. Please navigate to http://127.0.0.1:5050 in your browser
You can open your newly installed pgAdmin4 in your browser. 
With this the installation of PgAdmin4 on Ubuntu-16.04 comes to an end.
Устанавливаем на Ubuntu Desktop 16.04
Чтобы пользоваться по аналогии с pgAdmin3 как десктопным приложением.
Устанавливаем необходимые пакеты
$ sudo apt-get install python2.7-dev python-virtualenv python-pip libpq-dev
Создать папку и виртуальное окружение
$ mkdir optpgadmin4 -p
$ cd optpgadmin4
$ virtualenv env -ppython2.7
На момент написания статьи, последней версией pgAdmin4 была 2.0 на официальном сайте страница с пакетом находится по этому адресу.
Скачать программу и установить в виртуальное окружение
$ wget https//ftp.postgresql.org/pub/pgadmin/pgadmin4/v2.0/pip/pgadmin4-2.0-py2.py3-none-any.whl
$ source envbinactivate
(env)$ pip install pgadmin4-2.0-py2.py3-none-any.whl
Чтобы настроить безопасность , и создаем локальную конфигурацию. Так же можно настроить другие параметры, например почту и базу данных приложения
$ cp envlibpython2.7site-packagespgadmin4config.py envlibpython2.7site-packagespgadmin4config_local.py
$ nano envlibpython2.7site-packagespgadmin4config_local.py
Необходимо создать директории
$ sudo mkdir varlibpgadmin
$ sudo chmod 777 varlibpgadmin
$ sudo mkdir varlogpgadmin
$ sudo chmod 777 varlogpgadmin
Тестируем работоспособность. Необходимо ввести логин и пароль для доступа к веб-приложению.
$ optpgadmin4envbinpython optpgadmin4envlibpython2.7site-packagespgadmin4pgAdmin4.py
Мы можем обратиться к pgAdmin4 через браузер по адресу
Создаем скрипт для запуска и скачиваем иконку
$ cd optpgadmin4
$ touch pgAdmin4.sh
$ chmod +x pgAdmin4.sh
$ nano pgAdmin4.sh
1 2 3 |
#!/bin/bash source /opt/pgadmin4/env/bin/activate python /opt/pgadmin4/env/local/lib/python2.7/site-packages/pgadmin4/pgAdmin4.py & sleep 5; sensible-browser http://127.0.0.1:5050 |
Скачиваем иконку в формате
$ wget http//www.sinyawskiy.ru/images/pgadmin.svg
Создаем ярлык на рабочем столе
$ cd ~/Desktop
$ touch pgAdmin4.desktop
$ chmod +x pgAdmin4.desktop
$ nano pgAdmin4.desktop
Name=pgAdmin 4
Exec=/opt/pgadmin4/pgAdmin4.sh
Icon=/opt/pgadmin4/pgadmin.svg
Type=Application
Categories=Database
Terminal=false
Всё готово!
Step 3 — Creating a New Role
Currently, you just have the postgres role configured within the database. You can create new roles from the command line with the command. The flag will prompt you for the name of the new role and also ask whether it should have superuser permissions.
If you are logged in as the postgres account, you can create a new user by typing:
If, instead, you prefer to use for each command without switching from your normal account, type:
The script will prompt you with some choices and, based on your responses, execute the correct Postgres commands to create a user to your specifications.
You can get more control by passing some additional flags. Check out the options by looking at the page:
Your installation of Postgres now has a new user, but you have not yet added any databases. The next section describes this process.
Настройка Postgresql в Ubuntu
Вы знаете как установить Postgresql Ubuntu, но этого недостаточно для начала полноценной работы. Первым делом, откройте терминал и переключите его на пользователя postgres с помощью команды:
Эта учетная запись создается во время установки программы и на данный момент вы можете получить доступ к системе баз данных только с помощью нее. По умолчанию postgress использует концепцию ролей для аутентификации и авторизации.
Это очень похоже на учетные записи Unix, но программа не различает пользователей и групп, есть только роли. Сразу после установки Postgresql пытается связать свои роли с системными учетными записями, если для имени системной учетной записи существует роль, то пользователь может войти в консоль управления и выполнять позволенные ему действия. Таким образом, после переключения на пользователя postgres вы можете войти в консоль управления:
И посмотреть информацию о соединении:
Чтобы выйти наберите:
Теперь давайте рассмотрим как создать другие роли и базы данных.
Создание роли Postgresql
Вы уже можете полноценно работать с базой данных с помощью учетной записи postgres, но давайте создадим дополнительную роль. Учетная запись postgres является администратором, поэтому имеет доступ к функциям управления. Для создания пользователя выполните:
Скрипт задаст лишь два вопроса, имя новой роли и нужно ли делать ее суперпользователем.
Создание базы данных
Точно также как имена ролей сопоставляются с системными пользователями, имя базы данных будет подбираться по имени пользователя. Например, если мы создали пользователя segiy, то по умолчанию система попытается получить доступ к базе данных segiy. Мы можем ее очень просто создать:
Дальше, чтобы подключиться к этой базе данных нам нужно войти от имени одноименного пользователя:
Заходим в консоль и смотрим информацию о подключении:
Все верно сработало. Мы подключились с помощью роли segiy к базе segiy. Если нужно указать другую базу данных, вы можете сделать это с помощью опции -d, например:
Все сработало верно, при условии, что все компоненты были настроены как описано выше.
Создание таблиц
Теперь, когда вы знаете как подключится к базе данных Postgresql давайте рассмотрим как выполняются основные задачи. Сначала разберем создание таблиц для хранения некоторых данных. Для создания таблицы Postgresql используется такой синтаксис:
CREATE TABLE имя таблицы (имя_колонки1 тип_колонки ( длина ) ограничения ,имя_колонки2 тип_колонки ( длина ),имя_колонки3 тип_колонки ( длина ));
Как видите, сначала мы задаем имя таблицы, затем описываем каждый столбец. Столбец должен иметь имя, тип и размер, также можно задать ограничения для данных, которые там будут содержаться. Например:
CREATE TABLE playground (
equip_id serial PRIMARY KEY,
type varchar (50) NOT NULL,
color varchar (25) NOT NULL,
location varchar(25) check (location in (‘north’, ‘south’, ‘west’, ‘east’, ‘northeast’, ‘southeast’, ‘southwest’, ‘northwest’)),
install_date date
);
Мы создали таблицу детской площадки для описания оборудования, которое на ней есть. Сначала идет идентификатор equip_id, который имеет тип serial, это значит что его значение будет автоматически увеличиваться, ключ primary key значит, что значения должны быть уникальны.
Следующие колонки — обычные строки, для них мы задаем длину поля, они не могут быть пустыми (NOT NULL). Следующий столбец тоже строка, но она может содержать только одно из указанных значений, последний столбец — дата создания.
Вы можете вывести все таблицы, выполнив команду:
Здесь мы видим что кроме нашей таблицы, существует еще одна переменная — playground_equip_id_seq. В ней содержится последнее значение этого поля. Если нужно вывести только таблицы, выполните:
Вставка и удаление данных
У нас есть таблица, но пока что она пуста. Мы можем добавить в нее некоторые данные. Давайте добавим пункт, описывающий качели. Для этого используются такие команды:
INSERT INTO playground (type, color, location, install_date) VALUES (‘swing’, ‘yellow’, ‘northwest’, ‘2015-08-16’);
Заметьте, что имена столбцов не обязательно заключать в кавычки, а вот имена значений — обязательно. Теперь смотрим что получилось:
Удалять записи можно по любому критерию, например, удалим записи, поле type которых имеет значение slide:
И снова смотрим что получилось:
Introduction
pgAdmin is an open-source administration and development platform for PostgreSQL and its related database management systems. Written in Python and jQuery, it supports all the features found in PostgreSQL. You can use pgAdmin to do everything from writing basic SQL queries to monitoring your databases and configuring advanced database architectures.
In this tutorial, we’ll walk through the process of installing and configuring the latest version of pgAdmin onto an Ubuntu 18.04 server, accessing pgAdmin through a web browser, and connecting it to a PostgreSQL database on your server.
Создание и удаление таблиц
Теперь, когда вы знаете, как осуществлять доступ к СУБД Postgres, мы можем кратко рассмотреть вопрос выполнения некоторых распространённых задач в Postgres.
Для начала создадим таблицу для хранения данных. Давайте создадим таблицу, которая описывает параметры инвентаря детской площадки.
Базовый синтаксис для этой команды выглядит примерно так:
Как видно из этого примера, вы задаём имя таблицы и затем определяем необходимые столбцы, их тип и максимальную длину хранимых значений. Мы также можем добавлять ограничения на значения в каждом из столбцов.
Для целей нашего примера мы создадим простую таблицу:
Мы создали таблицу для инвентаря детской площадки. Первый столбец содержит идентификатор инвентаря с типом . Это целочисленный тип данных с автоинкрементом. Мы задали этот столбец с параметром первичного ключа (), что означает, что все значения должны быть ненулевыми и уникальными.
Для двух наших столбцов ( и ) мы не задали максимальную длину значений. Некоторые типы столбцов не требует задания максимальной длины значения, потому что длина определяется типом данных в этом столбце.
Кроме того мы создали столбцы и , которые не могут быть пустыми. Мы также создали столбец и настроили его таким образом, что его значение может принимать одно из восьми заданных значений. Последний столбец задаёт дату установки данной единицы инвентаря детской площадки.
Мы можем убедиться, что таблица создана, следующей командой:
Наша таблица на месте, но помимо неё у нас теперь есть и нечто под названием с типом . Это нечто представляет собой реализацию типа , который мы задали для столбца . Таким образом Postgres будет следить за следующим номером в последовательности идентификаторов, эта связь создаётся автоматически для столбцов данного типа.
Если вы хотите увидеть список только таблиц, без объектов-последовательностей, вы можете набрать следующую команду:
Troubleshooting
How do I enable logging in pgAdmin 4?
The default log settings for pgAdmin will write warnings and errors to a logfile, the location of which depends on the platform:
- Linux/MacOS: ~/.pgadmin/pgadmin4.log
- Windows: %APPDATA%\pgAdmin\pgadmin4.log
To override the log settings, create a file called config_local.py in the web/ directory of the installation, alongside the existing config.py. This file can be used to override any of the settings in config.py (which shouldn’t be edited). To modify the logging settings, create a file similar to the following:
import logging

# Application log level - one of:
#   CRITICAL 50
#   ERROR    40
#   WARNING  30
#   SQL      25
#   INFO     20
#   DEBUG    10
#   NOTSET    0
CONSOLE_LOG_LEVEL = logging.DEBUG
FILE_LOG_LEVEL = logging.DEBUG

# Log format.
CONSOLE_LOG_FORMAT = '%(asctime)s: %(levelname)s\t%(name)s:\t%(message)s'
FILE_LOG_FORMAT = '%(asctime)s: %(levelname)s\t%(name)s:\t%(message)s'

# Log file name
LOG_FILE = '/desired/path/to/pgadmin4.log'
Once the configuration change has been made, pgAdmin must be restarted.
How do I start pgAdmin such that it outputs a log to the console?
If you’re running in server mode, or directly using Python, then console logs will be sent directly to the tty under which the application is started.
In desktop mode, the process varies depending on the platform:
- Linux: Start the desktop runtime from the command line, e.g. /usr/local/pgadmin4/bin/pgadmin4, adjusting the path as necessary.
- MacOS: Start the desktop runtime from the command line, e.g. /Applications/pgAdmin\ 4.app/Contents/MacOS/pgAdmin4, adjusting the path as necessary.
- Windows: Console logs can be written to a file from the command line on Windows, e.g. «C:\Program Files\pgAdmin 4\v2\runtime\pgAdmin4.exe» > %TEMP%\pgadmin-console.log will write a log to %TEMP%\pgadmin-console.log.
Note that you may need to adjust the CONSOLE_LOG_LEVEL option in config_local.py to see useful information in the log. See this for more information.
Why does pgAdmin seem to use a lot of CPU cycles?
pgAdmin 4’s architecture will naturally require more CPU and memory than a traditional native desktop application, however, pgAdmin 4 also includes continually updating dashboards that weren’t present in pgAdmin III. The dashboards update each graph every second by default, even if they are not visible (to avoid gaps in the data). CPU usage may be noticably reduced by adjusting the refresh speed of the graphs to a longer period, such as ten seconds. This can be done under File -> Preferences -> Paths -> Dashboards -> Graphs. After changes have been made, you may need to navigate to a different dashboard instance for the changes to take effect.
On macOS, I get an error like: «pgAdmin 4 is damaged and cannot be opened»
This has been seen mostly on older versions of macOS (e.g. 10.10). Unfortunately the error message is usually misleading, and the digital signature of the application will validate correctly. The actual problem is typically that the operating system is configured to only allow running of app from the Apple App store.
To change this setting, open the Preferences Panel and then browse to Security and Privacy. From there, change the Allow apps downloaded from setting to App Store and identified developers (more secure) or Anywhere (less secure).
Note that the available options and their labels vary from release to release of macOS, and may not be exactly as described above.
Connect to the PostgreSQL database server via psql
In PostgreSQL, a user account is referred to as a role. By default, PostgreSQL uses ident authentication.
It means that PostgreSQL will associate its roles with the system accounts of Linux. If a role exists in PostgreSQL, the same Linux user account with the same name is able to log in as that role.
When you installed PostgreSQL, the installation process created a user account called associated with the default role.
To connect to PostgreSQL using the role, you switch over to the account on your server by typing:
It’ll prompt for the password of the current user. You need to provide the password and hit the keyboard.
Then, you can access the PostgreSQL using the by typing the following command:
You’ll access the postgres prompt like this:
From here, you can interact with the PostgreSQL like issuing a query.
To quit the PostgreSQL prompt, you run the following command:
This above command will bring you back to the postgres Linux command prompt.
To return to your regular system user, you execute the command like this:
Daemon installation on Unix
Note
pgAgent is available in Debian/Ubuntu (DEB) and Redhat/Fedora (RPM)
packages for Linux users, as well as source code. See the
pgAdmin Website. for more
information.
To install the pgAgent daemon on a Unix system, you will normally need to have
root privileges to modify the system startup scripts. Modifying system startup
scripts is quite system-specific so you should consult your system documentation
for further information.
The program itself takes few command line options, most of which are only
needed for debugging or specialised configurations:
Usage
  pathtopgagent options <connect-string>

options
  -f run in the foreground (do not detach from the terminal)
  -t <poll time interval in seconds (default 10)>
  -r <retry period after connection abort in seconds (>=10, default 30)>
  -s <log file (messages are logged to STDOUT if not specified)>
  -l <logging verbosity (ERROR=, WARNING=1, DEBUG=2, default )>
The connection string is a standard PostgreSQL libpq connection string (see
the
for further details). For example, the following command line will run pgAgent
against a server listening on the localhost, using a database called ‘pgadmin’,
connecting as the user ‘postgres’:
Шаг 1 — Установка pgAdmin и необходимых зависимостей
На момент написания самой последней версией pgAdmin является pgAdmin 4, хотя самая последняя версия, доступная в репозитории Ubuntu, — это pgAdmin 3. pgAdmin 3 уже не поддерживается, и сопровождающие проект специалисты рекомендуют устанавливать pgAdmin 4. В данном руководстве мы будем рассматривать процесс установки последней версии pgAdmin 4 в виртуальной среде (согласно рекомендациям команды разработки проекта) и установки ее зависимостей с помощью .
Для начала обновите индекс пакетов вашего сервера, если вы не делали этого последнее время.
Затем установите следующие зависимости. Список зависимостей включает , библиотеку арифметических операций с многократно увеличенной точностью; с файлами заголовков и статической библиотекой, которая помогает осуществлять коммуникации с бекэндом PostgreSQL; и , модуль Apache, который позволяет вам размещать внутри Apache веб-приложения на Python:
После этого создайте несколько директорий, где pgAdmin будет хранить данные сессий, данные хранилища и журналы:
Затем измените владельца этих директорий на вашего пользователя без прав root и группу. Это необходимо, потому что первоначально они принадлежат вашему root-пользователю, но мы будем устанавливать pgAdmin из виртуальной среды, принадлежащей вашему пользователю без прав root, а процесс установки подразумевает создание ряда файлов внутри этих директорий. После завершения установки мы изменим владельца на пользователя www-data и группу, чтобы директорию можно было использовать через сеть:
Затем откройте вашу виртуальную среду. Перейдите в директорию, в которой находится ваша среда программирования, и активируйте ее. Согласно соглашениям о наименованиях из обязательного руководства Python 3, мы перейдем в директорию и активируем среду :
После этого необходимо загрузить исходный код pgAdmin 4 на ваш компьютер. Чтобы получить последнюю версию исходного кода, перейдите на страницу загрузки pgAdmin 4 (Python Wheel) и нажмите ссылку для последней версии (на момент написания это версия 3.4). После этого вы будете перенаправлены на страницу Downloads (Загрузки) на веб-сайте PostgreSQL На этой странице вам необходимо скопировать ссылку на файл, которая заканчивается на , стандартный формат пакетов для дистрибутивов Python. Затем вернитесь в терминал и запустите следующую команду , заменив ссылку на ту, которую вы скопировали на сайте PostgreSQL, для загрузки файла на ваш сервер:
Далее установите пакет , базовую реализацию стандарта пакетов wheel. Будучи библиотекой Python, данный пакет служит расширением для сборки пакетов wheel и содержит инструмент для работы с командной строкой, который позволяет выполнять различные действия с файлами :
Затем установите пакет pgAdmin 4 с помощью следующей команды:
Она отвечает за установку pgAdmin и его зависимостей. Прежде чем подключаться к вашей базе данных, необходимо внести несколько изменений в настройку программы.
Step 6 — Creating and Deleting Tables
Now that you know how to connect to the PostgreSQL database system, you can learn some basic Postgres management tasks.
The basic syntax for creating tables is as follows:
As you can see, these commands give the table a name, and then define the columns as well as the column type and the max length of the field data. You can also optionally add table constraints for each column.
You can learn more about how to create and manage tables in Postgres here.
For demonstration purposes, create the following table:
This command will create a table that inventories playground equipment. The first column in the table will hold equipment ID numbers of the type, which is an auto-incrementing integer. This column also has the constraint of which means that the values within it must be unique and not null.
The next two lines create columns for the equipment and respectively, neither of which can be empty. The line after these creates a column as well as a constraint that requires the value to be one of eight possible values. The last line creates a column that records the date on which you installed the equipment.
For two of the columns ( and ), the command doesn’t specify a field length. The reason for this is that some data types don’t require a set length because the length or format is implied.
You can see your new table by typing:
Your playground table is here, but there’s also something called that is of the type . This is a representation of the type which you gave your column. This keeps track of the next number in the sequence and is created automatically for columns of this type.
If you want to see just the table without the sequence, you can type:
With a table at the ready, let’s use it to practice managing data.


