Linux multimedia studio
Содержание:
- Other
- Loop-control
- Safety
- Editing Tools
- Base note
- Your First commercial success..
- Footnotes
- Settings
- Base note
- File security, Autosave & Recovery
- Performance Settings
- First Install on Linux
- Screen Issues
- Adding Tracks
- Mixxx
- Audio Settings
- Создаём дорожку
- Computer Keyboard
- Automation Track Context Menu
- Equalizers
- The MIDI tab
- Piano Keys
- Интерфейс
- Good Song! Bad result
- Adding automation
Other
Music theory / Composition
| Link to video | Video covering | Maker |
|---|---|---|
| Crash course in music theory and composition | LazerBlade | |
| Drums, Beats, and white noise | LazerBlade | |
| Filters, automation, and build up | LazerBlade | |
| Chords, Scales & Keys Relationships | bearSoundz |
Mixing / EQ
| Link to video | Video covering | Maker |
|---|---|---|
| Kick & Bass EQ/mixing | LazerBlade | |
| Filter types explained with graphic equalizer. | Ian Sanner |
Mastering
| Link to video | Video covering | Maker |
|---|---|---|
| Mastering with Ardour; compression | LazerBlade | |
| Mastering with Audacity; compression | LazerBlade |
| Link to video | Video covering | Maker |
|---|---|---|
| Simple exporting | Ian Sannar |
Loop-control
Loops in LMMS are default understood as 1+n Bars!
It is the logic of a sequencer that determine that loops are the same as whole bars!
The Loop-points button is off by default. When turned on, the loop will appear as a bright green balk along the timeline.
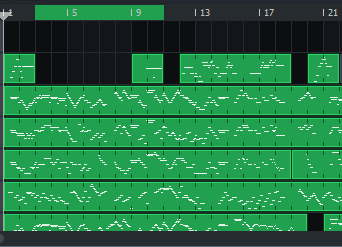 A loop from 3. to 11. bar
You can set the loop-point left and right as follows:
When you click on the time-bar for setting right-loop-point use right-mouse Only
When you click on the time-bar for setting left-loop-point use right-mouse + SH
So setting loop-points will default snap to the bar-deviders. You can control that.
Setting loop-points freely.
If you hold AltGr, then you can set your loop exactly as you want!- You can even drag them up and down!
For right loop-point AltGr+right-mouse
For left loop-point AltGr+SH+right-mouse
During Song-Editor playback, the playhead will loop continuously between the start and end loop-points. This is useful for testing a particular section of your piece, but it only exists in playback mode. It is not a way to repeat a section any certain number of times within your composition! -You’ll have to use copy/paste for that.
Safety
Remember to save often! Save your project every time you’ve created something that sounds great. It’s also a good strategy to save different versions of your song, allowing you to revert to a previous version of the project in the event that you’ve tweaked the production into something you don’t like. LMMS provides a speciel version-control-option, for this, in the file-menu: Save-as-new-version. Lets say your project was named as ‘MyProject’. When you now save as new version, the new file will be named «MyProject-01», and the old file ‘MyProject’ will not be altered.
When you save a project for the first time, you will be prompted for a folder and project name. You also have to choose if your project should be compressed (mmpz) or uncompressed (mmp). Subsequent saves will overwrite this file, and LMMS will show you a small message at the bottom of the screen. Wait for this message, before you continue your work!
LMMS also have 2 different layers of backup. We will get to those later. If you have made a default installation, and not deliberately disabled default options. then you pr default have both invoked!
Editing Tools
Draw Mode Tool
Despite their different content, the ways of working with segments are mostly similar.
Most of the work in the Song-Editor is done using the Draw Mode tool.
- left-click in an empty bar to add a segment
- middle-click on a block to delete it
- Ctrl+middle-click is a mute/unmute toggle for that block
- right-click on a segment to get a context menu
- left-drag on a segment to move it (block will snap to bar boundaries)
- Ctrl key after left-drag begins on a segment to move it freely (won’t snap to bar boundaries)
- Ctrl key before left-drag begins on a segment to copy it
- When you hover your mouse over the right end of a Beat&bass-segment, the mouse cursor becomes a double-headed arrow so you can drag the end of the Beat&bass-segment to make it extend over more or fewer bars — Only Beat&bass-segments can be dragged to a new length!
- left-drag = the segment extension/retraction snaps to bar boundaries
- Ctrl+left-drag = the segment extension/retraction is free (does not snap to bar boundaries)
Edit Mode Tool
The Edit Mode tool — also known as the selection tool — allows you to drag a rectangular selection box that selects multiple segments. You can then handle the selection as a group.
Selected segments change their color to distinct them from un-selected segments
- Ctrl+left-click on any segment you want to remove from the selection group, add one non-selected to the group
- Drag horizontally on any selected segment to move the selection group:
- Left-drag = movement where segments snap to bar boundaries
- Alt+left-drag = free movement (segments don’t snap to bar boundaries)
- Click on any empty bar to clear the selection from the selected segments
Marked blocks can not only be moved, but can be copied (ctrl+c) and inserted (ctrl+v) at the play-head position, anywhere in your project.
You can also delete (DEL) marked blocks.
It is recommended that you use the magnification settings, to find the magnification, that gives you the best view of your project. Since 1.2, LMMS has a 12,5% magnification, that allows you to see 350 bars of your project!
Changing structure in a project
Sometimes whole portions of a project is either needed to be removed, or you need space to insert new segments.
This is where you use INSERT and DELETE
Fist you move the play-head to the position where you want the change.Expanding the projectShift+Insert-key inserts a new, empty bar to the right of the playhead’s current position into all the tracks.
You will essentially push everything up-wards, and hence have a longer project, as the result!Condensing the projectShift+Delete-key moves all one bar to the left of the playhead’s current position
You will essentially pull everything down-wards, and hence have a shorter project as the result!
Both methods are powerful tools for making big changes in your project.
The scroll bars at the right and bottom of the window allow you to move the editors view around, but you can also scroll with your mouse-wheel!
Use mouse-wheel to scroll vertically.
Use Shift+mouse-wheel to scroll horizontally.
And you can scale the view:
Use Ctrl+mouse-wheel to scale the project horizontally.
Base note
Piano keys in the instrument plugins
In addition, the coloured square just above the keys shows the base note of the keyboard. Whichever note you select with this will set the octave to play the concerto-pitch of 440 Hertz (A4). For instance, moving this to A3 will make all the notes played move up by an octave (since A3 is now A4 and so forth). This allows you to adjust an individual instrument to be pitched correctly in relation to all the others. This is mostly unimportant for synthesizers where the A4 note is programmed to be 440Hz. However, for the AudioFileProcessor Plugin, this is extremely useful, as it allows you to adjust the note to be played back at its closest correct pitch, you then can finetune the output with the PITCH dial in the upper section of the UI. As an example, if you recorded a saxophone playing a Bb, you would adjust the base note to be Bb; so that the saxophone was played in the same pitch as your other instruments.

keyboard as piano
Keyboard
When the instrument window is selected, you can use the keyboard of your computer to play notes in a two-octave range. In addition, any MIDI keyboard can be used to send MIDI command to your instrument when it’s selected.
Your First commercial success..
Is that even possible?
Is it possible to actually sign with a label, and make a real record-deal??
Some have done it already!
This is such a story. Understand that this is just a story about how one person did get a ‘deal’, and that you dont have to use neither his methods, or indeed not his label, but it may be possible to do so.
Also understand that the label that is mentioned in this success-story, in no way is endorsed. It is simply just an example
This is what the LMMS user Chrimiting have experienced :
My experience with labels is quite simple.
I have been making music for four years and had recently started posting music on Soundcloud exclusively for free.
I am still a small producer so my music doesn’t generate tons and tons of attention but my music has been circling the internet for about three months.
Around two months in, my track Geared was featured on Top EDM Drops’s youtube video top Bigroom drops of june.
This was my first ever exposure that gave me any tiny bit recognition in the EDM world.
Soon after the release of this video I was sent a message on Soundcloud from a guy named Ivan Ces who said he was the owner of a label in its very beginning called ICG Recordings.
He said that he was looking for artists such as myself who produced music like myself to be part of this multi genre label.
I replied saying I was interested and wanted to know what the details about any profits made in the music that was sold under the label.
It was originally a 50/50 deal but I had it changed to be 55% me 45 % the label. After that I sent him a track I had recently finished called Buckshot (you buy Buckshot on Itunes now), He said that “they” liked it and he sent me a digital contract for the the single track the next day.
I now have another track coming out on the 18th of September 2015 called Serpent and it’s release was coordinated the same way.
This was my experience with a label and I hope that it gives you a small amount of insight to how getting “signed” to a label works.
the key thing is don’t always go to the label, build yourself so that they want you.
Labels want artists who will benefit them and their following.
thanks for reading.
Sincerely Chrimiting.
For the label in question : these links
Discussion and comments should better take place on our forum:
As a suitable last thought in respect to this ..
When you make the down payment on your Ferrari-Testa-imposible ..or what such a thingy is called, a small donation would be appreciated :p
Footnotes
— You could alternatively have dropped it on the existing «TripleOscillator: Default» track to replace that instrument with the one you were dragging, but this gives you an idea of how to create new instrument tracks.
— You should avoid having segments that overlap as there is no clear display of how many segments overlap in a particular area. A small segment might completely disappear behind a large one, leaving you confused as to where those extra notes were coming from.
Settings
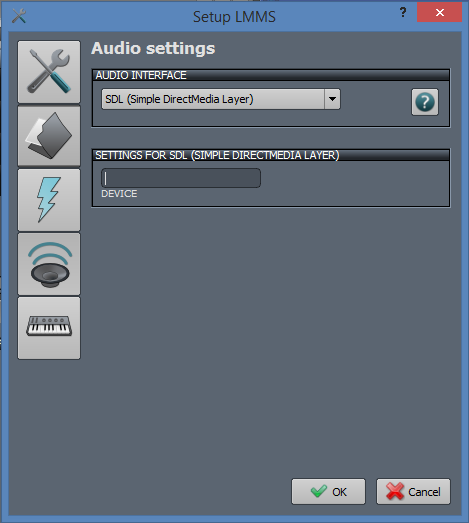
Q: I want to use another soundcard than the default one with LMMS. How to achieve this?
A: It’s recommended to set your preferred audio-interface and it’s parameters using the setup-dialog. If this doesn’t work for some reason, you can also set the environment-variable «AUDIODEV» to what ever your audio-device is (e.g. /dev/dsp for OSS or surround40:1,0 for ALSA).
Q: I want to import MIDI files but it tells me I need to specify a default soundfont?
A: First download a soundfont for free from the internet. Then in LMMS go to Edit —> Settings —> Paths (folder icon). Under the «default soundfont file»-section, you can browse for the downloaded file.
Base note
The green square just above the keys shows the ‘base note’ of the keyboard. You can drag the green square to any note position along the keyboard. Whichever note you select with this green mark will be played as A4 (i.e. the concert pitch of 440 Hertz). For example, moving it to A3 will make all the notes played by this instrument move up by an octave (since A3 is now A4). This allows you to adjust an individual instrument to be pitched correctly in relation to all the others. This is not important for synthesizers where the A4 note is programmed to be 440Hz. However, for the AudioFileProcessor Plugin, this is extremely useful, as it allows you to adjust the note to be played back at its correct pitch. As an example, if you recorded a saxophone playing a Bb, you would adjust the base note to be Bb, so that the saxophone was played in the same pitch as your other instruments.
File security, Autosave & Recovery
As mentioned in General-Settings There are two option to create a backups. Creating a *.BAK file is default On, and it is highly recommended that you keep this option On!
LMMS is really stable! -But even though thats a fact, you will sooner or later have a fatal crash! Nothing is more aggravating, than loosing all the work you have done, and even worse, the compositions!
Every time you manually save your project, LMMS will keep the previous project-version as
<myProject>.<current-project.ext>.BAK
This .BAK file will be saved in the same directory as your project!
This mean, that after you have saved a project, you will at any time, have 2 versions of your project:
1) The project in editor
2) The previous version of the project
If your project is ‘destroyed’, then you can revert to the .BAK, and you will have rescued at least part of your project.
LMMS has the Backup-file .BAK feature, as main file-security, but you may also like to invoke the Autosave feature!
Whereas a .BAK-file represent the penultimate version of your work, Autosave will create a copy of the current file-state!
Autosave will only be invoked when LMMS is Idle, so it will not default happen in replay, or during export!
You control the interval between each Autosave.
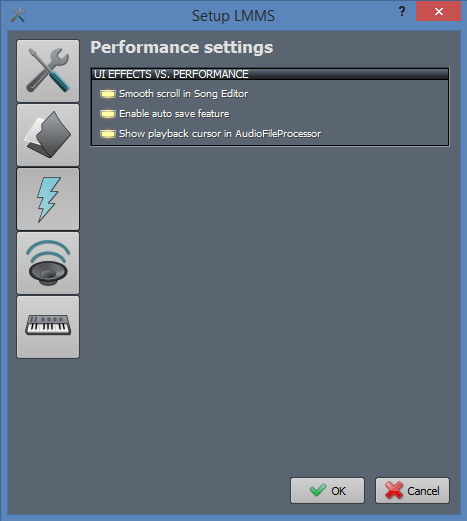
Because an autosave results in a tiny performance-drop, you find the settings for using Autosave in the Performance-tab, in Settings.
A choice of 5..15 mins between each Autosave-event, is recommended. Default is 5 mins.
If LMMS crashes it is very important that you pay attention to the screen next time you open LMMS!
You will get 2 options from Autosave:
1) Ignore
If you choose Ignore, anything Autosave has kept, will be deleted!
2) Recover
LMMS will load the Autosave-version of last loaded project, as a recover-project!
You need to use File| save-as on this file, and rename the recovery-file to a name of your own choice! Do that immediately!
Some users keep getting badly saved project, and there may be a reason for that!
If you use a labtop, you should make sure, that you have good battery-power, before you attempt to save your project!
If your battery is flat, your labtop may not be able to save the file correctly!
Pay attention to the save-message shown in low left corner of your screen!
This message must be shown, and it must show a successful saved file!
If you do not see this message, or if the message is a warning, your file was not saved correctly!
If you are in doubt, you should open the folder and inspect the file for size and time-stamp.
Performance Settings
|
|
|
First Install on Linux
- Get and install WINE
- Download our LINUX-LMMS-App-image
- Make the App-image installable
- Install LINUX-LMMS (If WINE asks for permissions to upgrade, say YES)
Linux and WINE updates
On at least openSUSE tumbleweed, there are ALLOT of updates.
One of those updates is wine.
Because of all the issues related to wine, lets take a look at what should happen, and how you should let wine do these updates.
Even though these issues only is known to be for opensuse, it is highly likely that they are not opensuse specific, but is relevant for all Linux distro.
The Fist time you start lmms, -or maybe the first time you use an vst, you will see wine config running.
Let WINE do everything uninterupted. After this, wine might come with a message, that wine mono is not installed. Click accept. WINE will then install wine mono.
Then LMMS is initially ready to use VST.
After a wine update you may get a wine config popup, again telling you that wine mono was not installed. Again, let wine install it.
After this, you again may get an erroneous project-loading, where one or several VSTs are not working!
Do NOT NOT -save the project!!
Shut LMMS down!
Restart, and load the same project. Wine will now work correctly, and your project will load correct.
The core of this is, that every time WINE complain that wine mono must be installed, click OK, even though you do have it installed!
Exactly what WINE-update is doing, and why the reinstalment of wine-mono is necessary, is not known.
Screen Issues
As more people buy very high resolution screens, it will properly force the OS to be able to cope with these screens. We are talking about 2K and 4K displays here. These UHD screens do not work well with a lot of programs, but newest LMMS does fine with these screens!
If you installed LMMS < 1.2 you will still have screen scaling issue!
Every component is only represented by a tiny unusable window.
LINUX
use a shell script:
#!/bin/bash
export QT_AUTO_SCREEN_SCALE_FACTOR="0"
export QT_SCREEN_SCALE_FACTORS="eDP-1=2.5;HDMI-1=2.5;DP-0=2.5".<absolute path to lmms App image>
Then set
chmod +x <script name>
make a symlink in
/bin/
to it
Note. You have to add all your connected monitors to QT_SCREEN_SCALE_FACTORS in order to make it work with all connected monitors.
Adding Tracks
There is no button for adding a new instrument track. You add a new instrument track by dragging the desired plugin or preset from the Side Bar to an empty area in the Song-Editor. Next, click on the instrument track’s name to show/hide the Instrument Editor window for that plugin. This window is where you can make changes to the sound of the instrument.
To add a new Beat/Bassline track, click the Add beat/bassline button. Right-click on the beat/bassline track’s name to name it.
To add a new sample track, click the Add sample-track button.
 A new sample-track, with no sample inserted
To insert a sound-clip, You double click on the empty Sample-track, and browse for your file, in the Open audio file dialogue.
Mixxx
Mixxx объединяет инструменты, необходимые ди-джеям для создания творческих живых миксов с цифровыми музыкальными файлами. Независимо от того, являетесь ли вы новичком-диджеем с ноутбуком или опытным тёрнтейблистом, Mixxx может поддержать ваш стиль и методы микширования.
Программа доступна для работы в Linux, Mac OS X и Windows.
Поэтому иметь его в студии может быть очень полезно на тот случай, если пользователь также является звукорежиссером.
Он имеет некоторые из следующих функций:
- четыре колоды с расширенным управлением;
- встроенные звуковые эффекты;
- четыре сэмплерных колоды;
- дизайнерские скины;
- запись и трансляция;
- поддержка аппаратного DJ оборудования;
- и многое другое.

Audio Settings
|
|
|
Создаём дорожку
Стандартный способ создания дорожки — добавление ударных инструментов в Beat+Bassline Editor (Пошаговом секвенсоре) и инструментов для дорожек мелодий в Song Editor (Финальном секвенсоре). Затем создаются различные ударные ‘петли’ (‘лупы’), используя кнопку Add bassline (Добавить ритм/лейтмотив) в Beat + Bassline Editor (Пошаговом секвенсоре) для для каждого ритма, который вам нужен — главной басовой линии, линии хай-хэт (тарелок), дополнительных ритмов и пауз и т.д. Они появляются в Song Editor (Финальном секвенсоре) по мере их создания. Чтобы они зазвучали, нажмите на первый квадратик на временной шкале для создания нового element (элемента) (сегмента). Вы также можете растягивать Beat+Bassline (битовые/басовые) elements (элементы) (blocks (блоки)), чтобы сделать их длящимися несколько квадратиков. Та же технология может быть использована для повторяющихся басовых линий, если вы создаёте их в Beat+Bassline Editor (Пошаговом секвенсоре).
keyboard as piano
Для дорожек мелодии, нажмите в Song Editor (Финальном секвенсоре) квадратик, который вы хотите сделать новым сегментом мелодии, и два раза щёлкните этот element (Элемент), чтобы открыть Piano Roll Editor (Секвенсор). Поместите ноту в сетке Секвенсора нажатием на линию с делениями (для её создания), а затем растягиванием за её правый край, чтобы сделать её короче или длиннее, как вам нужно. Вы также можете перетаскивать ноты выше и ниже по сетке или вперёд и назад по времени, чтобы поместить их где нужно. Как вариант, вы можете нажать кнопку ‘record (Записать ноты)’ в Piano Roll Editor (Секвенсоре) и сыграть ноты в реальном времени на клавиатуре, где клавиша ‘Z’ проигрывает ноту C (до), ‘S’ проигрывает C# (до-диез), ‘X’ проигрывает D (ре), и ‘D’ на вашей клавиатуре проигрывает ноту D# (ре-диез) (смотрите картинку справа). Чтобы играть ноты октавой выше, перейдите на клавишу ‘Q’, чтобы проиграть C (до), и т.д. LMMS также может использоваться с MIDI-клавиатурой. Список успешно подключенных клавиатур находится в стадии разработки. Yamaha PSR 500m, Yamaha E413 keyboard, Midistart 3 pro keys USB-клавиатура от miditech и Korg Nano — заявлены как работающие на нашем форуме. Но различия в железе и операционной системе немаловажны!
Спрашивайте в магазинах инструментов, можете ли вы протестировать клавиатуру, которую вы хотите купить, и берите клавиатуру с обычными по размеру пианино-клавишами. В будущем вы оцените этот выбор.
Теперь я бы порекомендовал вам прочитать и выполнить упражнения в разделе Your First Song with LMMS (Ваша первая композиция с LMMS).
Это очень помогло мне, когда я начал работать с LMMS.
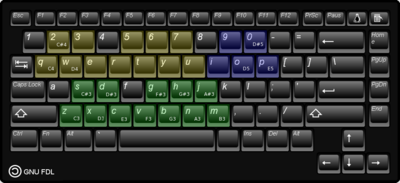
Computer Keyboard
keyboard as piano
When the instrument window is selected, you can use the keyboard of your computer to play notes in a 2-octave range. It starts from Z at C3 and goes horizontally across the bottom 2 rows of the keyboard to M playing B3 (i.e. Z X C V B N M play the natural notes and S D G H J play the sharps and flats). It continues with Q playing C4 and uses the top 2 rows of the keyboard to P playing E5 (i.e. Q W E R T Y U I O P play the natural notes and 2 3 5 6 7 9 0 play the sharps and flats).
In addition, a MIDI keyboard can be used to send MIDI command to this instrument when it’s selected.
Furthermore, the Piano-Roll window allows you to record notes as if you were playing a piano by using either a computer keyboard or a MIDI keyboard.
Automation Track Context Menu
The actions of each option are essentially the same as those for the instrument track above, except that this segment of cause are opened in automation editor.
In addition there are 4 other options:
- Set/Clear Record This record function will allow you to capture live movement of the connected controller, as the playhead passes over the segment. Observe that if the playhead is allowed to pass over the segment a second time, the captured movement are overwritten!
- Flip Vertically. This option allow you to flip the automation graph, over a vertical centre.
- Flip Horizontally. This option allow you to flip the automation graph, over a horizontal centre.
Below these 3 options, you can see a list over the controllers that are connected to the automation-track.
Equalizers
Are audio processors that cut out certain frequencies of a mix. They are useful for leaving headroom for the rest of the mix, and cutting out unwanted frequencies.
Nyquist EQ
Stats:
Parametric, Visual
Bands: Five
Electri-Q (Posihfopit Edition)
Stats:
Parametric, Visual, Anolog and Digital
Bands: Starts with 4, 6, or 8. Can have up to 64! O_O
Melda Production (MEqualizer)
Stats: Parametric, Visual
Bands: 6
ReaEQ
Stats: Parametric, Visual
Bands: UNLIMITED!!!
This concludes the first part of chapter one of improving lmms I will come out with part two of mixing tools soon, so stay tuned! I hope these tools help you to create the best music you possibly can! I look forward to hearing what you all have to offer! Thanks!
Keep spreading the music!
The MIDI tab
The MIDI tab looks like this:
These controls allow you to set which MIDI channel the instrument receives MIDI events on, and which it sends events to. Both these controls work in similar ways:
- Click the Receive MIDI-events or Send MIDI-events title next to the light to turn the reception or sending of MIDI events on or off.
- The channel setting controls which MIDI channel events will be received or sent on.
- The Default velocity control clamps all incoming or outgoing notes to once velocity when set.
- The Device selector button shows a list of which devices in your system can act as sources or sinks for MIDI events.
Piano Keys
At the bottom of the Instrument window is a small section of a piano keyboard.
This will display the notes that are playing by highlighting the key or keys as they’re played.
The scroll bar at the bottom of the screen allows you to move up and down (i.e. left and right) the keyboard to see different octaves.
Интерфейс
Когда вы запускаете LMMS, вы сначала увидите этот экран:
Оговорка: интерфейс может незначительно отличаться в зависимости от того, какая версия программы у вас установлена, и какую операционную систему вы используете.
Различные части экрана (элементы) пронумерованы жёлтым цветом. Они выполняют следующие функции:
- Главное меню предоставляет доступ к файлам проекта, некоторым плагинам, и онлайн-справке.
- В левой части Панели инструментов имеются два ряда: Кнопки в верхнем ряду связаны с файлами проекта — создать новый проект, открыть существующий, сохранить текущий и экспортировать в звуковой файл. Кнопки во втором ряду используются, чтобы показать/скрыть (переключить) различные окна в основной части интерфейса.
- В правой части панели инструментов имеются некоторые инструменты управления композицией, такие как темп, тактовый размер, громкость, высота тона и основная панель визуализации.
- Боковая панель имеет шесть кнопок. Нажатие на любую из них переводит соответствующую вкладку в положение включено/выключено. Каждая вкладка отображает определённый тип информации: Instrument plugins (Инструменты), My projects (Мои проекты), My samples (Мои семплы), My presets (Мои заготовки), My home (Домашняя папка) и My computer (Мой компьютер). Эти ресурсы могут быть использованы в сочинении вашей композиции.
Основная часть интерфейса содержит ряд окон, каждое из которых служит определённой цели.Вы можете показать/спрятать любое из этих окон нажатием кнопок во втором ряду Панели инструментов.
Когда LMMS запущена, четыре окна открываются по умолчанию:
- Song-Editor (Финальный секвенсор). Здесь вы сочиняете композиции.
- Beat+Bassline Editor (Пошаговый секвенсор). Здесь создаются ударные (ритм). Вывод из этого окна автоматически вставляется в окно Song-Editor (Финальный секвенсор) как ритм/басовая дорожка.
- FX-Mixer (Микшер FX). Это звуковой микшер, где отдельно регулируется громкость каждого канала.Он также имеет дополнительно окно (Цепь фильтров), где вы можете добавить спецэффекты и связывать их вместе.
- Controller Rack (Контроллеры)
Не забывайте сохранять чаще! Сохраняйте свой проект всякий раз, когда вы создали то, что хорошо звучит. Также хорошая стратегия — сохранять различные версии вашей композиции. Это позволит вам возвращаться к предыдущей версии проекта.
Когда вы сохраняете проект первый раз, вам будет предложено выбрать папку и ввести название проекта (имя файла). Последующие сохранения будут перезаписывать этот файл, и LMMS будет показывать вам небольшое сообщение об этом в нижней части экрана. Ждите это сообщение!
Good Song! Bad result
You are not there yet!
One of the most common problems, is sound-clipping, and nasty artefacts. One of those make the song sounds like it comes from a tin-bucket. Sometimes distortion will feel like really unpleasant hearing irritation, and your first impulse is to look for a volume control..
Your next job is to make sure you do not have that!
This part of the process, is at least as important as the previous ones!
The first thing we need to do, is to give each track in the project its own mixer-channel (Also called ‘Bus’)!
There are as usual several ways to assign instrument-mixer-Nr, to a track:
- Context-menu on the instrument-UI
It is the controller named FX.
Because no FX-channels have been made, we need a new one. Right-click the controller, and select: Assign-to. then select new-Mixer-channel.
Two thing happens:
The value in the controller will change, and at the same time a new mixer-channel is created in Mixer, and it is also given the same name, as the assigned preset!
The same assignment can be made from the track-buttons action-button. Here left-click, and assign the preset.
Take a look at the mixer now.
You can see that all channels has their own dB meter.
Start playing your project.
The first thing you need, is to make sure, that no meter, including master, are (constantly) in the red area. When a sound-intensity causes the meter to go ‘into the red’, you will get distortions, and really bad sound, well in fact even risk of damage to speakers, and worse -Your ears!
Often you will hear ‘into-the-red, being called ‘spiked-out’, ‘maxed-out’ or ‘clipping’ -Those all mean the same: Excessive volume, that creates artefacts!
I choose the phrase constantly. I did that because it is acceptable that your meter occasionally touches in the red, but its a fine art to know when touching is more like groping..
If you have clipping, you can deal with it in a lot of different ways. You can find much more about tools as EQs, limiters, and compressors, in the more specialized chapters of the wiki.
You can also watch the mixing video-tutorials, and learn much more about the power of the LMMS-mixer.
Right now, you can try to just change the volume sliders, and get rid of the red-clippings. then listen to your track again.
You should be able to hear the difference.
The instruments should be cleaner, and stand better individually in the total mix.
Adding automation
Now we will use one of LMMS’ most powerfull features: Automation!
Automation means that controllers like dials and sliders, can be controlled by drawed graphical shapes, during playback! This is how sweeps, risers, and growls are made in EDM!
Here we will only make an automation-example, and automate the dial, that controls a filter.
But before we do that, lets swap the current instrument for an other!
Before we do something like that, it is recommended that you save your project!
Open the Xylophon preset, so you see its interfase.
From sidebar, use the method to smart-token-search, for an instrument-preset named Square Ping
After you found that preset, right-click it, and choose: «Send-to-active-instrument»
That is how easy it is to swap a new preset into an other!br>
Play the project.
This preset has more Popcorn-feel!
Sometimes you can benefit from making tiny changes to a preset. In my ears there is a tad to much resonance, it has a kind of metallic artefact..
Here is something you need to understand. Even though a project sounds fine on your system, it may sound different on an other computer! That all depends on hardware!
On my pc, i would like to have less resonance. We can set that on second tab on the preset. It has the name «Envelope, Filter & LFO»
Open that!
In the bottom part, there is a dial named RESO. Change the resonance to 0.12.
Play the project again! Can you hear the difference?
To the left of dial RESO, we have an other dial: FREQ -That is the dial we will automate!
In Song-editor we first add an Automation-track.
Press the 5. button in Song-editor speedbar. It is named Add Automation-track.
LMMS inserted a new type of track in your project! You should rename this track now! Right-click in the name-field, and write «Square Ping HP-automation».
Point to the FREQ-dial!
Press and hold Ctrl
Drag the dial up into the Automation-track and release Ctrl.
LMMS inserts a block in the track. You can drag it longer, and you can see that the block has the same name as the track, but you can change that, on the context-menu
But the name is fine, so lets now add the automation
In this demo we will fade out over two bars, and fade in over the next two, for that we wil use a linear-progression!
Double-click in the Automation-segment. That open the Automation-editor!
First select the linear-progression
Place points on the progression as shown, by left-clicking in the editor.
Close Automation-editor (F8)
Now play your project!
If you again open the tab «Envelope, Filter & LFO», you can see how the FREQ-dial moves because it it automated!


